CenterPoint® Payroll
- CenterPoint Employee Portal Setup
Related Help

The CenterPoint Employee Portal consolidates the Red Wing Software payroll web services into one location.
- The registration/configuration/processing for all of the Red Wing Software web services are performed from the Employee Portal.
- Company announcements can be added to the Home section and edited at any time by the payroll administrator, making it easier for employees to stay up to date on important company information.
- Payroll administrators can create useful links for employees to any external web site or file. Use this section to communicate company policies or for providing benefit information such as health and dental insurance, flexible spending, IRS, 401K, etc.
- CenterPoint Time Clock, Pay Advices, and Self-Serve are accessible directly, providing employees with seamless access.
- The data synchronization processes for the Red Wing Software web services are combined into a single Employee Portal synchronization process.
Step 1 - Add the CenterPoint Employee Portal Module
Step 2 - Set Up Employee Portal
Step 3 - Employee Portal Registration for Administrators
Step 4 - Provide Employees with Portal Registration Instructions
Other Employee Portal Functions
Employee Portal Setup
Step 1 - Add the CenterPoint Employee Portal Module
- If CenterPoint Payroll is not open, start CenterPoint Payroll by double-clicking your CenterPoint icon on your desktop.
- Select File > Administration > Module Configuration Manager.
- Select Employee Portal and then click OK twice.
- Close CenterPoint, double-click the CenterPoint icon on your desktop to restart it, and then open your database.
Step 2 - Set Up Employee Portal
- From CenterPoint Payroll, select Employee Portal > Settings.
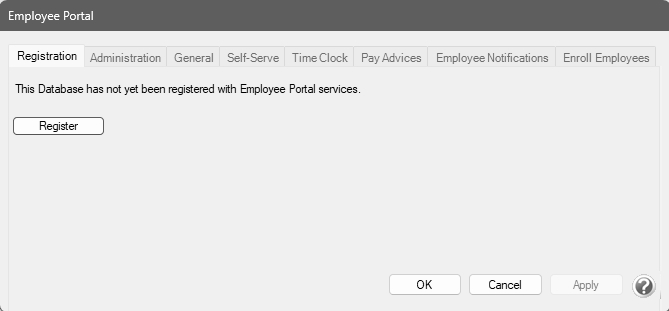
- On the Registration tab, click Register and wait while the Employee Portal registration and synchronization takes place. When it is complete, a Registration Code and Database ID will display. Take note of both. The Registration Code is used when your employees register for the CenterPoint Employee Portal. The Database ID uniquely identifies your database to web services.

- If you have issues with the data in the Employee Portal not reflecting changes in CenterPoint, click the Synchronize button to resynchronize your CenterPoint data with the Employee Portal.
- Select the Administration tab.
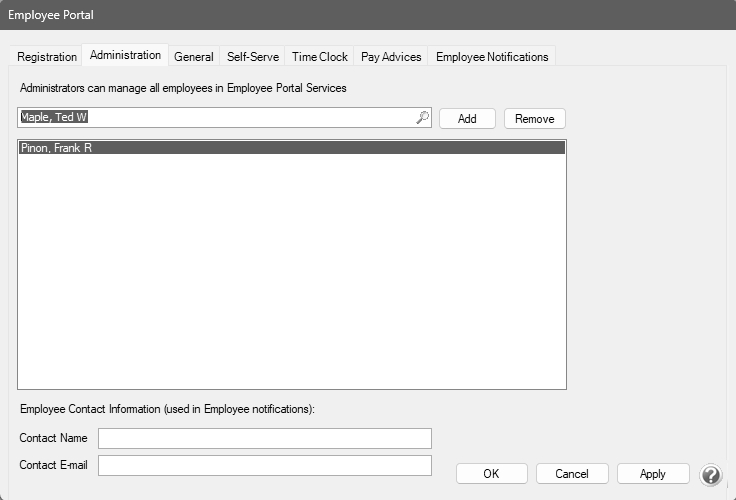
- Select an active Employee(s) that has access to enhanced functionality as administrative users for the Employee Portal, CenterPoint Time Clock or Publish Pay Advice services, and then click Add. To remove an administrator, select the employee in the list and then click Remove.
- In the Contact Name and Contact Email boxes, enter the information that should be used in email notifications to your employees on your behalf.
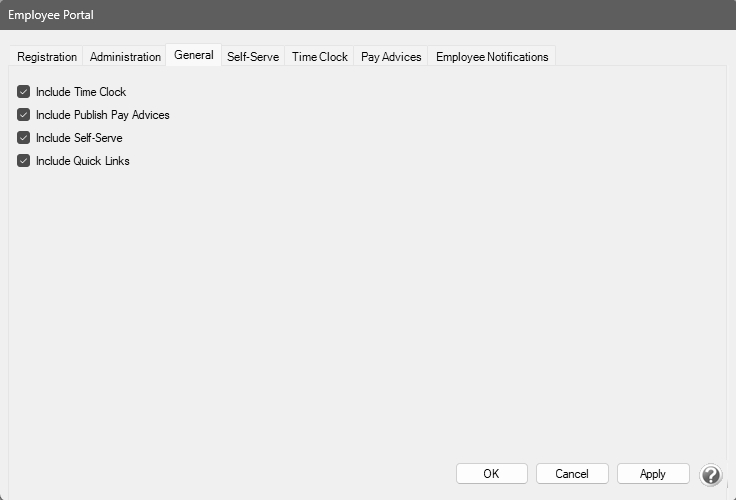
- Select the General tab.
-
Select the options you want your employees to have access to from the Employee Portal:
- Include Time Clock - Select this option if you want your employees to have access to CenterPoint Time Clock.
- Include Publish Pay Advices - Select this option if you want your employees to have access to Pay Advices.
- Include Self-Serve - Select this option if you want your employees to be able to update their personal and federal/state withholding or direct deposit allocations. Before creating a new pay run or updating employee setup, you are notified of any pending changes and can either approve or deny them.
- Include Quick Links - Select this option if you want to be able to provide useful links for employees to any external web site or file. This section can be used to communicate company policies or for providing benefit information such as health and dental insurance, flexible spending, IRS, 401K, etc.
- If you selected the Include Self Serve check box on the General tab in step 13, select the Self-serve tab and click here to continue with Self Serve setup.
- If you selected the Include Time Clock check box on the General tab in step 13, select the Time Clock tab and click here to continue with CenterPoint Time Clock setup.
- If you selected the Include Publish Pay Advices check box on the General tab in step 13, select the Pay Advices tab and click here to continue with Publish Pay Advices setup.
- Select the Email Notifications tab. This tab allows you to determine the content of the emails generated by the web services.

- Select the Type of email message that you wish to customize. The options are Employee Enrollment, Advice Published, or Employee Unenrolled.
- The Subject can be edited to any text you prefer. If you want the system to insert fields from a list of Subject fields, click Insert Fields.
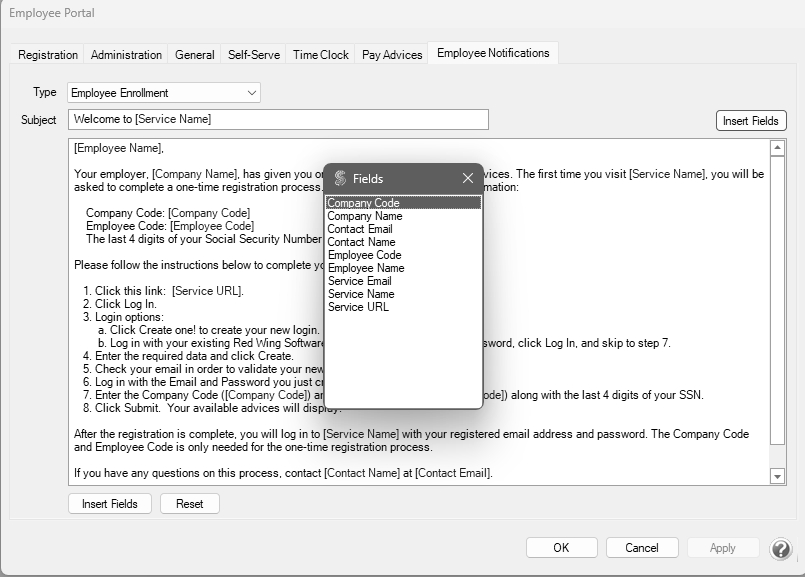
- Double-click the field you want to insert. The selected Field will display in between square brackets, for example the Subject below was edited to "Welcome to [Service Name] for [Company Name]".
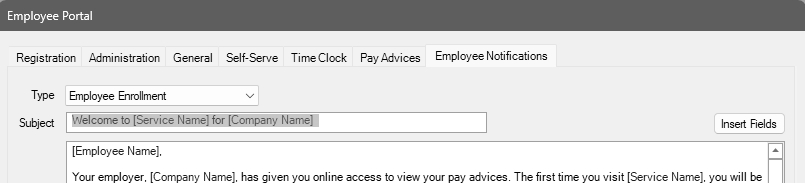
- The body of the email can also be edited to the text your prefer using the same method as the Subject.
Note: To create paragraphs, press your Ctrl and Enter keys at the same time.
Note: If you insert fields or edit the standard email text and you wish to return to the default information, click Reset.
- Click OK.
Step 3 - Employee Portal Registration for Administrators
- If your administrator and/or supervisors previously registered with either CenterPoint Time Clock or Publish Pay Advices, they can sign in with their existing username and password and do not need to re-register. Follow steps 1 -2 of the Registering for the Employee Portal for Administrators section of this document and then continue with the next section.
- If your administrator has not previously registered with either CenterPoint Time Clock or Publish Pay Advices, they will need to register for the CenterPoint Employee Portal using the section below. The Payroll Administrator will need to provide them with the Company Code (located in Setup > Payroll Details > Employee Portal Settings > General tab) and their Employee Abbreviation. Continue with steps 1- 14 in this section.
- From a web browser, enter https://employeeportal.redwingsoftware.com.
- Click Log In.
- Click Create One! to create an identity.
- Enter your First Name and Last Name.
- Enter an Email address and a Confirm Email address.
- Enter a Password and Confirm Password. Passwords must be at least six characters and no longer than 25 characters, include one numerical character and one lower case letter.
- Click Create. This will send an email to the address you entered above.
- Check the email address you provided above for an email from Red Wing Software.
Note: If the email is not received, please look in your Junk email folder.
- Click the here link in the email.
- From your web browser, click the CenterPoint Employee Portal tab or return to https://employeeportal.redwingsoftware.com.
- Click Proceed.
- Enter the Company Code provided to you by your Payroll Administrator.
- Enter your Employee Code (this is the employee Abbreviation used in CenterPoint Payroll located in Setup > Employees).
- Click Submit. If you were not previously enrolled with CenterPoint Time Clock or Publish Pay Advices and you completed Step 1-15, a confirmation email will be sent from CenterPoint Employee Portal to the email address you provided during registration.
Note: If the email is not received, please look in your Junk email folder.
Step 4 - Provide Employees with Portal Registration Instructions
Use the Employee Portal Enrollment Wizard to enroll multiple employees for an employer at once. After enrolling employees in the Employee Portal, you will need to provide them with their initial login information. CenterPoint Payroll can automatically send this information via email, or if you prefer, you can deliver it to your employees manually.
To send email notifications from CenterPoint Payroll, each employee must have an email address entered in Setup > Employees. If you choose to notify employees outside of CenterPoint Payroll manually, a template is provided.
- From CenterPoint Payroll, select Employee Portal > Enroll Employees.
- After enrolling employees in the Employee Portal, you will need to provide them with their initial login information. Determine if you want to Send email notifications through CenterPoint Payroll or Send notifications manually.
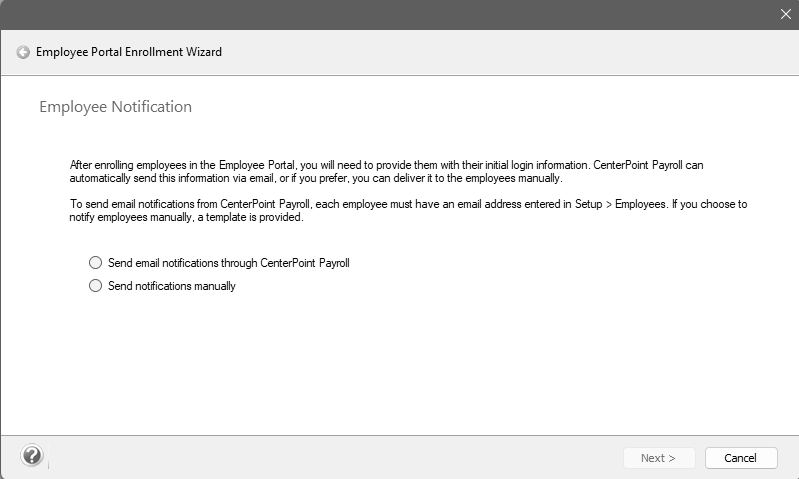
- Click Next.
- Use the Employee Portal Enrollment Wizard to enroll multiple employees for an Employer at once. To enroll individual employees, double-click the employee name to move the selection to the right side of the screen. To enroll multiple employees, select each employee while holding the Ctrl key and then click the right arrow to move the selections to the right side of the screen. To select all employees, select the right double-arrows.
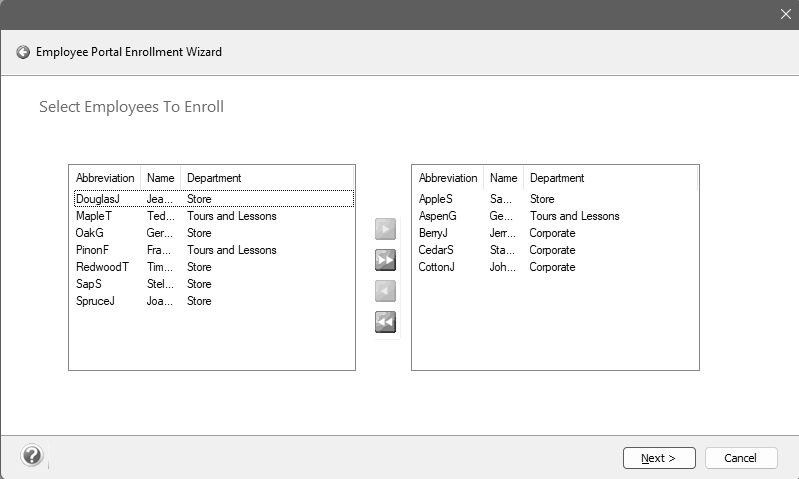
- Click Next.
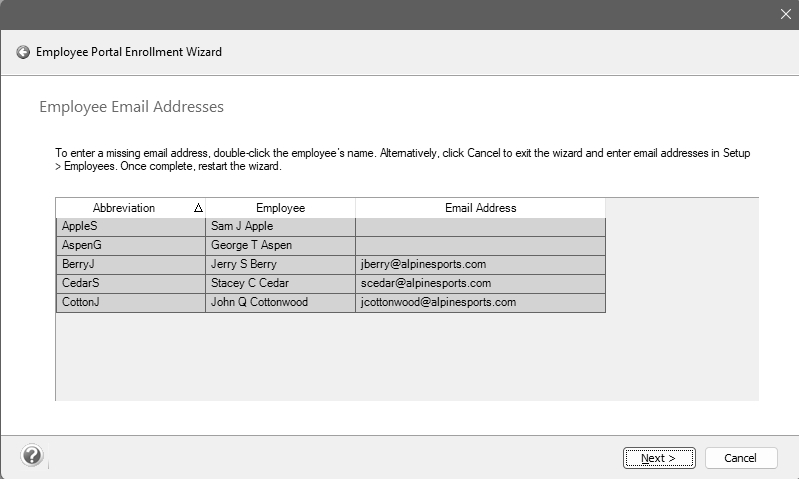
- The selected employees will display on the Employee Email Addresses screen. To enter a missing email address, double-click the employee’s name. Alternatively, click Cancel to exit the wizard and enter email addresses in Setup > Employees. Once complete, restart the wizard.
-
Click Next.
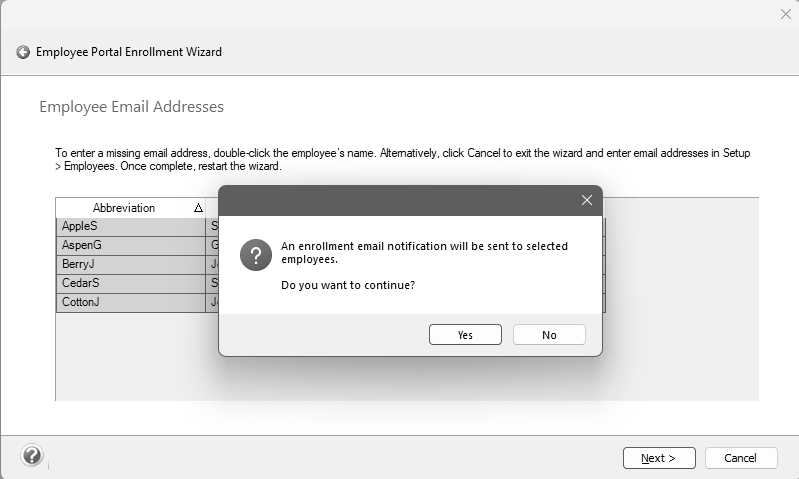
- At the An enrollment email notification will be sent to selected employees. Do you want to continue? message, click Yes.
- Click Next.
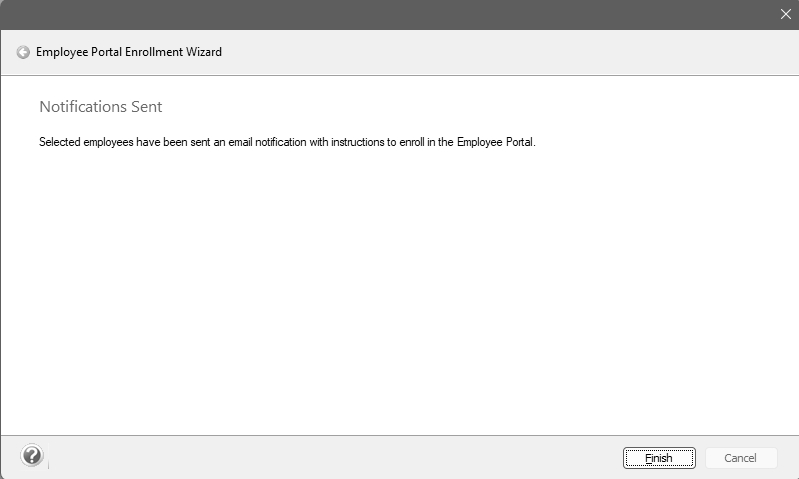
- On the Notifications Sent screen, click Finish.
Step 5 -Additional Employee Documentation:
The following documentation is available and can be distributed to your employees. Click the link below to view the documentation.
- Employee Quick Reference for Employee Portal – This document contains concise information about using the CenterPoint Employee Portal.
- Employee Quick Reference for Self-Serve - This document contains concise information about using Self-Serve.
- Employee Quick Reference for Publish Pay Advices - This document contains concise information about using Publish Pay Advices.
- Employee Quick Reference for CenterPoint Time Clock Website- This document contains concise information about using the CenterPoint Time Clock website.
- Employee Quick Reference for CenterPoint Time Clock App- This document contains concise information about using the CenterPoint Time Clock app.
- Self-Serve Setup - This document contains detailed information about using Self-Serve.
- Using CenterPoint Time Clock for Employees - This document contains detailed information about using the CenterPoint Time Clock.
- Using CenterPoint Time Clock for Supervisors - This document contains detailed supervisor information about using the CenterPoint Time Clock.
Other Employee Portal Functions
Maintain Announcements
Announcements can be maintained only when an employee that was designated as an Administrator is logged into the Employee Portal.
- From a web browser, enter https://employeeportal.redwingsoftware.com.
- Click Log In.
- Enter your Email and Password and click Log In.
- Select your Company (Subscriber) and Employer. Click Select.
-
From the menu on the left side of the screen, select
 Announcements. To create an announcement, click the plus sign
  at the bottom of the screen.
- In the Description box, enter up to 500 characters of text for the announcement.
- In the Sequence box, enter a number that will determine the order of the announcements that display on the Announcements list.
-
To edit an Announcement select the link, click the
 icon, and then make your changes on the Edit Announcements screen. To delete an Announcement, select the announcement, click the
  icon, and at the Are you sure you want to delete the announcement? message, click Yes.
Maintain Quick Links
Quick Links can be maintained only when an employee that was designated as an Administrator is logged into Self-Serve.
- From a web browser, enter https://employeeportal.redwingsoftware.com.
- Click Log In.
- Enter your Email and Password and click Log In.
- Select your Company (Subscriber) and Employer. Click Select.
- From the left side of the screen, , select
 Quick Links. To create a link, click the plus sign at the bottom of the screen.
- Enter the URL, Label, and Description for the web site you want to link to.
- In the Sequence box, enter a number that will determine the order of the links that display on the Quick Links list.
-
To edit a Quick Link, select the link, click the icon, and then make your changes on the Edit Quick Link screen. To delete a Quick Link, select the link, click the icon, and at the Are you sure you want to delete the link? message, click Yes.
Disable Web Services Access for Employees
- From CenterPoint Payroll, select Setup > Employees > Portal tab.
- In the box next to Registered "employee email address" box, click the drop-down arrow and select Unregister.
- At the This will unregister the employee's user account and they will have to re-register to access Portal services, are your sure? message, click Yes.
- At the Employee unregistered message, click OK.
Frequently Asked Questions
Q: How do I change the email address that an employee uses to log into CenterPoint Pay Advices?
A: To reset the registration status of an enrolled employee:
- From CenterPoint Payroll, select Setup > Employees.
- Select the Portal tab.
- In the box next to Registered"employee email address" box, click the drop-down arrow and select Unregister.
- At the This will unregister the employee's user account and they will have to re-register to access Portal services, are your sure? message, click Yes
- At the Employee unregistered message, click OK
- The employee will need to register with CenterPoint Pay Advices again by creating a new account with their preferred email address. If you enter the new email address in the Unregistered box and click Invite), a new enrollment notification will be sent with detailed information about registering. If you choose not to send the enrollment email, you will need to provide instructions to your employee outside of CenterPoint or the employee can follow the Employee Registration (One-time Setup) section in theUsing Publish Pay Advices document.
Q: I have an employee that can't remember their password. Can I look it up for them?
A: To ensure passwords are protected, we do not have password look ups available. If an employee is unable to remember their password, they can reset their password online in CenterPoint Employee Portal.
To retrieve a forgotten password:
- From a web browser, enter https://employeeportal.redwingsoftware.com.
- Click Log In.
- Start CenterPoint Employee Portal, click Log In, and then click the Forgot your Password? link.
- Enter your Email address and click Email Link.
- An email will be sent to the address the employee provided.
- Open the Red Wing Software Reset Password email and click the here link.
- To reset your password, enter your Email, new Password, and Confirm Password, and then click Reset.
|
Document: 3407 |
|---|