- Print/Reprint Checks or Email/Resend (Advices)
Related Help
_24.jpg) Print/Reprint Checks or Email/Resend Checks (Advices) Video - Duration: 10 min 31 sec
Print/Reprint Checks or Email/Resend Checks (Advices) Video - Duration: 10 min 31 sec
 View or Print as PDF for CenterPoint Accounting for Agriculture and CenterPoint Accounting
View or Print as PDF for CenterPoint Fund Accounting
| Document #: | 3335 | Product: | CenterPoint® Accounting |
|---|
Checks can be printed and reprinted and advices can be emailed or resent in CenterPoint. CenterPoint allows you to print your checks at the time you save the transaction entry. You can also choose to print/reprint multiple checks or email/resend multiple ACH (advices) after transaction entry via the Print/Email Checks screen. If you choose to email/resend checks (advices) a non-negotiable advice will be attached to an e-mail as a PDF file using the selected form design. During the reprint process, you can choose to keep the original check number or assign a new check number. There are also additional options for reprinting/resending checks (advices) defined in this document.
Prerequisite
The Email Setup preference (File > Preferences > Email Setup > Email Setup > Database tab) is a required part of the configuration needed to send emails from CenterPoint. See the Email Setup topic for additional information.
Optional Setup: Define a Default Subject and Message for Emailed Checks (Advices)
Set Customer Email/Print Defaults
Set Sent From and Optional Email Addresses
Option 1: Reprint/Resend Checks (Advices) from Print/Email Checks
Option 2: Reprint/Resend Transactions from Transaction Search
Optional Setup - Define a Default Subject and Message for Emailed Checks (Advices)
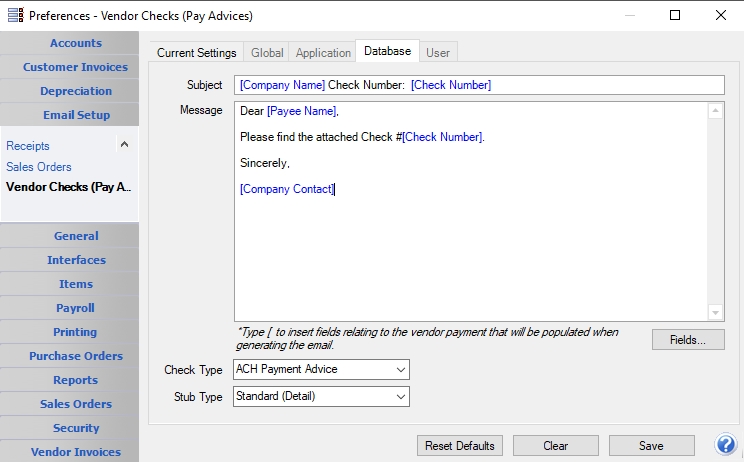
If you'd like to use the same e-mail Subject, Message, and Form each time you email a check (advice), it can be added to this preference. This preference also allows you to add Form Fields from the check (advice) data to the default Subject line or Message text.
- Select File > Preferences > Email Setup > Vendor Checks (Pay Advices).
- Select the Database tab.
- Enter a default Subject and Message.
- If you want to insert Form Fields into the Subject or Message of the email, click the Fields button at the location the form field should be inserted. The available Form Fields for sales orders are:
| Company Abbreviation |
Company Name |
Company Address 1-3 |
Company Phone |
Company Contact |
| Payee Abbreviation | Payee Name |
Payee Contact |
Check Date | Check Number |
| Check Amount | Memo 1 | Memo 2 |
-
For example, you can customize the default Subject and Message for emailed checks (advices) to include data fields from the checks (advices)data along with default text:
-
In the Subject box, click Fields, select Company Name, type Check Number:, click Fields or type [, and then select Check Number.
- In the Message box, type Dear,click Fields or type [, select Payee Name, and then type a comma.
- In the Message box, type Please find the attached Check #,click Fields or type [, select Check Number, and then type a period.
- In the Message box, type Sincerely,.
- In the Message box, click Fields or type [, select Company Contact.
-
Note: To create paragraphs, press your Ctrl and Enter keys at the same time.
- Select a default Check Type and Stub Type for emailing checks (advices). The default form for vendor checks (pay advices) is the non-negotiable ACH Payment Advice form. This form will be used to format the PDF file that will be attached to the email.
- Click Save.
Set Vendor Email/Print Defaults
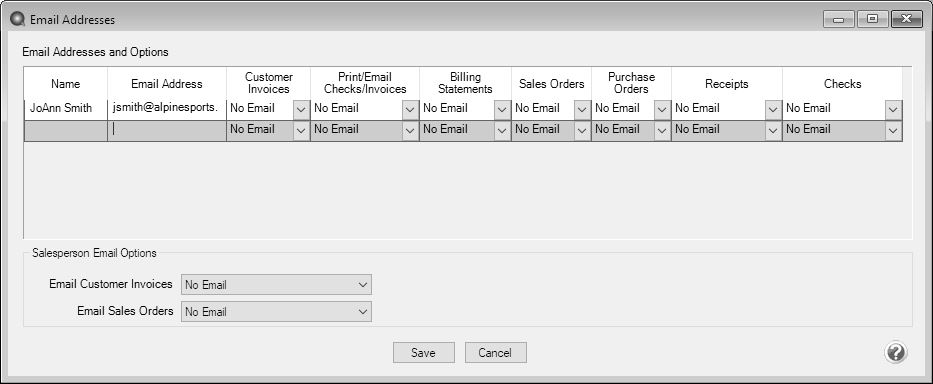
Prior to emailing a check (advice) to a vendor, the vendor file must include an email address and email form options on the Email/Print tab.
- Select Setup > Names > Names or Setup > Vendors.
- Find the appropriate vendor and click Edit.
- Click on the Email/Print tab. Use the Email Addresses and Options section on this tab to set up multiple email addresses where Checks (advices) can be sent for this vendor. You can also select how each email is to be sent, No Email, Send "To..." (directly to the recipient), Send "CC..." (as a carbon copy), or Send "BCC..." (as a blind carbon copy, for example, the person sending the email may want to enter their own email address so they have an audit trail of emails sent ). The Email Addresses and Options settings will be used to set the default image on the Email button on the Payment entry screen. An envelope image with a check mark on it will mean the form will be emailed and an Envelope image with a cross-through on it will mean the form will not be emailed.

- Click Save.
Set Sent From and Optional Email Addresses
The Setup > General > Email Addresses menu selection is used to set the name and email address checks (advices) are sent from. This menu allows you to select other Sent From email address for the different forms that you send via email.
You can optionally add email addresses where messages and attached documents can be sent to; including internal staff, outside accountants, or other addresses that are not related to the name/customer the transaction is entered for. You can also select how each email is to be sent, directly to the recipient, as a carbon copy, or as a blind carbon copy or set a default "From" email address for each document.
- Select Setup > General > Email Addresses.
- Enter the Name, the Email Address, and select how checks (advices) should be sent, No Email, Send "From..." (the default e-mail address the check (advice) is sent from), Send "CC..." (as a carbon copy), or Send "BCC..." (blind carbon copy).
Printing Checks During Entry
When entering payments, the Print icon will display the default for the selected vendor. For example, if you have a vendor setup to print only, the Print icon will display a green check mark on it, if the vendor is not set to print, the Print icon will display with a red X on it.
- You can change the print settings or add the payment to the ACH file for a vendor from the Payments screen by clicking on the Print icon. You can also change the printer, check or stub type, and the number of copies from the Print Settings screen. After changes are saved on the Print Settings screen by clicking OK, printing will not start until the transaction is saved.
- Use the Print/Email Checks screen to print/reprint checks or a group of checks or email checks (advices) after transaction entry.
Printing or Emailing Multiple Checks (Advices)
- Select Processes > Purchases > Print/Email Checks.
- If this is the first time entering this screen, the screen will not list any checks (advices). After using the screen for the first time, the previous filter selection will automatically display.
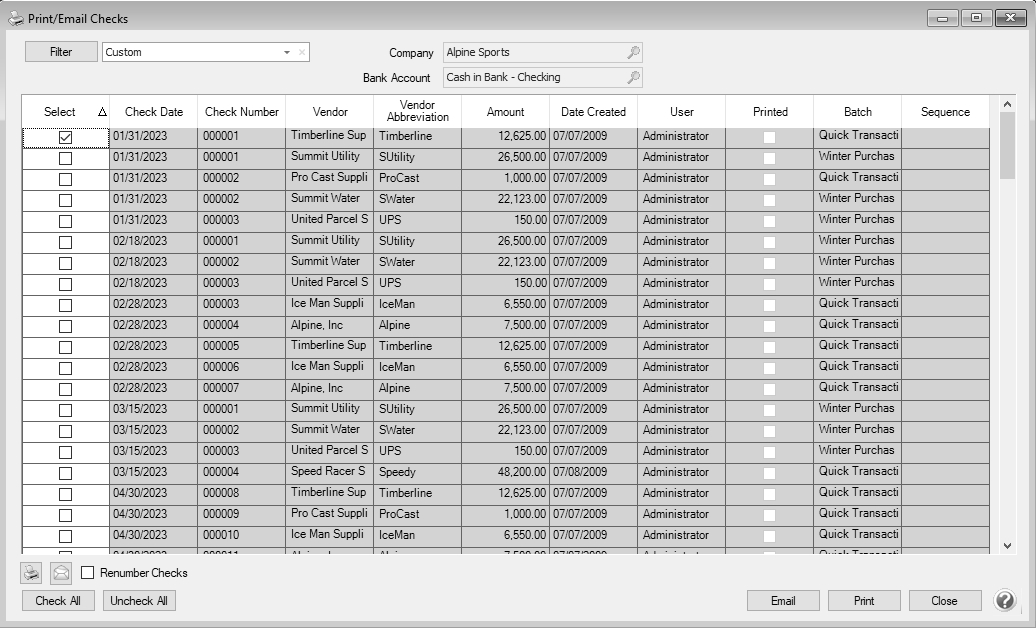
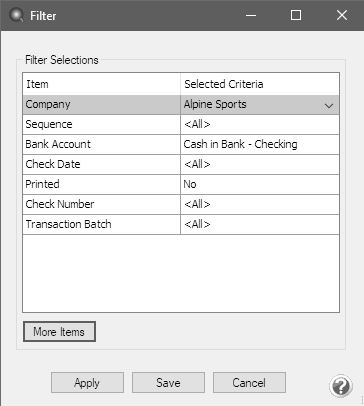
- If you would like to filter the list of checks (advices) that display, click the Filter button, select your filter criteria, and either Apply the filter to the list (you will see Custom in the Filter box) or Save the filter so you can select the named filter in the Filter box in the future. In the example below, the filter is set to display checks (advices) that aren't printed for Alpine Sports. for the and the Cash in Bank - Checking bank account and the filter was saved with the name Not Printed - Alpine Sports - Cash In Bank Checking
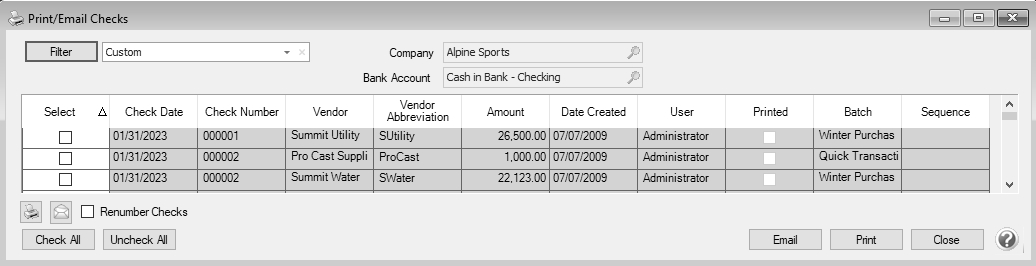
- To select all checks (advices) for printing, click Check All or select each check (advice) you want to print/email. To unselect all checks (advices) from the printing selection, click Uncheck All.
- Select the Check form type. If you are emailing advices, the suggested format is the non-negotiable ACH Payment Advice.
- Click the Printer icon to change the default printer, check or stub type, and the number of copies from the Print Settings screen.
- Click the Envelope icon to change the defaults set in File > Preferences > Email Setup > Vendor Checks (Pay Advices) for the Subject, Message, and Form.
- Click Email to email the selected advices. Advices will be emailed and according to the email settings on the vendor. Click Print to print a copy of all selected checks.
- You will receive a Process Completed Successfully message when completed.
- Click Close.
Reprint/Resend Checks (Advices)
Option 1: Reprint/Resend Receipts from Print/Email Checks
- Select Processes > Purchases > Print/Email Checks.
- Choose a saved filter that will include the check (advice) or click the Filter button to define new filter criteria.
- To select all checks (advices) for reprinting/resending, click Check All or select each check (advice) you want to reprint/resend. To unselect all checks (advices) from the selection, click Uncheck All.
- Select the Check form type. If you are emailing advices, the suggested format is the non-negotiable ACH Payment Advice.
- Click the Printer icon to change the default printer, check or stub type, and the number of copies from the Print Settings screen. .
- Click the Envelope icon to change the defaults set in File > Preferences > Email Setup > Vendor Checks (Pay Advices) for the Subject, Message, and Form.
- Click Email to email the selected advices. Advices will be emailed and according to the email settings on the vendor. Click Print to print a copy of all selected checks.
- You will receive a Process Completed Successfully message when the receipt(s) complete resending.
- Click Close.
Option 2: Reprint/Resend Transactions from Transaction Search
- Select Reporting Tools > Transaction Search.
- Enter the selection criteria for the checks (advices) to be reprinted/resent:
- Select a period from the drop down or enter a specific date range in the Date Selection field
- Select Summary in the Format Definition field.
- Click Search. The transactions that meet the selection criteria specified in step 2 will display.
- Select the transactions you need to reprint/resend. More than one transaction can be selected at a time by dragging your mouse down the rows or by holding down the Ctrl key on the keyboard while single clicking on individual transactions.
- Right-click and select Reprint Checks.
Option 3: Reprint/Resend From Report Drill Downs
- Select Reports > Reports.
- Preview any report where the transaction will be included.
- Click on the appropriate transaction to display the transaction in it's original format. The Printer and Email icons that display on the transaction will determine if the check (advice) will be reprinted/resent when you click Save.
|
Document: 3335 |
|---|