CenterPoint® Accounting for Agriculture
- Reports
Related Help
_24.jpg) Printing/Previewing Reports Video - Duration: 24 min 57 sec
Printing/Previewing Reports Video - Duration: 24 min 57 sec
Customizing Reports Video - Duration: 16 min 08 sec
Report Favorites Video - Duration: 18 min 12 sec
Batch Reports Video - Duration: 16 min 17 sec
Report Filter Security Video - Duration: 7 min 03 sec

| Document #: | 3094 | Product: | CenterPoint® |
|---|
The reports in CenterPoint allow your data to be presented in a way that is meaningful to your organization. All of the standard reports can be filtered and modified for maximum flexibility in reporting. Reports you use on a regular basis can be organized on Favorites, Database Favorites, and Network Favorites tabs to make them easier to locate and print/preview. You can also setup batches of reports to all generate at the same time to make monthly or quarterly reporting easier.
This topic includes instructions on how to:
Generate a Report
- From the Reports menu, click Reports.
- Select the Reports tab. The reports are organized into folders and sub-folders based on different categories of reports. Use the Search box to filter and locate reports by title or click the + sign next to a folder to open it and continue opening the folders until you find the individual report you want to print or preview. Click on the report to highlight it.
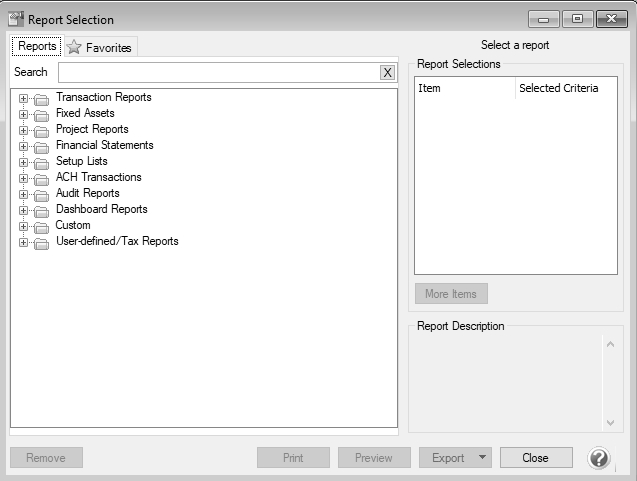
- Once a report is selected, the ReportSelections for that specific report will display (each report will have different filters available). These options allow you to filter the data you see in the reports, including the date range for which you are generating the report. Once a report is selected, the report name will also be displayed above the selections and remain highlighted in blue on the left side of the screen when using the selections.
To use a filter within the Report Selections:
- Click on the filter you want to use (For example, Period or Company/Fund).
- A pop-up box will display all options for that filter. Select the specific item(s) you want the report filtered by.
Note: You can select up to 500 items to filter the report by for each option.
- Click OK.
Note: To clear a filter and return the selection to All, select the filter and click Clear.
- For more information, see the Report Selections and Selection Criteria procedure.
- Each report automatically displays the default Report Selections when the report is selected, but additional filters are also available. To review and/or add those filters to the Report Selections
- Click More Items.
- Check the box for any filters you want to add.
- Click OK. All selected filters will now be displayed with the default Report Selections.
- Once you have made all desired Report Selections, click Print to print the report or click Preview to bring up a report preview and to make further modifications. For more information on modifying reports, please see the topic Customizing Reports.
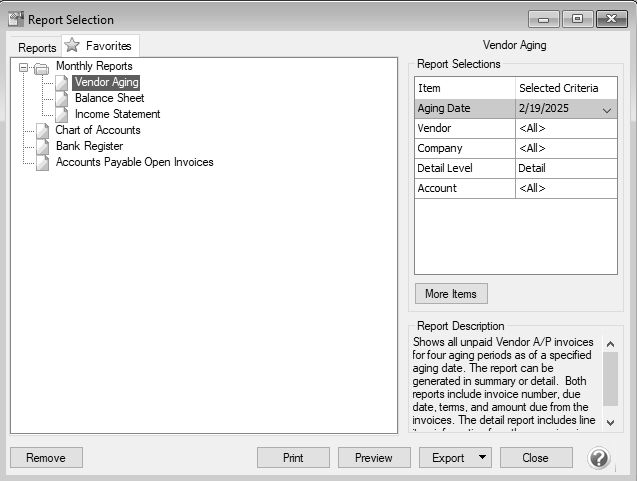
Add Reports to the Favorites Tab
The Favorites tab in reports allows you to organize frequently used reports to make them easier to find. It is also where customized reports are saved. Reports on your Favorites tab are specific to your computer. Other CenterPoint users will have their own list of favorite reports.
- To save a default report to the Favorites tab:
- Highlight the report on the Reports tab.
- Right-click on the report and select Add to Favorites.
- Enter a name for the report and click OK.
- To save a custom variation of a report:
- Preview a report and make modifications.
- Click on the
.jpg) icon.
icon. - Enter a name for the report and click OK.
- You can organize the reports on the Favorites tab into folders.
- Right-click in the blank space on the Favorites tab and select New Folder.
- Enter a name for the folder.
- Drag and drop reports or other folders into your new folder.
- To remove reports from your Favorites tab, right-click on the report and select Delete.
- To determine which tab will be the default tab when you select Reports > Reports, select File > Preferences > General > Reports, click on the Application tab, and in the Default Report Tab box, select the tab to display as the default.
- If you want only your Favorites to display when you select Reports > Reports, select File > Preferences > General > Reports, click on the Application tab, and in the Disable Reports Tab box, select Yes.
Add the Database Tab
A Database tab can be added to Reports. It allows you to save favorite reports to a specific database (whereas reports saved to the Favorites tab are specific to a computer). Each database on your computer can have a separate list of database favorites. Any user accessing the database would see the same list of reports on the Database tab.
- To add the Database tab (one-time setup):
- From the File menu, click on Preferences. Select General and Reports. Click on the Application tab.
- Change Display Database Favorites to Yes.
- Click Save.
- To add reports to the Database tab:
- Highlight the report on either the Reports tab or Favorites tab.
- Right-click and select Add to Database.
- To determine which tab will be the default tab when you select Reports > Reports, select File > Preferences > General > Reports, click on the Application tab, and in the Default Report Tab box, select the tab to display as the default.
- If you want only your Favorites or Database Favorites to display when you select Reports > Reports, select File > Preferences > General > Reports, click on the Application tab, and in the Disable Reports Tab box, select Yes.
Setup Network Favorites
If you have a network version of CenterPoint, you can setup a Network Favorites tab that displays the same favorites for all users and all databases on the network.
- On one computer:
- Add the desired reports to the Favorites tab. Note: See the Add Reports to the Favorites Tab section above for step-by-step instructions.
- Go to the My Documents folder on the hard drive and copy the CenterPoint.Favorites.Variations file.
- Copy the CenterPoint.Favorites.Variations file to a shared location on the network.
- At each workstation:
- In CenterPoint, go to the File menu and click on Preferences. Select General and Reports. Click on the Application tab.
- For Location of the Network Reports variation file, click
.jpg) and select the location of the file from Step 1.
and select the location of the file from Step 1.
Generate a Batch of Reports
Batch reports allow you to print all reports that are in a specific folder on your Favorites tab at the same time. A batch (folder) is created on the Favorites tab and then all appropriate reports can be added to the batch (folder). With a single selection, all reports within this batch can easily be generated. This can make running month-end or quarterly reports quicker and easier.
- Create a Report Batch (folder):
- Add the reports you want in the batch to the Favorites tab.
Note: See the Add Reports to the Favorites Tab section above for step-by-step instructions on adding reports and creating folders on the Favorites tab.- Create a folder on the Favorites tab for your batch and drag the desired reports to that folder.
- Select the first report in the folder and identify a preset date range in the Report Selections.
Note: Repeat this step for each report in the folder/batch.
For example, This Month or This Quarter. Do not use Custom. When you generate the report batch you will select a date, the reports will be produced based on the date you enter and the date range selected. For example, if the report is set for This Month and the Batch Date is 5/15/16, then the report will print for 5/1/16 - 5/31/16.
- Other Date Range and Period Range selections include:
- This YTD - When you generate the report batch, the reports will be produced from January 1 of the current system year unless that period is not yet opened and then it is January 1 of the last opened year and through the current system date or current system period unless that period is not open and then it is the last opened period.
- Last YTD - When you generate the report batch, the reports will be produced from January 1 of the current system year minus one year unless that period is not yet opened and then it is January 1 of the last opened year through the current system date or period minus one year unless that period is not open and then it is the last opened period.
- This Fiscal Year YTD - When you generate the report batch, the reports will be produced from the Date Settings preference for the fiscal year end month plus one month of the current system year unless that period is not yet opened and then it is the first period of the last opened year through the current system date or period unless that period is not open and then it is the last opened period.
- Last Fiscal Year YTD - When you generate the report batch, the reports will be produced from the Date Settings preference for the fiscal year end month plus one month minus one year of the current system year unless that period is not yet opened and then it is the first period of the last opened year through the current system date or period minus one year unless that period is not open and then it is the last opened period.
- To maintain the list of pre-defined date selections in the Date Range, Period and Period Range report filter controls, right-click on the Date Range, Period or Period Range and select Options.
- Other Date Range and Period Range selections include:
- From the Date Options screen, you can select the ranges that apply to you. Once changes are made, they will be saved and re-used anywhere that report filter is used. Each type of filter (Date Range, Period and Period Range) maintains its own configuration settings.
- Generate the Reports:
- From the Favorites tab, select the folder for your batch reports.
- Choose the Batch date and Company/Fund from the Report Selections. When the report is generated, a combination of the preset date range assigned in the report and the Batch Date will be used to select the data for the report. Report selection filters can be removed from a batch folder by clicking on the More Items button and removing the check mark next to the filter. Once the filter is removed, the reports in that batch will use the filters that are saved with each individual report for that iteration of the batch report.
- Click Preview to preview the batch report, click Print to print the report, or click Export to export reports to PDF or Excel (when exporting reports generated from a batch, the PDF export adds each report in the batch to a combined single PDF document and the Excel export adds each report in the batch to a separate worksheet.
Set Report-level Security
This option allows Administrators to configure report-level security by user group for the report selections criteria for a report or prevent access to the report.
When setting report-level security for report selections, the Administrator can set a default value for specific criteria for the report when the user group prints/previews a report. When the default is set, it cannot be changed when the user group prints/previews the report.
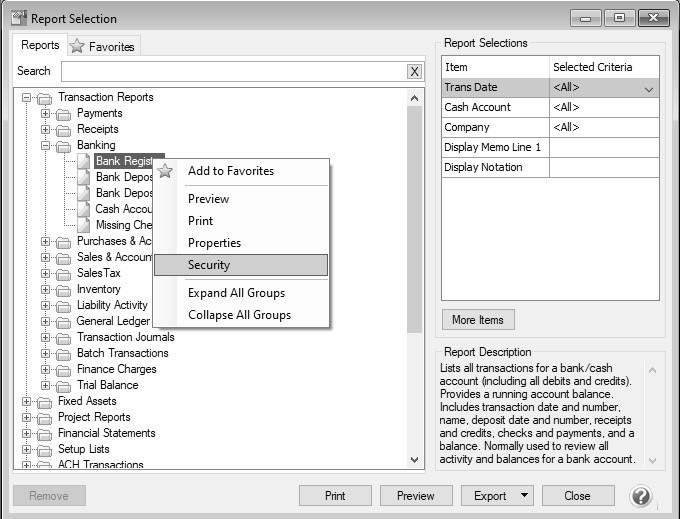
- Log into a CenterPoint database as an Administrator.
- Select Reports > Reports and select the report you want to set report-level security for. The example below will use the Bank Register report.
- Right-click on the report and select Security. This menu is only available when logged in as an Administrator.
-
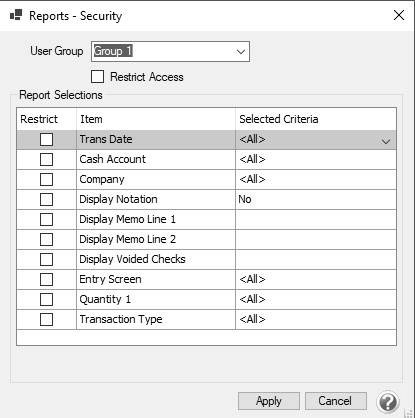
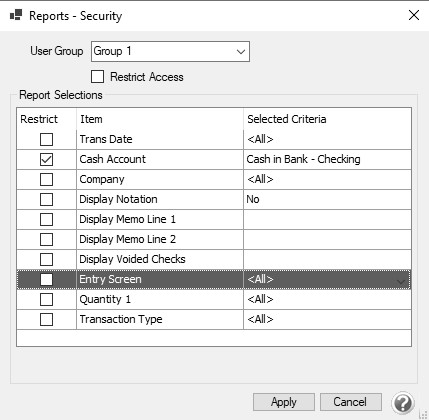
The Reports - Security screen displays with all of the available Report Selections for the selected report. Select the User Group this report-level security setting applies to.
-
This screen allows you to set the following report-level security for the selected User Group.T
- To prevent access to the report for the specified User Group, select the Restrict Access check box.
- To set a default value for a Report Selection, click the drop-down arrow in the Selected Criteria column, and then select the default reporting criteria. For example, you may want to set a default Cash Account for a Bank Register report.
- To prevent access to changing the default value for the selected Report Selection, select the Restrict check box. For example, if you want to prevent users in a User Group to be able to change the default Cash Account for a Bank Register when printing/previewing a Bank Register report.
- Click Apply.
- Click OK.
- Close the Reports - Security screen.
|
Document: 3094 |
|---|