CenterPoint® Accounting for Agriculture
- Customer Payments Portal Setup and Processes
Related Help
_24.jpg) Customer Payments Portal Video - Duration: 16 min 52 sec
Customer Payments Portal Video - Duration: 16 min 52 sec
 View or Print a PDF
| Document #: | 3450 | Product: | CenterPoint® Accounting |
|---|
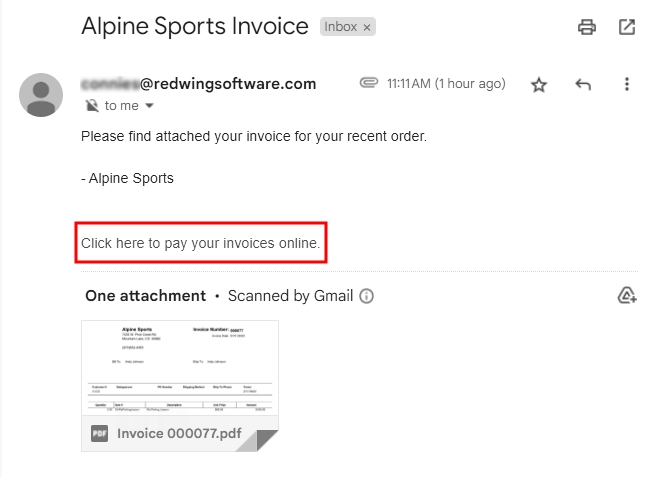
The Customer Payments Portal allows you to accept credit card or e-check (ACH) payments online from your customers. Red Wing Software joined forces with Fiserv, a premier integrated payments solution provider, to offer seamless payment processing within CenterPoint Accounting. The Customer Payments Portal works with the invoice emailing feature in CenterPoint. When customers receive their invoice or statement, the email will contain a link to a unique Invoices Due web page where they can pay outstanding invoices online. Those payments are then imported into CenterPoint as receipts applied to the invoices.
Step 1: Set Up the Customer Payments PortalStep 2: Enter Customer Invoices and Send Via Email
Step 3: Get Customer Receipts from the Customer Payments Portal
Manage the Customer Payments Portal in CenterPoint
Step 1: Set Up the Customer Payments Portal
e-check (ACH) processing. If you have not done so already, contact the Red Wing Software Sales department to connect with Fiserv and activate the Customer Payments Portal.
Add the Customer Payments Portal
- If CenterPoint is not open, start CenterPoint by double-clicking your CenterPoint icon on your desktop.
- Select File > Administration > Module Configuration Manager.
- Select Online Services, select Customer Payments Portal, and then click OK twice.
- Close CenterPoint, double-click the CenterPoint icon on your desktop to restart it, and then open your database.
Register the Customer Payments Portal
- In CenterPoint, select Setup > Online Services.
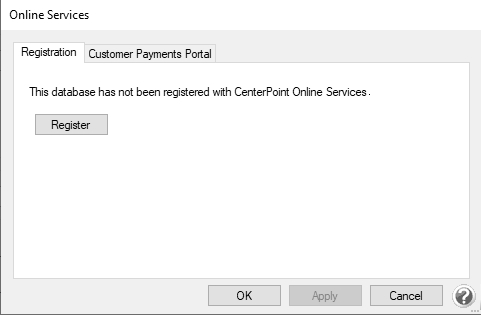
- Click Register.
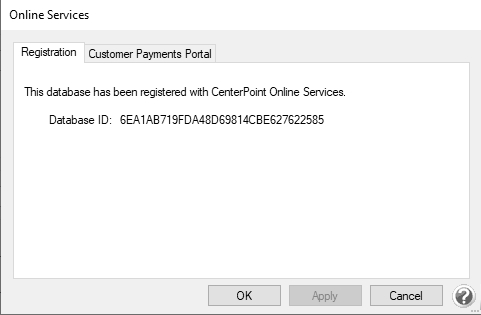
-
After registration is complete, select the Customer Payments Portal tab.
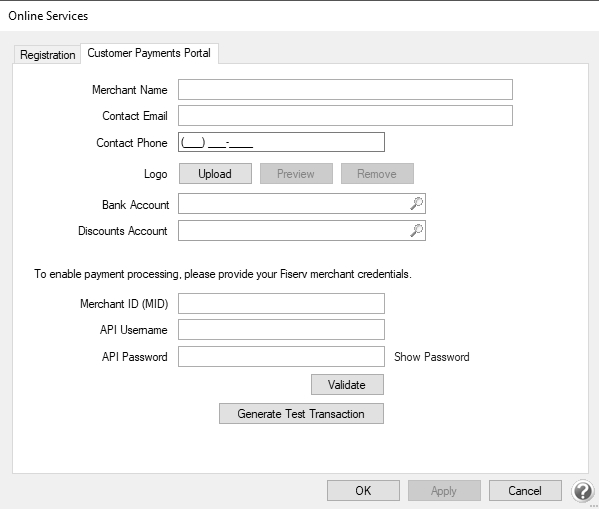
- In the Merchants Name box, enter the name that you want your customers to see in the Customer Payments Portal.
- Enter your Contact Email and Contact Phone that you want displayed in the Customer Payments Portal.
- If you want your logo to display in the Customer Payments Portal, click the Upload button, select the logo file (the file must be between 0 and 150 kb and can be any image file format, for example .jpg, .bmp, .png, etc.), and then click Open. To preview the logo, click Preview and to remove the logo, click Remove.
- Select the Bank Account and Discounts Account to use when importing customer payments from the Customer Payments Portal into CenterPoint as receipts. Enter your Merchant ID (MID), API Username, and API Password credentials provided to you by Fiserv for processing credit card payments. Click Validate to verify the credentials are accurate.
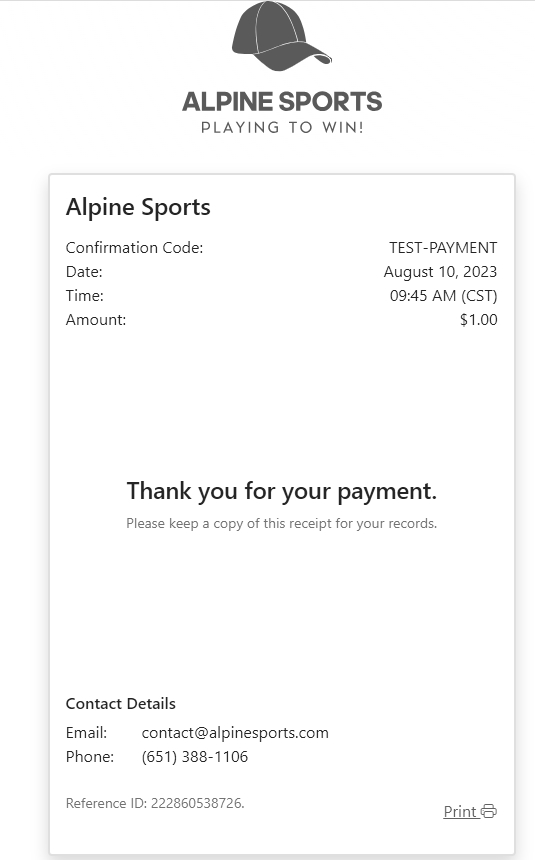
- Click Generate Test Transaction.This process generates a test invoice for $1.00, which can be paid through the Customer Payments Portal to test Fiserv merchant configuration. The test transaction will not update CenterPoint Accounting.
- Click OK to pay the test transaction through the Customer Payments Portal.
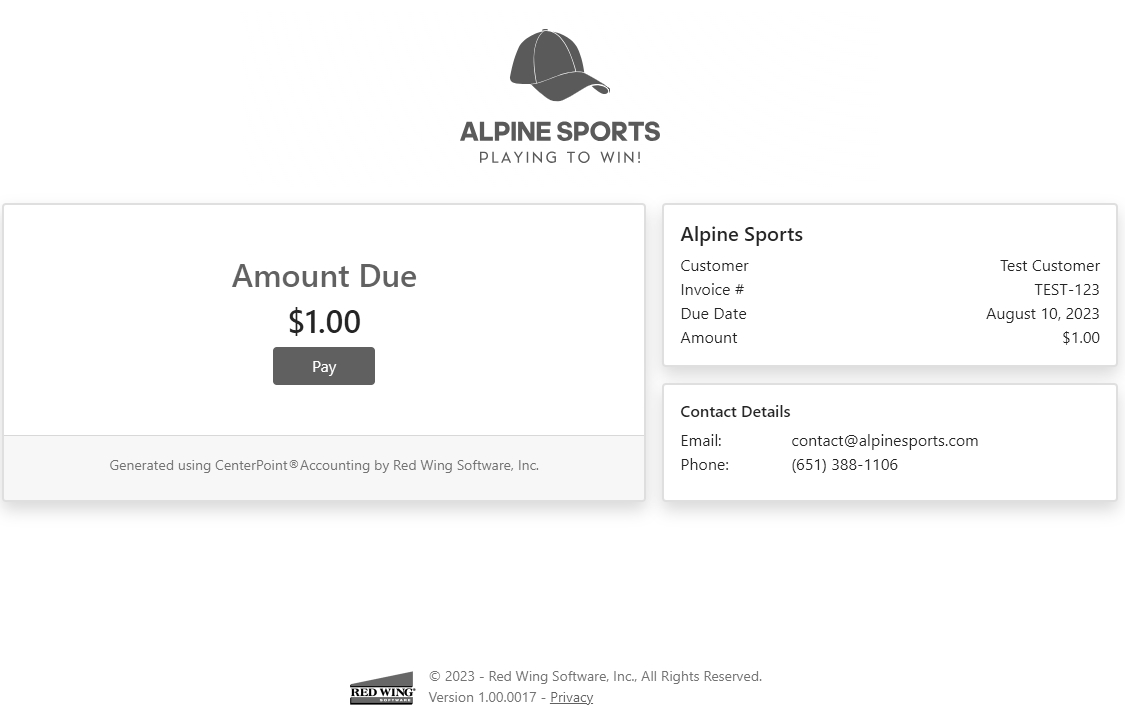
- Click Pay, select the method of payment: Credit Card Information or E-Check Information (this payment option is available only if the Merchant ID is configured with Fiserv to accept e-check (ACH) payments), enter your credit card or bank account information, and then click Submit.

-
If the test payment is approved, a receipt will display for your records.
-
Switch to the CardPointe portal to verify the $1.00 payment and void the transaction to void/refund the $1.00. If you have questions on CardPointe functions, contact Fiserv .
-
You can generate a test transaction as often as necessary.
Set Up Emailing of Invoices
Only customers who are configured to receive invoices via email will be included in the Customer Payments Portal. If you email statements, customers who receive emailed invoices will also have a link to pay online included with their billing statement email. For full instructions on how to email customer invoices, please see the Emailing Customer Invoices topic. If you are already sending customers invoices via email, continue to Step 2.
- Setup Email Preferences
- Select File > Preferences.
- On the left, select Email Setup > Email Setup, and then select the Database tab at the top .
- Enter the required information.
- On the left, select Customer Invoices.
- Enter a default Subject and Message and select the Form for emailing invoices.
- Optional: Select Billing Statements to enter defaults for emailed statements.
- Click Save.
- Set Up Customers to Receive Invoices by Email
- Select Setup > Names or Setup > Customers
- Edit the appropriate customer.
- Click the Email/Print tab.
- Enter the Name and Email Address(es) that will receive invoices emailed to this customer.
- Select Send “To”, Send “CC”, or Send “BCC” for Invoices for each email address.
- Optional: Set the email options for Statements if you would also like this customer to receive emailed billing statements. If they receive emailed invoices, the statements will also contain the link to pay online.
- Click Save.
- Repeat for each customer who will receive emailed invoices.
- Set Up Sent from Email
Note: If this step is not completed, the email address used for Test Settings in the Email preference will be used as the From email address.
- Select Setup > General Email Addresses.
- Enter the Name and Email Address and select how Customer Invoices and Print Checks/Invoices should be sent. Click Save.
Step 2: Enter Customer Invoices and Send Via Email
When you enter an invoice for a customer set to email invoices, the Email button at the bottom of the invoice screen will show a green check mark to indicate that when the invoice is saved, the customer will receive the invoice via email.
The customer will receive an email that contains a link to pay their invoices online.
Step 3: Get Customer Receipts from the Customer Payments Portal
Credit card payments your customers make online can be brought directly into CenterPoint as receipts applied to their invoices.
-
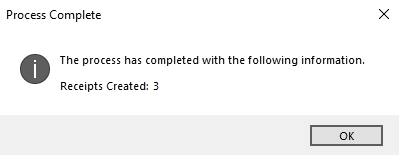
Select Processes > Customer Payments Portal > Get Customer Receipts.
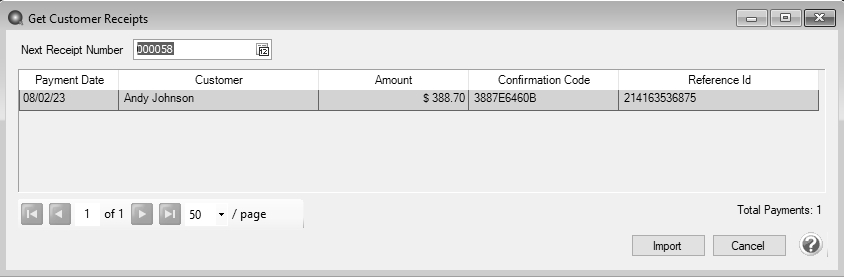
- In the Next Receipt Number box, the next sequence number for receipts will display or enter the next Receipt Number to use when generating receipts.
- The available online payments for the registered database will display. Click Import to generate receipts for all available online payments.
- At the This will generate receipts for all available online payments, continue? message, click Yes.
- When the process completes successfully, the following screen displays.
-
Click OK.
Manage the Customer Payments Portal in CenterPoint
Customer Open Invoices
The Customer Open Invoices option allows you to review the status of open customer invoices on the Customer Payments Portal and post any invoices that are not currently online. It also has an option to launch the Customer Payments Portal for a specific customer.
Select Processes > Customer Payments Portal > Customer Open Invoices.
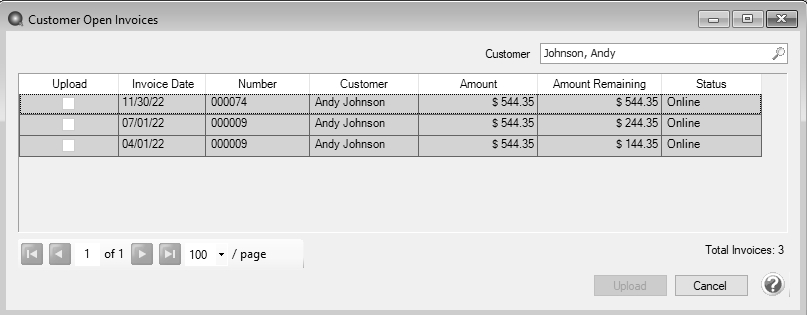
- If you want to filter the list, select the Customer to filter by.
- Invoices from the Customer Payments Portal will display in invoice date descending order. The Status of the invoices can be one of the following:
- Offline: The invoice is not on the Customer Payments Portal.
- Not Synched: The invoice is on the Customer Payments Portal, but the Amount Due doesn't match with CenterPoint.
- Online: The invoice is on the Customer Payments Portal with no Amount Paid or Discount Applied and the Amount Due is the full amount remaining.
- Payment: The invoice is on the Customer Payments Portal with a partial payment applied.
- Paid: The invoice is paid in full on the Customer Payments Portal. The invoice has not been imported into CenterPoint.
If an invoice has a status of Offline or Not Synched, select the Upload check box and then click the Upload button to upload the invoice to the Customer Payments Portal (invoices can only be uploaded if the customer is configured to receive emails for customer invoices).
Right-click and select Refresh to update the screen with changes made on the Customer Payments Portal.
To view the online Customer Payments Portal for a specific customer, right-click on an invoice for the customer and select View Customer Invoices Online for "Customer Name".
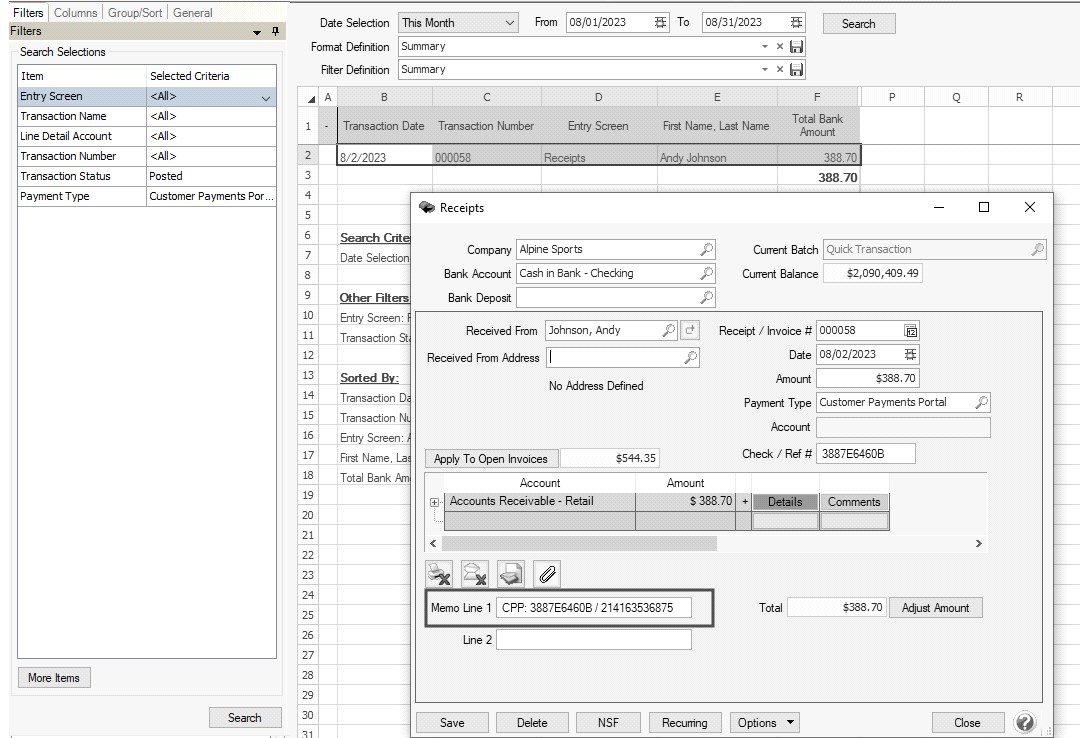
View Receipts from the Customer Payments Portal in Transaction Search
The receipts will come into CenterPoint as “Receipt” transactions, just as if they were entered into CenterPoint directly. They are visible in Transaction Search and on any reports where you would normally review receipts. In addition, receipts from the Customer Payments Portal have a Payment Type of Customer Payments Portal, and Memo Line 1 will contain a CPP label followed by the Confirmation Code/Reference Id of the online payment.
To easily find all Customer Payment Portal Receipts:
- Select Reporting Tools > Transaction Search.
- On the left side of the screen, click More Items and select Payment Type.
- In the Payment Type box, select Customer Payments Portal.
- Enter any other search selections, such as Customer or Date.
- Click Search.
Frequently Asked Questions
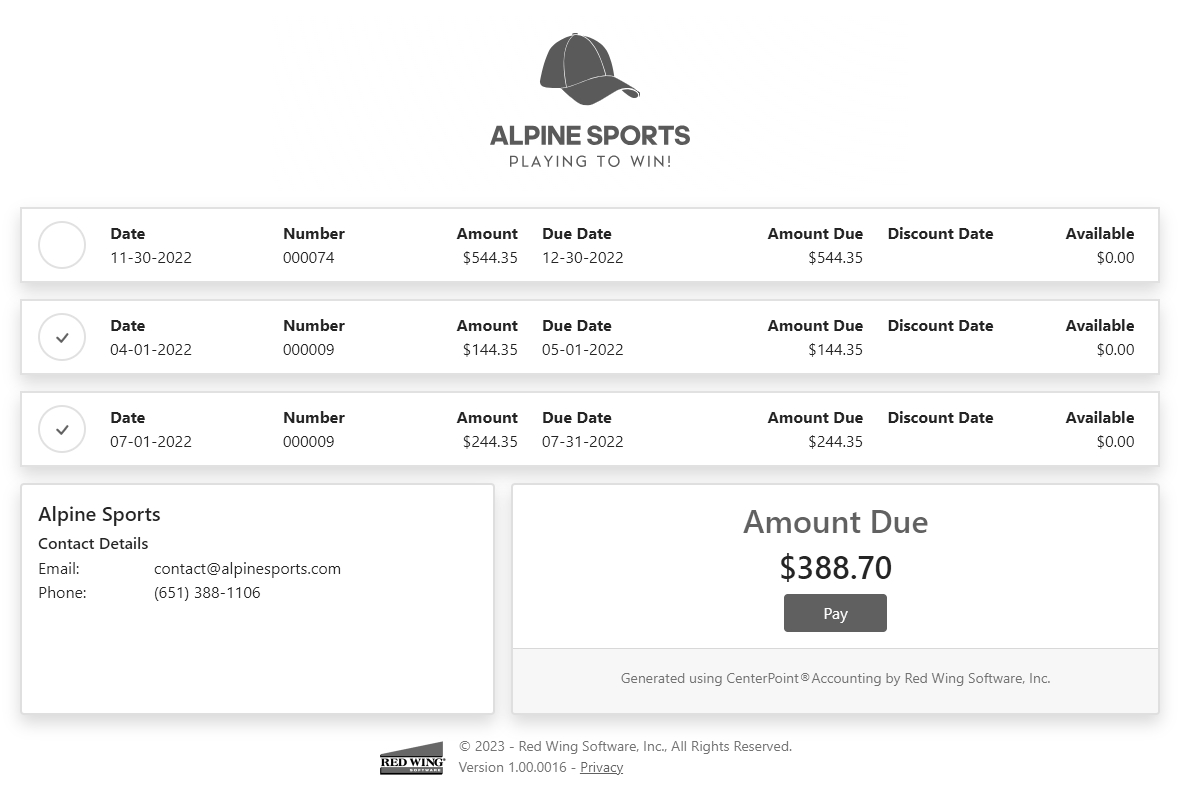
Q: Can I see what my customers will see when they go to the Customer Payments Portal?
A: Yes, on the Customer Open Invoices screen, you can right-click on any invoice and choose View Customer Invoices Online for "Customer Name" to launch that customer's Customer Payments Portal. This is an example:
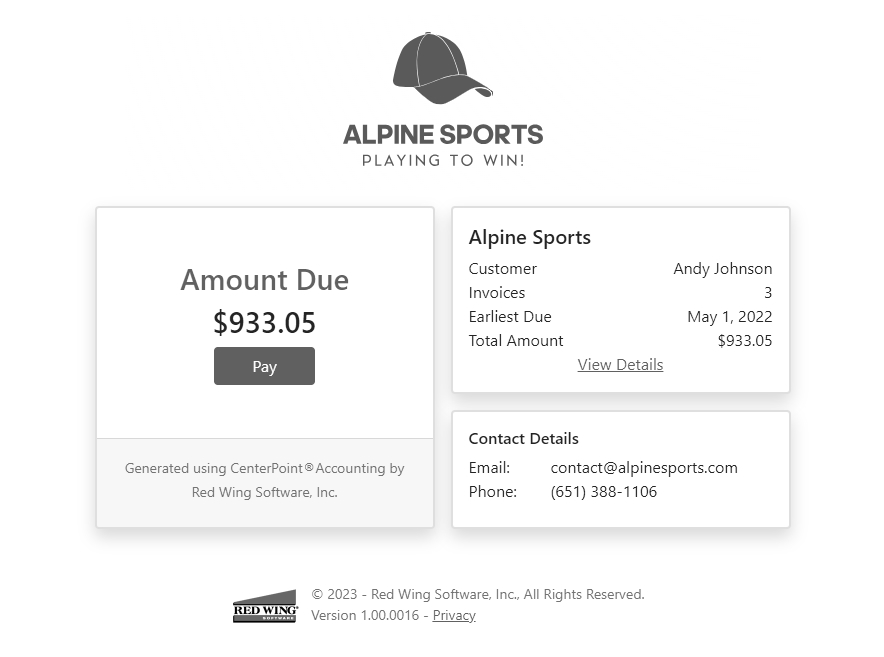
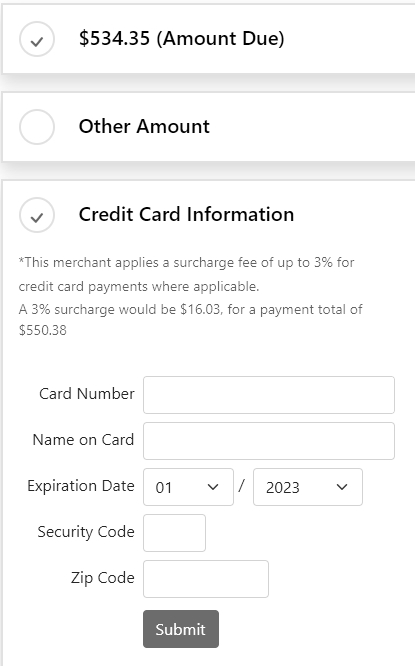
Customers can choose to pay the full amount due, or if they have multiple invoices, click the View Details to see the individual invoices. They can unselect any invoices they do not wish to pay at this time and click Pay to pay the selected invoices.
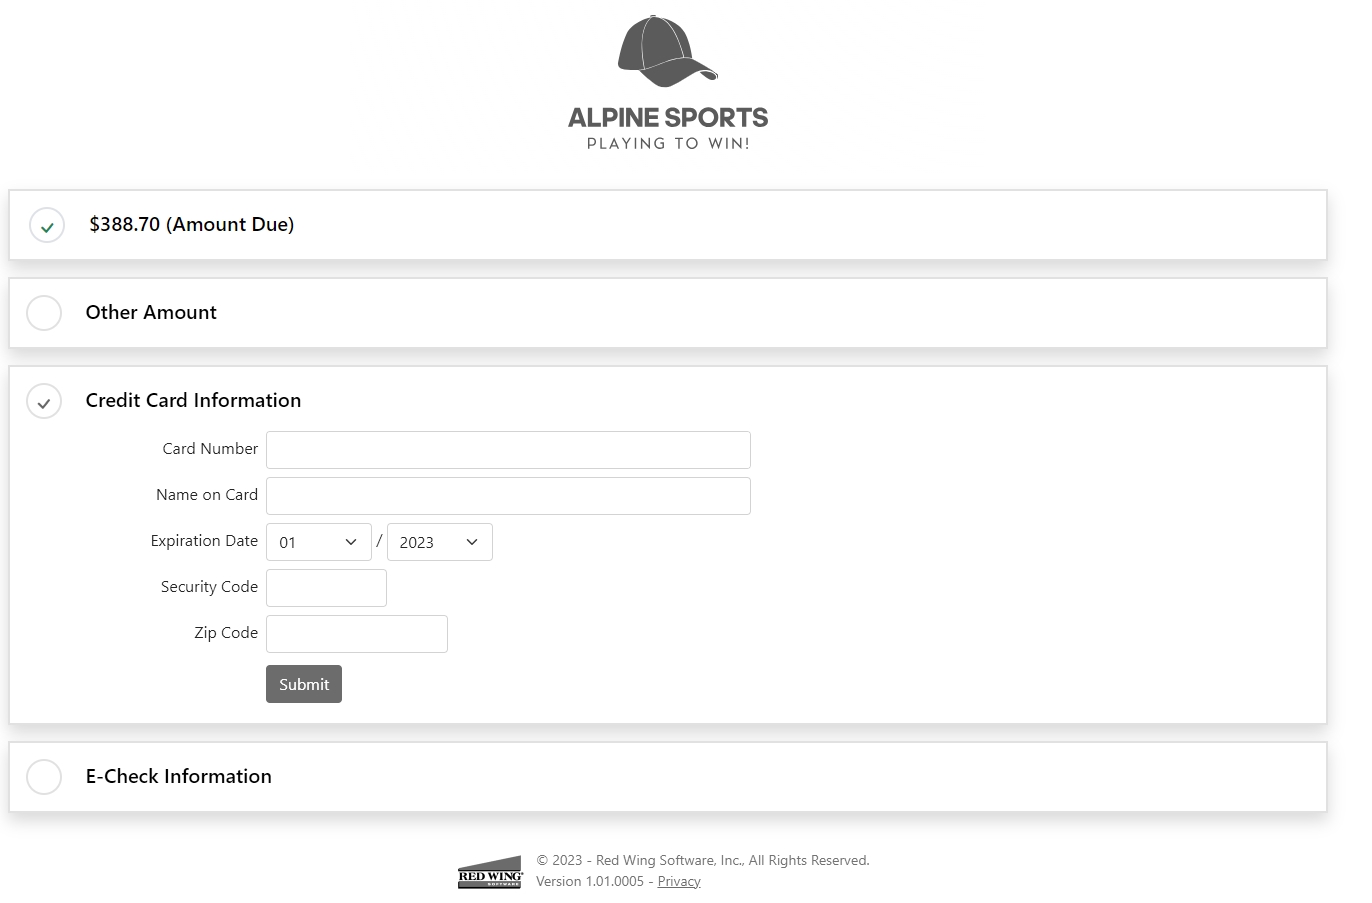
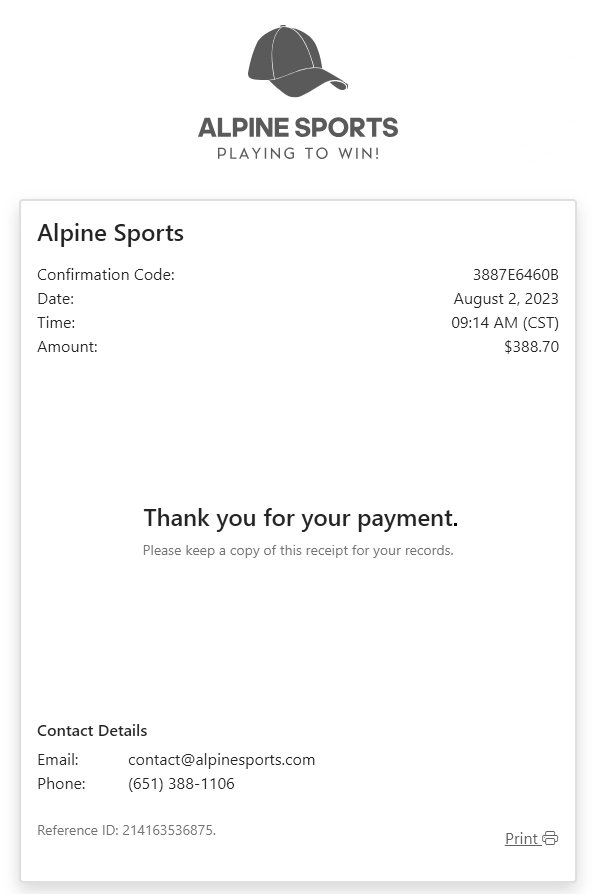
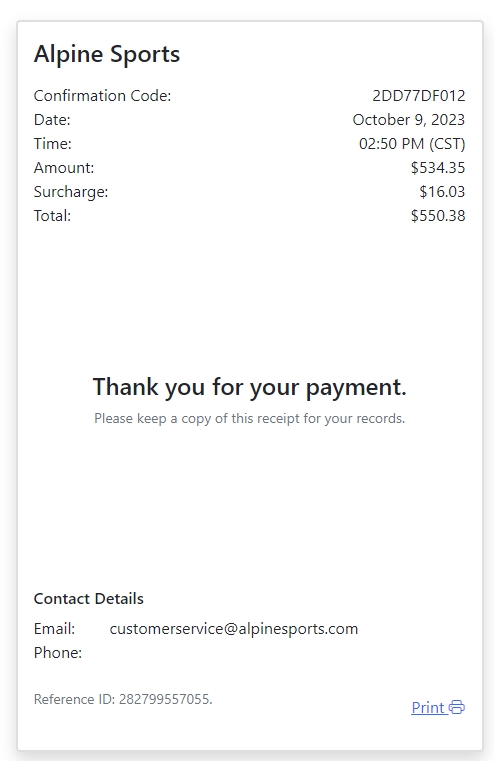
They can choose to pay the amount due or make a partial payment. They will enter their credit card or bank account information (this payment option is available only if the Merchant ID is configured with Fiserv to accept e-check (ACH) payments), and click Submit to make the payment. If their credit card or e-check information is approved, a receipt will display that they can print for their records.
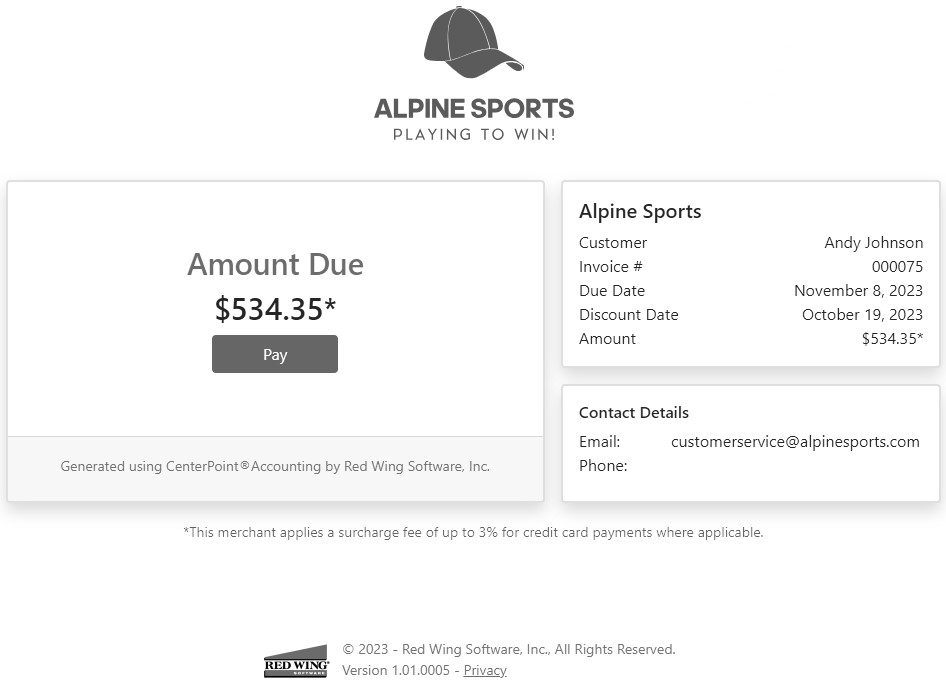
Q: My company applies a surcharge to customers paying with a credit card. How are customers informed of the surcharge?
A: If your Merchant ID is set up by Fiserv to apply surcharges, a message will display the surcharge percentage in the Customer Payments Portal and the amount of the surcharge applied will display on the payment screen and receipt.
Q: My customer deleted the email. How do I get them a new link to the Customer Payments Portal?
A: You can email them a new copy of the invoice from Processes > Sales > Print/Email Invoices.
Q: What happens if I edit or delete an invoice that is already uploaded to the Customer Payments Portal?
A: CenterPoint will sync with the Customer Payments Portal and remove the deleted invoice or update the invoice with the edited information.
Q: My customer does not want to pay online, what happens to the invoice on the Customer Payments Portal?
A: Your customer can continue to pay the way they have in the past. When the receipt is entered in CenterPoint to pay the invoice, the invoice will no longer be available to pay on the Customer Payments Portal.
Q: My customer called to pay with a credit card. Can I process the credit card on the Customer Payment Portal so that the payment can be imported into CenterPoint?
A: Yes, from Processes > Customer Payments Portal > Open Customer Invoices, right-click on the invoice and select View Customer Invoices Online for “Customer Name”. This will bring you to their Customer Payment Portal page where you can select the invoice(s) and make a payment using the credit card information they provide.
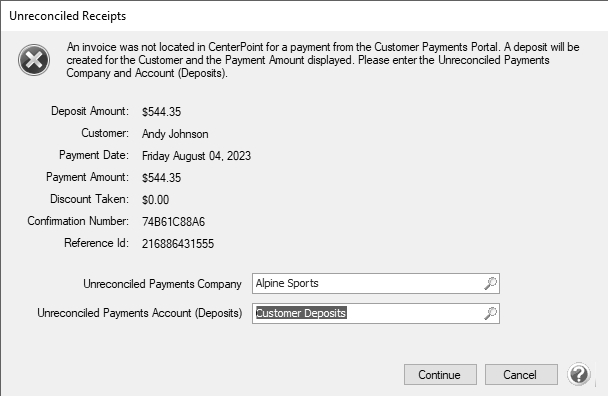
Q: A customer made a payment and the invoice was not found in CenterPoint. How is this reconciled?
A: In the rare occurrence that a payment made on the Customer Payments Portal cannot be matched with an open invoice in CenterPoint (for instance, the payment was made online, and then a receipt was entered in CenterPoint before the online payment was imported) CenterPoint will prompt you that it needs to create a customer deposit for this payment.
Document: 3450