CenterPoint® Accounting
- Import Bank Transactions into CenterPoint
using Plaid
Related Help
Bank Transaction Import Video - Duration: 11 min 40 sec

The Bank Import process allows you to seamlessly import transactions from most financial institutions into CenterPoint, using an integration with Plaid instead of a manual import process. This process is used to either create transactions that are not in CenterPoint yet, or to match transactions that have already been entered so they are not duplicated and you can check them for accuracy.
Connect to Plaid and Add a Financial Institution
Map Financial Institution Accounts
Auto-Generated Rules for Transactions
Create and Apply Rules/Actions to Transactions
Connect to Plaid and Add a Financial Institution
A Plaid account lets you connect your financial accounts to apps and services. Your data is kept safe with best-in-class data encryption and security.
- Select Processes > Banking > Bank Transaction Import.
- Click Add.
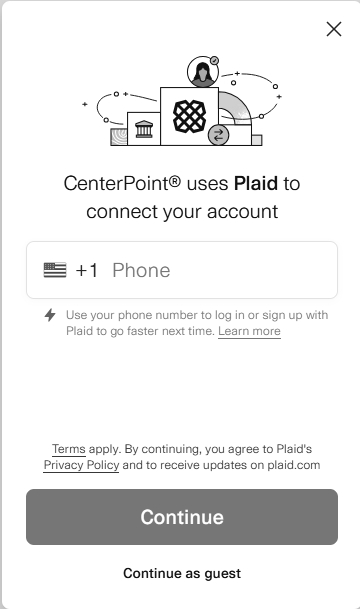
- Enter your Phone number to sign up with Plaid.
- Click Continue.
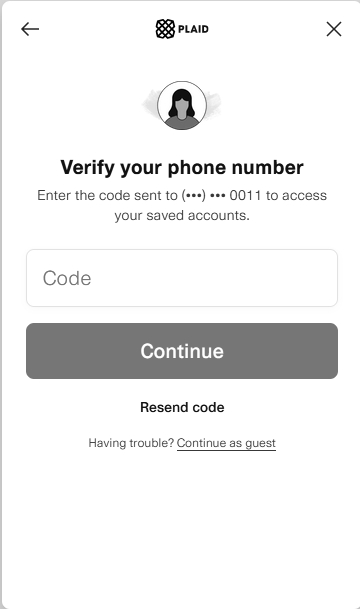
- Enter the Code sent to your phone number.
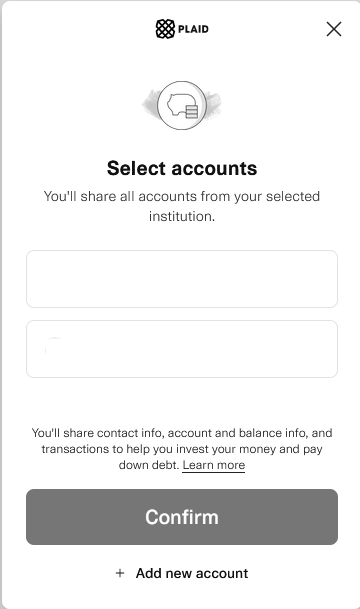
- The Select accounts screen will display.
-
Click Add new account.
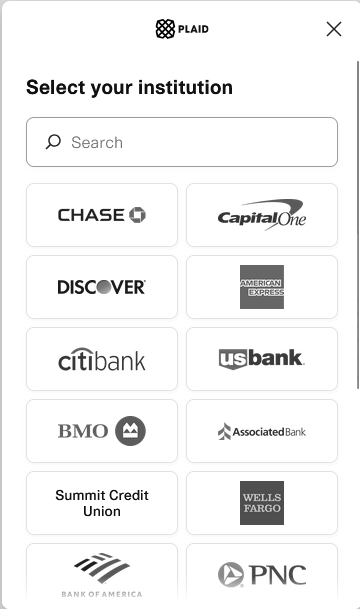
- Select your institution. If your institution is not in the displayed list, use the Search box.
- When the log in screen displays for your financial institution, follow the on-screen instructions to log in and connect your account(s).
- Click Submit.
- Your accounts display and will be connected to CenterPoint.
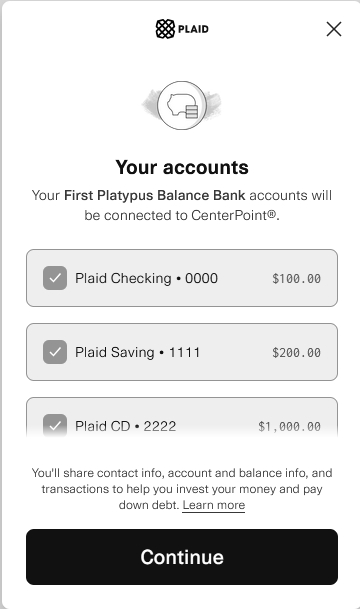
- Click Continue.
- When the Linking Complete message displays, close the tab/browser and return to the Bank Transaction Import screen in CenterPoint.
- At the "Links that are inactive for more than 90 days will be deactivated and the import will need to be readded" message, click OK.
Map Financial Institution Accounts
The Bank Transaction Import Edit screen will display a list of the accounts associated with the financial institution. The accounts you want to include in the review/import process must be mapped to specific CenterPoint companies and accounts.
-
For each financial institution account that you want to include in the review/import process, select the Company and Account.
-
Click Save.
Review Financial Transactions
After the financial institution accounts are mapped to specific CenterPoint companies and accounts, the Bank/Institution accounts will be available to review.
-
If the Bank Transaction Import screen is not currently displayed, select Processes > Banking > Bank Transaction Import.
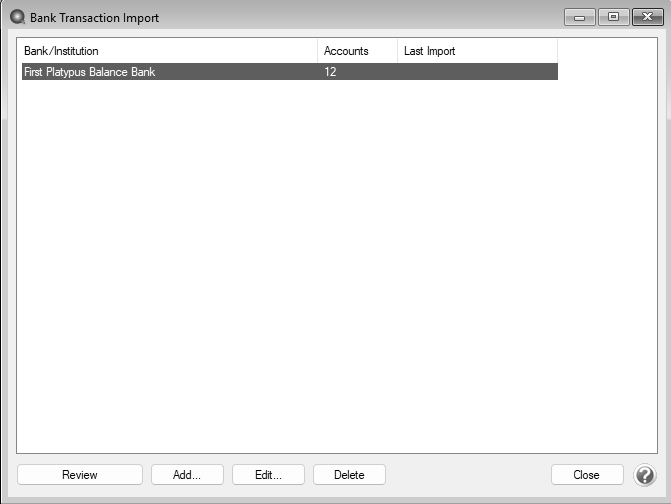
- Double-click the Bank/Institution you want to review or select the Bank/Institution, and then click Review.
- Select the Institution you want to review transactions for.
- Select the Account you want to review transaction for.
- If you want to change how many days’ worth of transactions to review (30, 60 or 90 Days), change the selection in the Period box.
- Click Import. A message indicating the number of transactions imported displays, click OK. You can import on any schedule, but you do need to import at least once every 90 days to keep the link active.
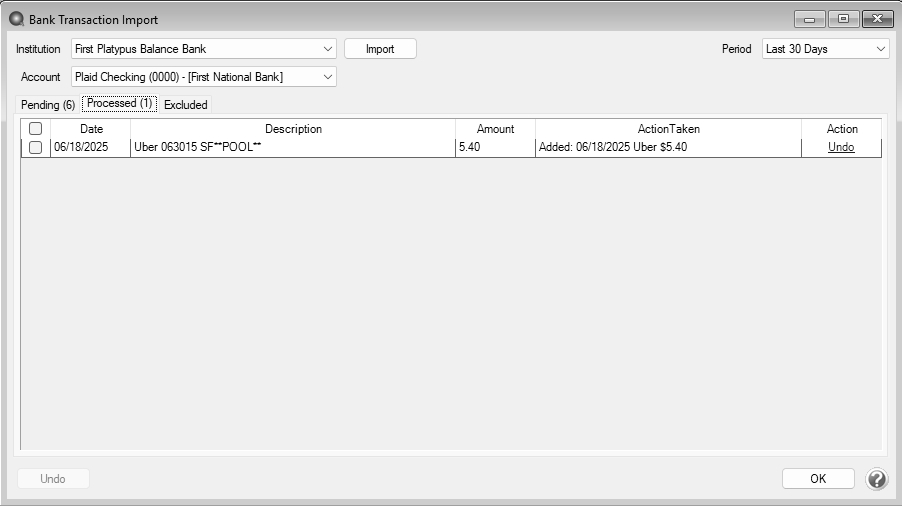
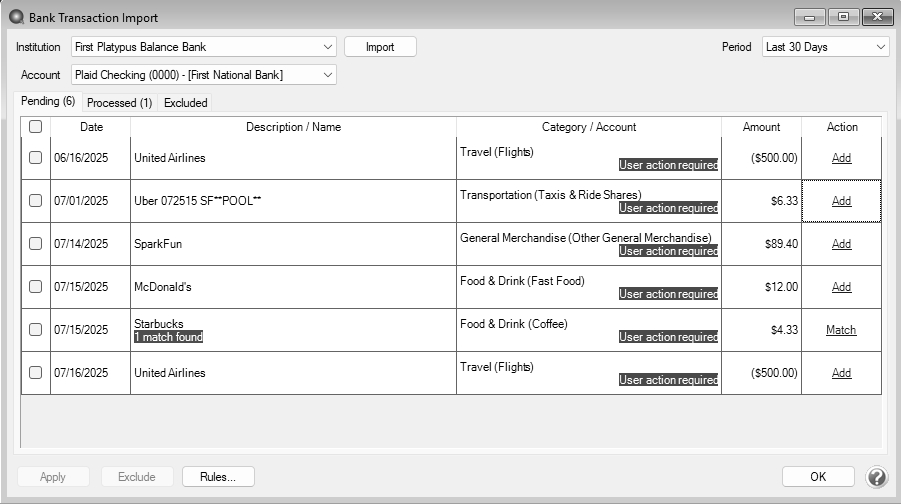
- Imported Bank/Institution transactions that have yet to be processed will display on the Pending tab. The tab will indicate the number of transactions that are pending. Bank/Institution transactions that have a mapped Name and Account, or have a single, green match can be processed without any further user action. Select the check boxes for these transactions (or check all with the check box in the header and the system will skip any that need additional action) and click Apply to add/match these transactions.
- Positive amounts represent Outgoing transactions (purchases).
- AP payments are created in CenterPoint for a cash/line of credit account with the option to apply to an open invoice.
- For credit card liability accounts, AP invoices are created in CenterPoint.
- Negative amounts represent Incoming transactions (income or refunds).
- AR receipts are created in CenterPoint for cash/line of credit accounts.
- For credit card liability accounts, AP payments are created in CenterPoint that should be applied to open invoices.
- Positive amounts represent Outgoing transactions (purchases).
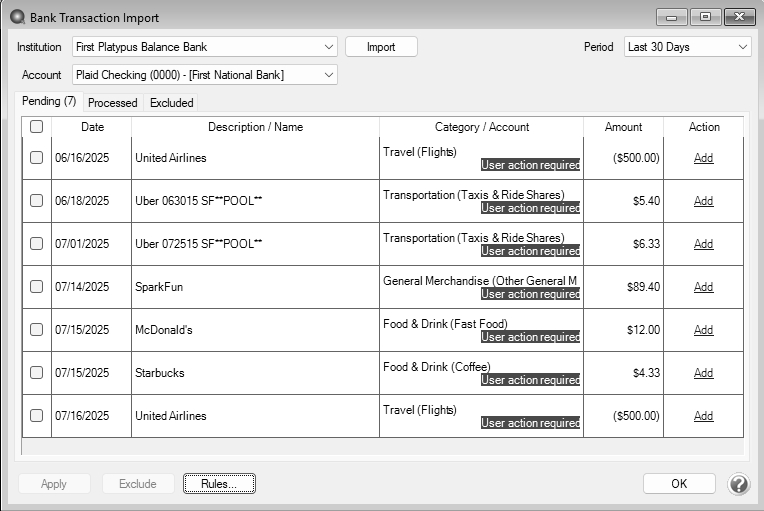
If a pending Bank/Institution transaction needs more information to be added to CenterPoint, a "User action required" message displays in the Category/Account column. The first time you review transactions for a Bank/Institution, all transactions will say “User action required.” This is because no mapping is set up yet. To review/change the action the imported Bank/Institution transaction should take when processed, in the Action column, select the Add, Match, or Exclude link.
Add - This link allows you to manually map/review the Name and Account in CenterPoint that the Bank/Institution transaction data represents and add the transaction to CenterPoint. If a Description or Category from the Bank/Institution is mapped to a Name or Account in CenterPoint via a rule, the mapped CenterPoint information displays below the Bank/Institution information in gray.
Match - This link allows you to review a Bank/Institution transaction that matches an existing CenterPoint transaction. The color indicates confidence in the match - green being an exact match, orange a medium confidence match, and red a low confidence match.
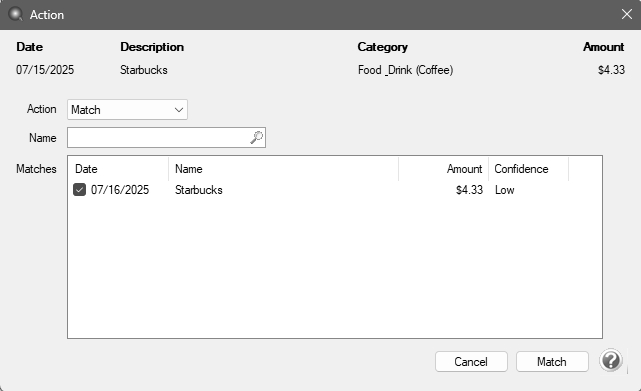
- The process will attempt to match transactions by Name, Transaction Date, and Amount– in that order. Partial matches are also possible. Dates must also match within a period of +/- 3 days.
- If there are multiple matches, the actual match transaction must be selected before the Match action can be completed. If the matched transaction is not an exact match, right-click on the matched transaction and select Find in Search... to view/edit with CenterPoint Transaction Search.
- Select the Action you want to perform for the matched transactions - select Add to add the transaction to CenterPoint by providing Name and Account details, Match to move the item to the Processed tab without adding it to CenterPoint, or Exclude for a transaction you do not want to map or match.
Exclude - This link is used if you do not wish to map or match this Bank/Institution transaction to CenterPoint. Click Exclude to remove it from the Pending tab. You can click Undo to move excluded transactions from the Excluded to the Pending tab.

Example:
-
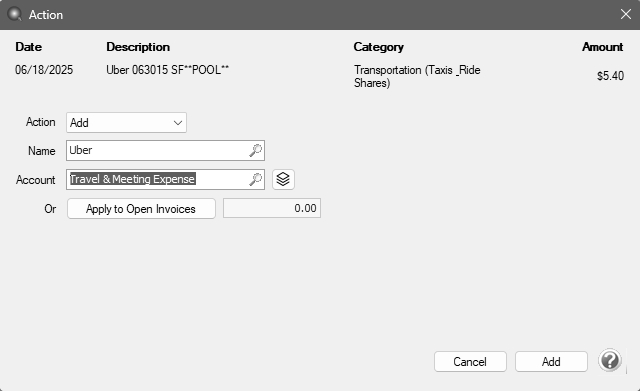
Using the transactions in the example above, the Add link was selected for the 6/18/25 transaction.
-
Select the Name and Account that should be used to map the Bank/Institution transaction to CenterPoint. In this example, the Bank/Institution transaction with the Description Name of "Uber" with a Category/Account of Transportation (Taxes & Ride Share) should be mapped to the CenterPoint vendor Name (Uber) and Account (Travel & Meeting Expense). Click Add to map this transaction to CenterPoint. When the mapping is complete, the transaction will be moved to the Processed tab. Other transactions with the same Description/Category will be mapped because the auto-rule was created.
Auto-Generated Rules for Transactions
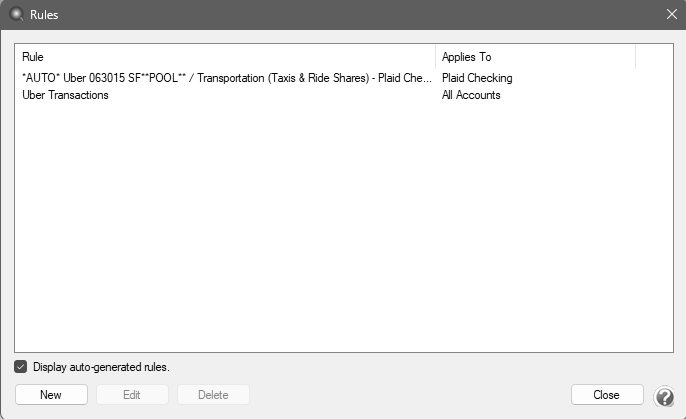
Each time you manually map a Description/Name customer/vendor Name and/or Account, by using the Add link, an auto-generated rule is created. Your data will start to be automatically mapped for processing. The more items you map, the more automated it will become, where you will only need to manually change things that you want to map differently than before, or transactions from new vendors/customers. Auto-generated rules are hidden from the Rules list, unless the Display auto-generated rules check box is selected. Auto-generated rules are applied after any user-defined rules and only apply to the Account for which they were created.
Example
-
From the Bank Import Transactions screen, If you click the Rules... button and select the Display auto-generated rules check box, a Rule will display from the example above.
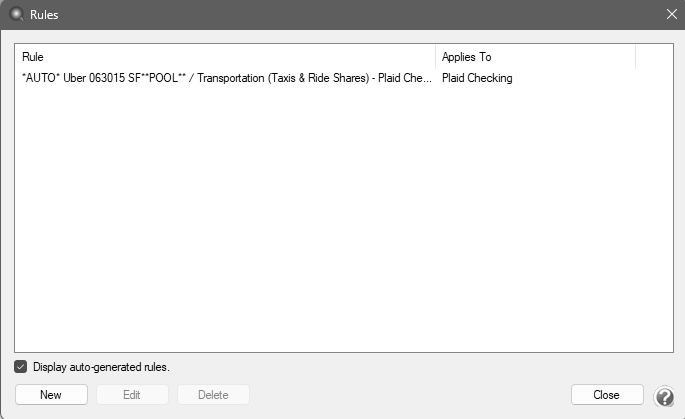
- As you map Bank/Institution transactions, auto-generated rules will continue to be defined. Theses rules can be Edited or Deleted.
- If you want an auto-generated rule to become a Rule that is always applied, click Edit and define the rule using the Create and Apply Rules/Actions to Transactions section in this document.
Create and Apply Rules/Actions to Imported Transactions
Rules help CenterPoint map the Bank/Institution imported transactions description/categories to transactions in CenterPoint. Any new or edited rules are applied to the Pending tab when the Rules screen is closed. Only the first rule to map a customer/vendor Name or account is applied, but rules can be cumulative. Mappings are not reset when rules are applied, so if you or a rule maps a customer/vendor or account, subsequently modifying that rule, adding a new rule, or removing a rule will not affect the mapping of that transaction.
Example:
-
Using the transactions in the example above, a rule can be defined for Bank/Institution transactions with the Description/Name of "Uber" with a Category/Account of Transportation (Taxes & Ride Share) to always map the vendor Name (Uber) and account (Travel & Meeting Expense) with CenterPoint.
- Click the Rules... button.
- Click New.
- In the Name box, enter a required name for the Rule, for example Uber Transactions.
- In the Apply To box, select the Bank/Institution account the rule applies to, in this example All Accounts was selected.
- In the For box, select whether this is an Incoming (AR Receipt ) or Outgoing (AP Payment for a cash/line of credit account or transaction).
- If you want to set conditions the data must match for the rule to be applied for either the Description or Category, under the Conditions box, click Add.
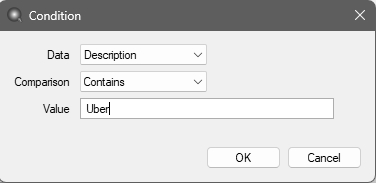
- In the Data box, select Description or Category.
- In the Comparison box, select one of the following options:
- Equals - The value must match the specified text completely.
- Begins With - The value must start with the specified text.
- Contains - The value must contain the specified text.
- Ends With - The value must end with the specified text.
- In the Value box, enter the value the Comparison apples to. In this example, the rule will apply if the Description of any Bank/Institution transaction contains the text "Uber".
- Click OK.
- In the Vendor/Customer box, select the CenterPoint vendor/customer. In this example, the Uber vendor was selected.
- In the Account box, select the CenterPoint account. If a percentage should post to multiple CenterPoint accounts, click the
 icon, select each account, define the percentages, and then click OK.
 - In the Action box, if you want to include the transaction, leave the selection at None. To exclude any transaction that meets the rules set above, select Exclude.
- Click OK.
-
Click Close. All mappings made will display on the Pending tab. In this example, the CenterPoint Vendor '"Uber" displays in the Description/Name column under the Bank/Institution's Description/Name and the CenterPoint Account "Travel & Meeting Expense" displays in the Category/Account column under the Category/Name for the financial institution for the transaction dated 7/1/25 for $6.33.
Transactions Between Two Bank Accounts
Transactions between two bank accounts, such as a bank transfer or credit card payment transaction, appear in the Bank Transaction Import for both accounts, but should only be matched or added in one account and a rule to exclude these transactions should be created in the other account.
- Bank Transfers
- Add – If you are adding the transaction, choose which account will handle the addition and exclude the transaction from the other account.
- Match – If this transaction is already entered in CenterPoint as a payment or receipt, it will show as a match on the Bank Account for the transaction. It should be excluded from the account used on the detail line. If the bank transfer was entered into CenterPoint as a journal entry, the Bank Transaction Import will not be able to find the match, and the transaction should be excluded from both accounts.
- Credit Card Payments
- Add – If you are adding the transaction, it is normally added as an outgoing transaction from the bank account making the payment, and excluded on the credit card account.
- Match – If this transaction is already entered in CenterPoint, it will show as a match on the bank account making the payment. The Bank Transaction Import will not find a match on the credit card account, and a rule should be set up to exclude the transaction.
Processed Transactions
The Processed tab displays imported transaction data and the Action Taken.
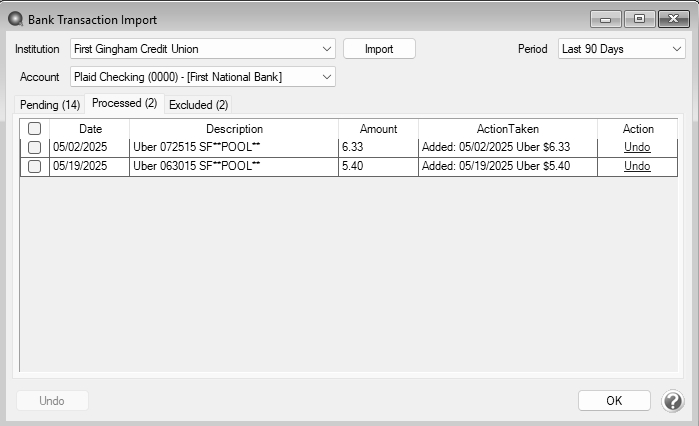
When you select a transaction(s) and click the Undo link or Undo button, transactions with the Action Taken of:
- Matched will be unlinked and moved back to the Pending tab.
- Added will be deleted and moved back to the Pending tab.
Excluded Transactions
The Excluded tab displays imported transaction data that has been excluded from CenterPoint.
When you select a transaction(s) and click the Undo link or Undo button, transactions will be moved back to the Pending tab.
View/Edit Transactions Added to CenterPoint
- Select Reporting Tools > Transaction Search.
-
Select a Date Range and/or Entry Screen and then click Search.
- In the example below, the Entry Screen of Payments and the Date Range of 06/01/25 - 07/01/25 were selected. Two transactions are found in search for Uber.
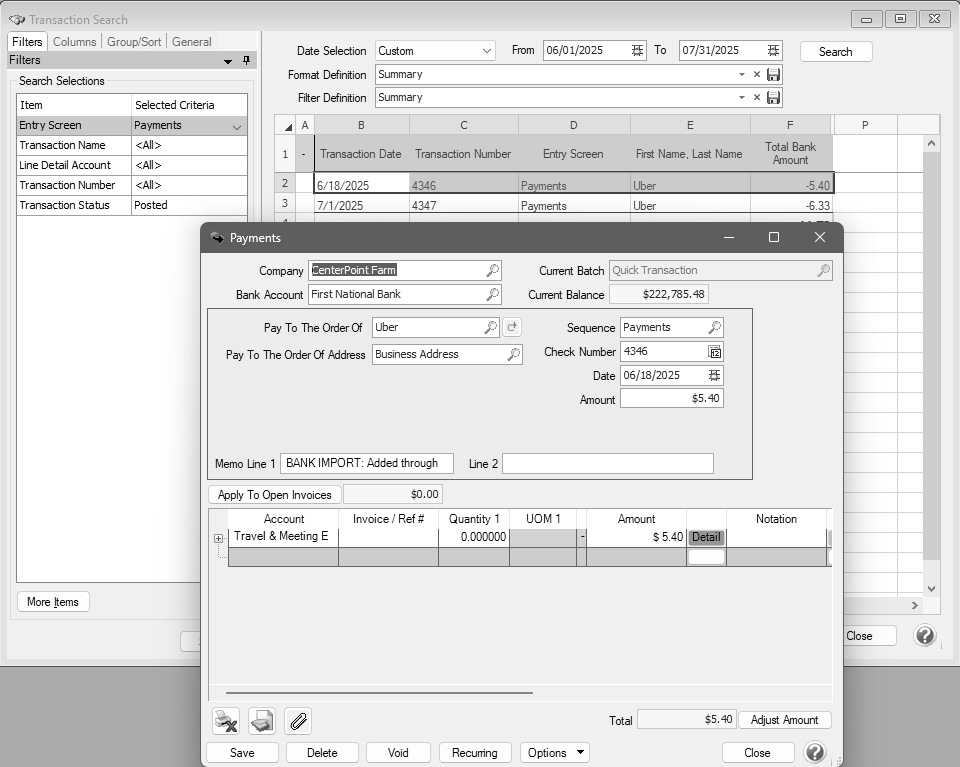
You can verify that the Pay to the Order Of and account are correct based on the Rules/Actions applied and that the transaction came from Bank Import by reviewing Memo Line 1.
|
Document: 3478 |
|---|