CenterPoint® Accounting
- Customizing Reports
Related Help
_24.jpg) Printing/Previewing Reports Video - Duration: 24 min 57 sec
Printing/Previewing Reports Video - Duration: 24 min 57 sec
Customizing Reports Video - Duration: 16 min 08 sec
Report Favorites Video - Duration: 18 min 12 sec
Batch Reports Video - Duration: 16 min 17 sec
Report Filter Security Video - Duration: 7 min 03 sec

CenterPoint allows you to customize reports to match your needs. A system supplied report can be modified to create many variations to the same report. These customized reports are saved as Favorites for future use. You can also add folders to your Favorites to organize your custom reports.
The customizing tools can be used to add or remove columns from the report, change the sort order, add or remove subtotals, change the title and page numbering, etc. All customizing is done from within the preview of an existing report.
Step A - Customize an Existing Report
- Select a report that you would like to customize (Reports > Reports).
- Choose the appropriate Selection Criteria and click Preview.
- On the left side of the preview screen, six tabs (General, Header, Columns, Group & Sort, Filters and Footer) are displayed. The information in these tabs is used to customize reports. Click on a tab to open it and display all the options available.
- General tab: Manages the title and style of the report and the position of the date, time stamp, and page numbers.
- Header tab : Controls the information displayed in the report heading (title, company/fund name, etc.).
- Columns tab : Select which columns of data do and do not print on the report.
- Group & Sort tab : Manages how data is sorted and subtotaled (grouped).
- Filter tab : Displays the selection criteria that can be used for this report. This is the same information that is available in the Selection Criteria prior to previewing the report.
- Footer tab : Manages the information (if any) printed at the bottom of each page on the report.
- Select the tab and make the appropriate changes. (See the "Step-by-Step Instructions for Common Report Changes" section for more information on making changes.)
- Click the Refresh button after making changes in a tab to update the report with the new changes.
Step-by-Step Instructions for Common Report Changes
Change the Title of a Report
- From the preview of any report, click on the General tab.
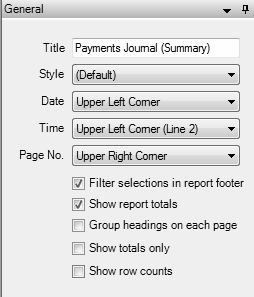
- Click in the Title field and enter the text you'd like to use for the report title. This will also be used as the default name when the report is saved as a Favorite.
Change the Font Size on a Report
- From the preview of any report, click on the General tab.
- Select the Style drop down to change the font size of the report. The Style also controls indentations, shading and underlining within a report.
- Select a different Style from the list. Click Refresh to update the screen. Continue applying a different style until you find the style/font that best fits your needs.
Remove or Move Page Numbering
- From the preview of any report, click on the General tab.
- Click on the Page No. drop-down box and select the appropriate option (Do Not Print, Upper Left Corner, etc.).
Remove or Move the Date and Time Printed Stamps
- From the preview of any report, click on the General tab.
- Click on the Date and/or Time drop-down box and select the appropriate option (Do Not Print, Upper Left Corner, etc.).
Change the Size or Location of the Header Information (report title, company/fund name, etc.)
- From the preview of any report, click on the Header tab.
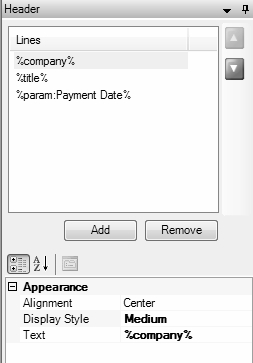
- At the top of the screen in the Lines area, click on the header information that you'd like to change (Company/Fund, Title, etc.) and the Appearance information for that line will display below.
- To change the size of the text used for that line on the report, click in the Display Style field and select Small, Medium or Large.
- To change where the text will print, click in the Alignment field and select Left, Center or Right.
Add Another Title Line to the Top of a Report
- From the preview of any report, click on the Header tab.
- Click on the Add button.
- Select the New Item line in the Lines box to display the Appearance information below.
- Click on the ellipse button on the Text field to select a field from the database to print or simply enter the text to print.
Add, Remove or Move a Column of Data to the Report
- From the preview of any report, click on the Columns tab. All columns that are available to print on this particular report will be displayed on the Available tab. This list changes for each report.
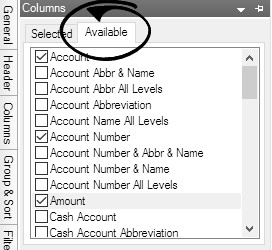
- To add a column of data to the report, select the check box next to the column name. Select the Selected tab to display all of the columns you selected on the Available tab to display on this report.
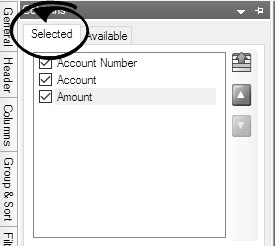
- To remove a column of data from the report, on the Selected tab, unselect the check box next to the column name.
- To move a column of data, on the Selected tab, select the column and then use the green up and down arrows on the right to move the column.
Note: the striped up arrow immediately moves the field to the top with other selected items. The plain green up arrow moves the item up the list one row at a time.Change the Title of a Column
- From the preview of any report, click on the Columns tab.
- Click on the column to be modified and the Appearance information will be displayed below.

- Click in the Header field and make the appropriate changes or click in the Header Override field if the column heading label is for a column that was generated based on the data represented in the column, for example period column names on Income Statements and Balance Sheets.
Change the Sort Order of Data in a Report
- From the preview of any report, click on the Group & Sort tab. All columns of data included in the report will be displayed on the Selected tab..
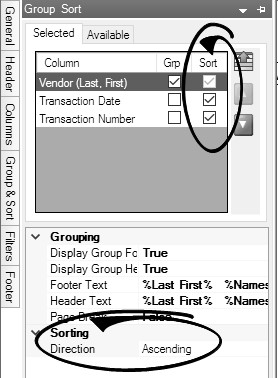
- Place a check mark in the Sort box for the column or columns you'd like to sort on.
- After selecting a column to sort, the Sorting option is displayed below. Choose Ascending or Descending.
- If you have chosen more than one column to sort on, then the sort order must also be specified. This is done by using the green up and down arrows on the right. In the example above the report would sort by Vendor, Transaction Date, and then Transaction Number.
Change What Data is Subtotaled in a Report
- From the preview of any report, click on the Group & Sort tab. All columns of data included in the report will be displayed on the Selected tab..
- Each column that is selected to Group will, by default display a heading and a subtotal. Changing the group options on a report can significantly change the look of a report. For example, this report is grouped by Cash Account by default.
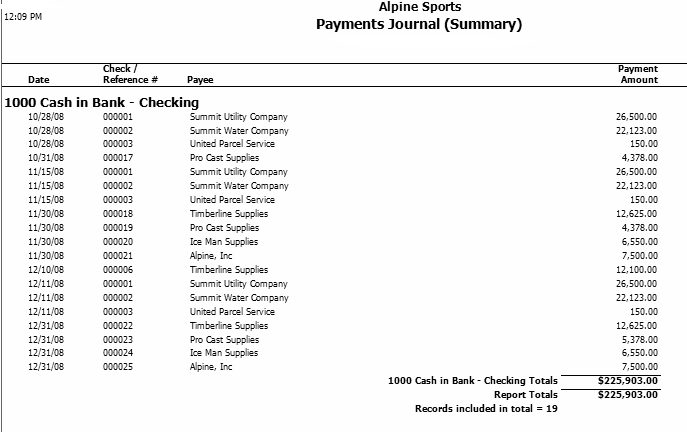
If we remove the check mark from Group on the Cash Account and instead, Group by Payee (First Last), it completely changes the look of the report.
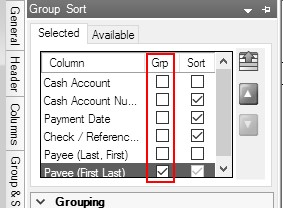

- Select each Column that you would like grouped & subtotaled by placing a check mark in the Grp box.
- If you have chosen more than one column to group on, then the group order must also be specified. This is done by using the green up and down arrows on the right.
Step B - Save Customized Report for Future Use
- Once a report is successfully customized, save the report as a Favorite by clicking on the Favorites icon
 while still in the preview screen. For more information about favorites, see the About Favorites topic.
 - Specify a name for the customized report and click OK. It will then be available for future use in the Reports > Reports > Favorites tab.
Step C - Organize Custom Reports for Easy Access (optional)
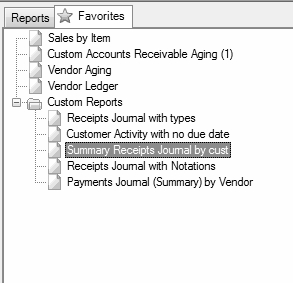
- The Favorites tab (Reports > Reports > Favorites tab) will display all reports that have been marked as Favorites. This can be system supplied reports and/or customized reports. By default, they are displayed in a flat list.
- The reports in the Favorites tab can easily be sorted and grouped.
- To change where in the list a report is displayed: Left click on the report and while still holding down the left mouse button, drag it to the new location in the list. Then release the left button on the mouse.
- To group multiple reports together:
- Right-click in any blank space on the Favorites tab.
- Select New Folder.
- Type in a name for the new folder and press enter on the keyboard (in this example, we named the folder "Custom Reports").
- Use the same "drag and drop" process described above to move reports in to the new folder.
See the Report Favorites topic for additional information.
|
Document: 3075 |
|---|