***See centerpoint-data-importer.htm instead.
CenterPoint Accounting
- CenterPoint Data Importer
Related Help

The Data Importer is a tool that allows you to import data into CenterPoint from other software applications at no additional charge.
- The types of data that can be imported are:
- Accounting Master Files - Companies/Funds, Customers, Names, Name Location Types, Projects, Sales Items, Vendors, and Accounts.
- Agriculture Master Files: All of the master files listed above for Accounting and Production Center Details (Crop or Livestock).
- Payroll Master Files: Employees, Names, Payroll Deductions, Payroll Earnings, Work Shifts, and Workers' Compensation Classes.
- Transactions - AP Invoices, AR Invoices (Basic), Cash Payments, Cash Receipts, Customer Invoices, General Journals and Sales Orders.
This document includes the following information:
Installing the CenterPoint Data Importer
Using the CenterPoint Data Importer for Master Files
Using the CenterPoint Data Importer for Transactions
Prerequisites:
- The CenterPoint Data Importer must be installed on a computer that already has CenterPoint installed.
- The data to be imported must be saved in a comma delimited (.CSV) file.
Installing the CenterPoint Data Importer:
-
Double-click the CenterPoint###Setup.exe (###=Your CenterPoint product) file.
-
If CenterPoint is already installed, choose the Modify Available Options maintenance operation. If CenterPoint is not already installed, continue through the screens until the Setup Type screen displays, select Custom.
- Select the down-arrow next to Data Import, select Entire feature will be installed on local hard drive, and then click Next until the installation begins.
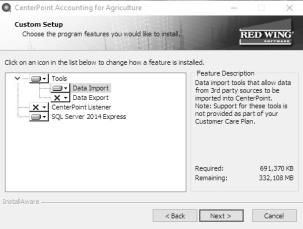
- Click Finish. A shortcut will be created on your Start menu under Red Wing Software called CenterPoint Data Importer.
-
An existing database is needed to import data into. If you don't have an existing database, create a database in File > New > New Database Wizard.
The above steps will only need to be completed one time. After the first time the installer will remember your settings and will update the importer, etc. automatically.
Using the CenterPoint Data Importer for Master Files
Mapping by Column
Mapping by Column allows you to use the Column # in the Data Importer to specify which column of your .CSV file contains the information that corresponds to the FieldName column. This "maps" the Data Importer Data Field to your user-definable .CSV file column. It also allows you to set a value as the Default Value in a Data Field for your import.
Rules
- The data to be imported must be saved in a comma delimited (.CSV) file.
- The Column# column in the Data Importer must specify the location of the column in your .CSV file.
- The file must include all the data fields (columns) with (required) after the field definition. For example, for the Type of Import = Vendors the required data field (column) is LastName.
- Employee Import - The employee import requires a "TemplateEmployee". A template employee is a valid employee that is used as a starting point for adding new employees through the import. A template employee should be in place in the source database before an import can take place. The .template employee is a required column in the .CSV file and should contain the template employee's abbreviation.
Specify How Your .CSV File is Defined
- From your Start menu under Red Wing Software, locate and start the CenterPoint Data Importer.
- In the Type of Import box, select the type of data you want to import into CenterPoint.
After the Type of Import is selected, each data field (column) available to that type of import is listed at the bottom of the CenterPoint Data Importer screen. This information provides you with a description of valid data field (column) values, and lists the data fields that are required..
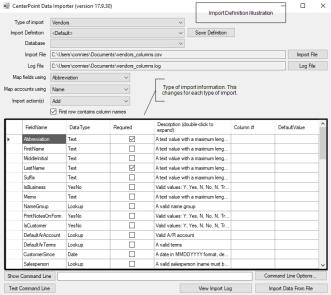
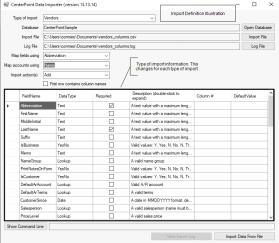
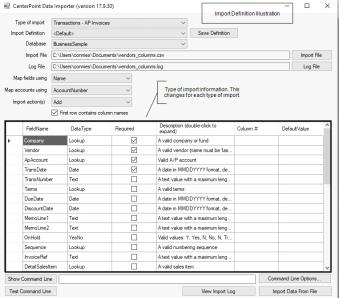
In the Import Definition Illustration, the Type of Import was selected; each data field (column) available to that type of import is listed at the bottom of the CenterPoint Data Importer screen. The Type of Import Information section provides you with:
- FieldName - A description of the valid data field (column). This is the header record definition in your data file.
- DataType - Use this information along with the Description to define the format of the data - Text, Yes No, Lookup, etc. and what values are valid.
- Required - If this box is selected for the data field, the file must include this data field (column).
- Description - Use this information along with the DataType to define the format of the data - Text, Yes No, Lookup, etc. and what values are valid.
- Column # - This information is used to specify which column of your .CSV file contains the information in the FieldName columns. This "maps" the Data Importer Data Field to your user-definable .CSV file column.
- Default Value - This information is used to set a default value for a Data Field to be imported from your .CSV file.
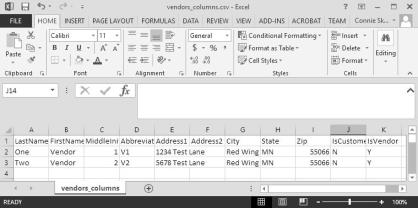
- Use the information in your .CSV file to define the columns in the Type of Import Information to define columns (data fields) for your import. For example, the .CSV file contents below are an example of a .CSV file created for importing Vendor:
- Specify that the first row of the .CSV file contains column names.
- The LastName is in Column#1, FirstName is in Column#2, MiddleInitial is in Column#3, etc.
- The Default Value for the IsVendor column = Y.
- Continue with the Performing the Import section in the Using the CenterPoint Data Importer for Master Files section of this document.
Mapping by Data Field
Mapping by Data Field does not involve any user-definable field mapping from your .CSV file to the Data Importer. When you use this method, your file must include a header record that exactly matches the Data Fields in the Data Importer.
Rules
- The data to be imported must be saved in a comma delimited (.CSV) file.
- The file must include a header record that exactly matches the data fields (columns) from the FieldName list (an example of the list is in the Import Definition Illustration in this section).
- The file must include all the data fields (columns) with (required) after the field definition. For example, for the Type of Import = Vendors the required data field (column) is LastName.
- Employee Import - The employee import requires a "TemplateEmployee". A template employee is a valid employee that is used as a starting point for adding new employees through the import. A template employee should be in place in the source database before an import can take place. The .template employee is a required column in the .CSV file and should contain the template employee's abbreviation.
Define the .CSV File Fields/Columns
- From your Start menu under Red Wing Software, locate and start the CenterPoint Data Importer.
- In the Type of Import box, select the type of data you want to import into CenterPoint.
After the Type of Import is selected, each data field (column) available to that type of import is listed at the bottom of the CenterPoint Data Importer screen. This information provides you with a description of valid data field (column) values, and lists the data fields that are required..
In the Import Definition Illustration, the Type of Import was selected; each data field (column) available to that type of import is listed at the bottom of the CenterPoint Data Importer screen. The Type of Import Information section provides you with:
- FieldName - A description of the valid data field (column). This is the header record definition in your data file.
- DataType - Use this information along with the Description to define the format of the data - Text, Yes No, Lookup, etc. and what values are valid.
- Required - If this box is selected for the data field, the file must include this data field (column).
- Description - Use this information along with the DataType to define the format of the data - Text, Yes No, Lookup, etc. and what values are valid.
- Column # - This information is used with the Mapping by Column type of import, please see the Mapping by Column section of this document.
- Default Value - This information is used with the Mapping by Column type of import, please see the Mapping by Column section of this document.
- Use the Type of Import Information to define columns (data fields) in your .CSV file. For example, the .CSV file contents below are an example of a .CSV file created for importing Vendors.

- Each column includes a header from the FieldName list, for example Abbreviation, FirstName, MiddleInitial, LastName, Address1, Address2, City, State, Zip, IsCustomer, IsVendor etc. are all listed in the FieldName list in the Type of Import Information in the Import Definition Illustration in this section.
- According to the Type of Import Information, the FieldName:
- Abbreviation is not required and can contain text with a maximum length of 10.
- LastName is required and can contain text with a maximum length of 50.
- MiddleInitial is not required and can be left blank.
- Address1/Address2/City are not required, can contain text with a maximum length of 30, and can be left blank.
- Zip is not required, can contain text with a maximum length of 10, and can be left blank.
- IsCustomer is not required and valid values are Y, Yes, N, No, True, False, 1, -1 or 0 (case sensitive).
- IsVendor is not required and valid values are Y, Yes, N, No, True, False, 1, -1 or 0 (case sensitive).
- Save the .CSV file.
- Continue with the Performing the Import section in the Using the CenterPoint Data Importer for Master Files section of this document.
Performing the Import
- From your Start menu under Red Wing Software, locate and start the CenterPoint Data Importer.
- In the Type of Import box, select the type of data you want to import into CenterPoint.
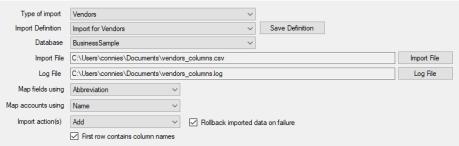
- If you want to use a previously saved import definition, in the Import Definition box, click the down arrow and select the import definition. If you want to save this definition for future imports, click Save Definition, enter the name for the import definition, and click Save As.
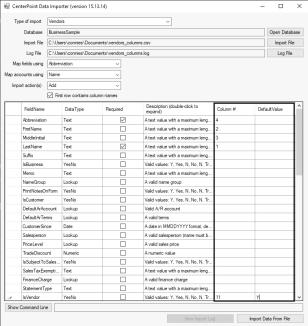
- In the Database box, select the CenterPoint database the information should be imported into. If your database does not show on this list, contact Red Wing Software Technical Support.
- In the Import File box, select the .CSV file that will be used to import the data into CenterPoint.
- In the Log File box, the default location displays, if you want to save the log file to a different location, click Log File, select the new location, and then click Save.
- In the Map Fields Using box, select the data field (column) you want to match the CenterPoint Data Importer field definition with your .CSV data field column header, for example ID (used only for advanced users and developers that know what CenterPoint's internal unique identifier is), Abbreviation or Name. In the example below, the Type of Import selected was Vendors and the match for data fields should be made on Abbreviation. When you choose to Map Fields Using, the entire file must be consistent with this mapping, for example if you choose Abbreviation, you can't use an abbreviation in one column and have a name in another column.
- In the Map Accounts Using box, select the data field (column) to use to map general ledger accounts to the CenterPoint Data Importer field definition with your .CSV data field column header, for example ID (used only for advanced users and developers that know what CenterPoint's internal unique identifier is), Abbreviation, Name or AccountNumber. In the example below, the Type of Import selected was Vendors and the match should be made on Name.
- In the Import Actions box, select Add to add data to the CenterPoint database, select Update to change existing data in the CenterPoint database, or select Both to add and update data in the CenterPoint database. In the example below, the Type of Import selected was Vendors and the data will be added to the Business Sample database.
- A default location will be displayed for the log file that documents the progress of the data import. If you want to change the location, click Log file and select the location on your computer where you want to store the file.
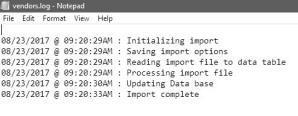
- Click Import Data From File. If your import is successful, an Import Succeeded message displays. To view information about your import, click View Import Log. An example of a successful log file is displayed below.
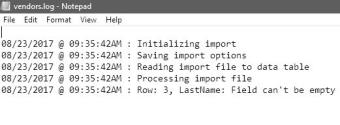
- If your import is not successful, an Import failed - click View Import Log message displays. Click View Import Log. An example of an unsuccessful log is displayed below. In this example, Row 3 in the .CSV file did not contain the LastName which is a required field. The .CSV file would need to be changed to include data in the LastName column in Row 3 and the import process repeated to successfully import this data.
Using the CenterPoint Data Importer for Transactions
Mapping by Column
Mapping by Column allows you to use the Column # in the Data Importer to specify which column of your .CSV file contains the information that corresponds to the FieldName column. This "maps" the Data Importer Data Field to your user-definable .CSV file column. It also allows you to set a value as the Default Value in a Data Field for your import.
Rules
- The data to be imported must be saved in a comma delimited (.CSV) file.
- The file must include all the data fields (columns) with (required) after the field definition. For example, for the Type of Import = Transactions - AP Invoices the required data field (columns) are Company/Fund, Vendor, AP Account, TransDate, and Amount.
- The rows in your file will be assigned to transactions based on the Company/Fund and TransNumber combination. TransNumber is not a required field, if you want to split detail records by transaction number, include the TransNumber data field (column).
Specify How Your .CSV File is Defined
- From your Start menu under Red Wing Software, locate and start the CenterPoint Data Importer.
- In the Type of Import box, select the type of data you want to import into CenterPoint.
After the Type of Import is selected, each data field (column) available to that type of import is listed at the bottom of the CenterPoint Data Importer screen. This information provides you with a description of valid data field (column) values, and lists the data fields that are required..
In the Import Definition Illustration, the Type of Import was selected; each data field (column) available to that type of import is listed at the bottom of the CenterPoint Data Importer screen. The Type of Import Information in the Import Definition Illustration provides you with:
- FieldName - A description of valid data field (column). This is the header record definition in your data file.
- DataType - Use this information along with the Description to define the format of the data - Text, YesNo, Lookup, etc. and what values are valid.
- Required - If this box is selected for the data field, the file must include this data field (column).
- Description - Use this information along with the DataType to define the format of the data - Text, YesNo, Lookup, etc. and what values are valid.
- Column # - This information is used to specify which column of your .CSV file contains the information in the FieldName columns. This "maps" the Data Importer Data Field to your user-definable .CSV file column.
- Default Value - This information is used to set a default value for a Data Field to be imported from your .CSV file.
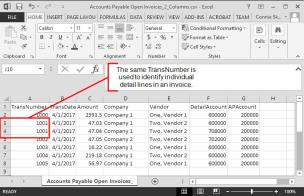
- Use the information in your .CSV file to define the columns in the Type of Import Information to define columns (data fields) for your import. For example, the .CSV file contents below are an example of a .CSV file created for importing Accounts Payable Invoices:
- Specify that the first row of the .CSV file contains column names.
- The TransNumber is in Column#1, TransDate is in Column#2, Amount is in Column#3, etc.
- Continue with the Performing the Import section in the Using the CenterPoint Data Importer for Transactions section of this document.
Mapping by Data Field
Mapping by Data Field does not involve any user-definable field mapping from your .CSV file to the Data Importer. When you use this method, your file must include a header record that exactly matches the Data Fields in the Data Importer.
Rules
- The data to be imported must be saved in a comma delimited (.CSV) file.
- The file must include a header record that exactly matches the data fields (columns) from the FieldName list (an example of the list is in the Import Definition Illustration in this section).
- The file must include all the data fields (columns) with (required) after the field definition. For example, for the Type of Import = Transactions - AP Invoices the required data field (columns) are Company/Fund, Vendor, AP Account, TransDate, and Amount.
- The rows in your file will be assigned to transactions based on the Company/Fund and TransNumber combination. TransNumber is not a required field, if you want to split detail records by transaction number, include the TransNumber data field (column).
Define the .CSV File Fields/Columns
- From your Start menu under Red Wing Software, locate and start the CenterPoint Data Importer.
- In the Type of Import box, select the type of data you want to import into CenterPoint.
After the Type of Import is selected, each data field (column) available to that type of import is listed at the bottom of the CenterPoint Data Importer screen. This information provides you with a description of valid data field (column) values, lists the data fields that are required, and determines which data fields can be left empty.
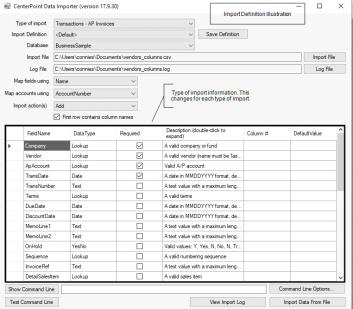
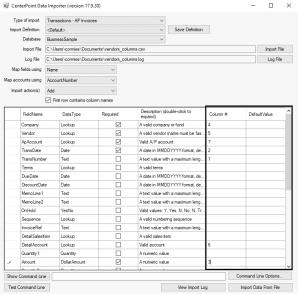
In the Import Definition Illustration, the Type of Import was selected; each data field (column) available to that type of import is listed at the bottom of the CenterPoint Data Importer screen. The Type of Import Information in the Import Definition Illustration provides you with:
- FieldName - A description of valid data field (column). This is the header record definition in your data file.
- DataType - Use this information along with the Description to define the format of the data - Text, YesNo, Lookup, etc. and what values are valid.
- Required - If this box is selected for the data field, the file must include this data field (column).
- CanBeEmpty - If this box is selected for the data field, the data field (column) in your file can be left blank. If a required field can also be left blank, a default value will be assigned.
- Description - Use this information along with the DataType to define the format of the data - Text, YesNo, Lookup, etc. and what values are valid.
- Column # - This information is used with the Mapping by Column type of import, please see the Mapping by Column section of this document.
- Default Value - This information is used with the Mapping by Column type of import, please see the Mapping by Column section of this document.
- Use the Type of Import Information to define columns (data fields) in your .CSV file. For example, the .CSV file contents below are an example of the .CSV file created for importing Accounts Payable Invoices.
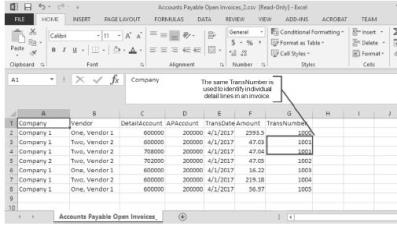
- Each column includes a header from the FieldName list, for example Company/Fund, Vendor, DetailAccount, APAccount, TransDate, Amount, TransNumber, etc. are all listed in the FieldName column from the Type of Import Information in the Import Definition Illustration in this section.
- According to the Type of Import Information, the FieldName:
- Company/Fund is required and is a lookup for a valid company or fund.
- Vendor is required and is a lookup for a valid vendor (name be 'last, first').
- DetailAccount is not required, is a lookup for a valid account, and can be left blank.
- AP Account is required and is a lookup for a valid A/P account.
- TransDate is required and contains a date in the MMDDYYYY format (delimiters optional).
- Amount is required and is a numeric value.
- TransNumber is not required, can be left empty, and can be text with a maximum length of 20. If there are multiple detail lines in the invoice, include the same number for each detail line.
- Save the .CSV file.
- Continue with the Performing the Import section in the Using the CenterPoint Data Importer for Transactions section of this document.
Performing the Import
- From your Start menu under Red Wing Software, locate and start the CenterPoint Data Importer.
- In the Type of Import box, select the type of data you want to import into CenterPoint.
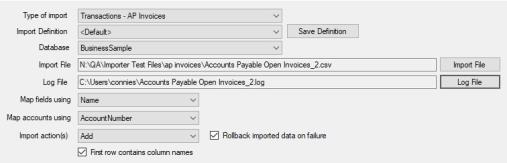
- If you want to use a previously saved import definition, in the Import Definition box, click the down arrow and select the import definition. If you want to save this definition for future imports, click Save Definition, enter the name for the import definition, and click Save As.
- In the Database box, select the CenterPoint database the information should be imported into. If your database does not show on this list, contact Red Wing Software Technical Support.
- In the Import File box, select the .CSV file that will be used to import the data into CenterPoint.
- In the Log File box, the default location displays, if you want to save the log file to a different location, click Log File, select the new location, and then click Save.
- In the Map Fields Using box, select the data field (column) you want to match the CenterPoint Data Importer field definition with your .CSV data field column header, for example ID (used only for advanced users and developers that know what CenterPoint's internal unique identifier is), Abbreviation, or Name. In the example below, the Type of Import selected was Transactions - AP Invoices and the match for data fields should be made on Name. When you choose to Map Fields Using, the entire file must be consistent with this mapping, for example if you choose Abbreviation, you can't use an abbreviation in one column and have a name in another column.
- In the Map Accounts Using box, select the data field (column) to use to map general ledger accounts to the CenterPoint Data Importer field definition with your .CSV data field column header, for example ID (used only for advanced users and developers that know what CenterPoint's internal unique identifier is), Number, Abbreviation, Name, or AccountNumber. In the example below, the Type of Import selected was Transactions - AP Invoices and the match should be made on AccountNumber.
- In the Import Actions box, select Add if it is not selected for you. In the example below, the Type of Import selected was Transactions - AP Invoices and the data will be added to the Business Sample database.
- A default location will be displayed for the log file that documents the progress of the data import. If you want to change the location, click Log file and select the location on your computer where you want to store the file.
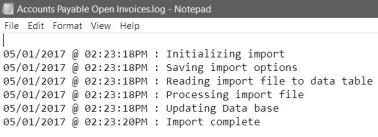
- Click Import Data From File. If your import is successful, an Import Succeeded message displays. To view information about your import, click View Import Log. An example of a successful log file is displayed below.
- If your import is not successful, an Import failed - click View Import Log message displays. Click View Import Log. A description will display informing you about why the import failed. The .CSV file would need to be changed to include or change the data and the import process repeated to successfully import this data.
|
Document: 3311 |
|---|