CenterPoint® Payroll
- Advanced Earnings Matrix
Related Help
_24.jpg) Pay Defaults Video - Duration: 7 min 21 sec
Pay Defaults Video - Duration: 7 min 21 sec
 View or Print as PDF
The Advanced Earnings Matrix allows you to track and pay employees in a variety of ways without the need to create a long list of custom earnings. This is especially necessary for companies such as hospitals and fitness facilities where employees work at different pay rates for shifts, departments, locations, profit centers, etc. You can set up parameters (tracking mechanisms) for each of the variables needed within a grid for each employee. The tracking mechanisms are called default earning rates and you choose the default earning rates you wish to track. The Advanced Earnings Matrix includes the Detailed Earnings Time Sheet that allows employee time to be entered securely and confidentially without the entering party seeing the employee pay.
Assign the Default Earning Rates
Assign the Default Earning Rates
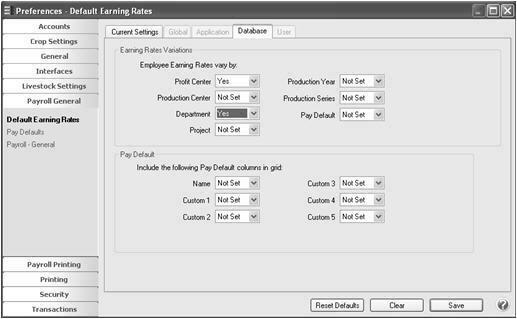
- Select File > Preferences > Payroll > Advanced Earnings Matrix.
- Click the Database tab.
- Under Employee Earning Rates, change the earning rates you want to track to Yes. In the example below, we will have different rates by profit center and department for the employee. If you choose to track pay defaults by including pay defaults, under Pay Defaults, select the custom columns that define information related to a selected Pay Default, and then follow the Pay Defaults Preference section below..
- Click Save.
Pay Defaults Preference
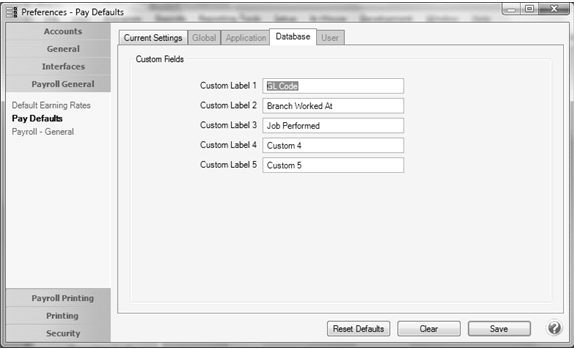
The Pay Defaults preference allows you to set the labels to be used for the five custom fields available to a Pay Default. These labels will be displayed when you modify the custom fields in the Setup > Payroll Details > Pay Defaults > Custom Fields Tab which allows you to enter up-to five custom pieces of information associated with the Pay Default item and can be added as a column on the . The labels can also be displayed by adding the Custom 1 - 5 columns to Setup > Payroll Details > Pay Defaults and can be added to the Processes > Time Sheets > Detail button > Pay Default lookup. Each field can hold up-to 50 characters. Labels for each field come from and can be configured in this preference.
Assign Default Earning Rates by Employee and Employer
- Select Setup > Payroll Details > Default Earning Rates.
- In the Employee box, select the employee you want to set default earning rates for.
- In the Employer box, select the employer the default earning rate applies to.
- The columns that display on the left side of the screen are dependent on the items you chose to track in the Advanced Earnings Matrix preference. In the example below, the default earning rates will be entered by Profit Center and Department.
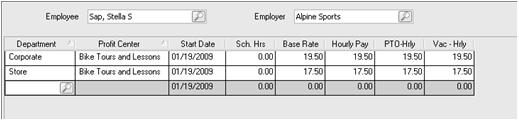
- Enter the different variables for each employee, for example the employee in this example is paid a different rate when they work in the Corporate department for the Bike Tour and Lessons profit center than when they work in the Store department.
- When all earning rate variables for an employee are entered, click Save.
- You can verify this setup by printing the Default Earning Rates report from Reports > Payroll Setup Lists > Employees > Default Earning Rates. You can add the Start Date and Scheduled Hours columns to the report when it is Previewed by clicking the Columns tab.
Default Earning Rates Time Sheet
If you setup default earning rates for your employees and you do not want the person entering the time to see the employee pay rate during time entry (often if the time entry person is not actually processing the payroll, they are just entering the time), use the Default Earning Rates Time Sheet.
- Select Processes > Default Earning Rates Time Sheets.
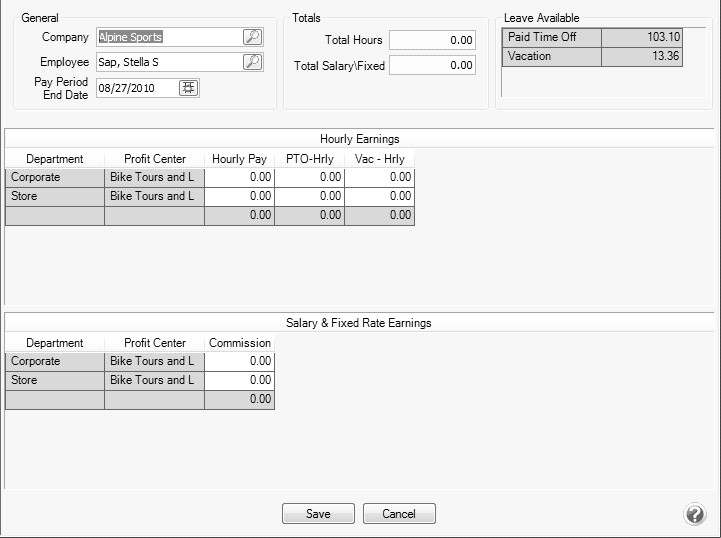
- Select the employer, pay period ending date, and employee.
- The columns that display on the left side of the screen are dependent on the items you chose to track in the Advanced Earnings Matrix preference.
- In the Hourly Pay, PTO-Hourly, or Vac- Hrly columns, enter the number of hours that are applicable.
- For salary or fixed rate earnings, enter any Commissions or Pay Advances that are applicable.
- Verify the Leave Available grid. The grid displays one row for each active paid leave item associated with the selected employee, including how much of that leave is available for use. The available leave is for reference purposes only and does not adjust itself to reflect any leave hours entered into the Hourly Earnings or Salary & Fixed Earnings grids.
- Click Save.
- Repeat for all employees.
- In Processes > Pay Employees, select the employees, and then click Import Time Sheets to use the time sheets in the payroll.
|
Document: 3426 |
|---|