CenterPoint® Payroll
- Affordable Care Act (ACA) Forms - Prepare and Print and/or eFile
Related Help
_24.jpg) ACA Forms for CenterPoint Payroll Video (Part 1) - Duration: 13 min 23 sec
ACA Forms for CenterPoint Payroll Video (Part 1) - Duration: 13 min 23 sec
ACA Forms for CenterPoint Payroll Video (Part 2) - Duration: 7 min 15 sec
 View or Print as PDF
The instructions in this document include the information necessary to set up CenterPoint Payroll in order to process Forms 1094-C and 1095-C.
Step A - Set the Employer ACA Specifics
For detailed information about the Affordable Care Act, see the following publications:
Publication 5208 Affordable Care Act: Are you an applicable large employer?
Q & A on Employer Shared Responsibility Mandate
Q & A on Information Reporting Mandate
Affordable Care Act Mandates for Employers
Q & A on Affordable Care Act Mandates
1094-C and 1095-C Instructions
Step A - Set the Employer ACA Specifics
- Select Setup > Employers.
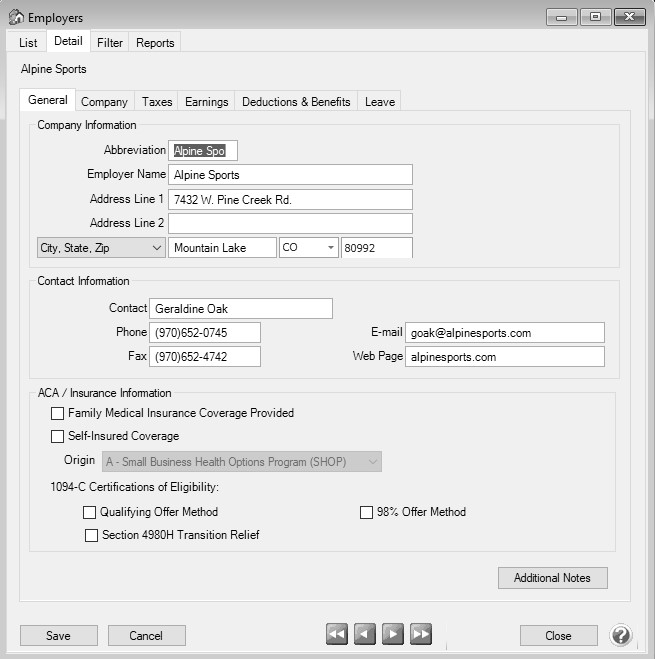
- Select your employer and click Edit.
- Under ACA/Insurance Information, select the Family Medical Insurance Provided checkbox if family medical insurance is provided by the employer.
- This step should only be completed if you are self-insuring your employees with your own health insurance and not insuring your employees through an insurance company. If you do not self-insure your employees, skip to Step 6. Under ACA information, on the bottom of the General tab, select the Self-Insured Coverage check box. When this check box is selected, the Part III Employer Provided Self-Insured check box will be marked on the 1095-C Transmittal form.
- If you selected the Self-Insured Coverage check box, in the Origin box, select the code that will display for the Origin on the 1095-B. The options are:
A - Small Business Health Options Program (SHOP).
B - Employer-sponsored coverage.
C - Government-sponsored program.
D - Individual market insurance.
E - Multi-employer plan.
F - Other designated minimum essential coverage.
G -Individual Coverage HRA (Health Reimbursement Arrangement)
- Under 1094-C Certifications of Eligibility, select the appropriate boxes:
- Qualifying Offer Method - Check this box if the employer is eligible to use and is using the Qualifying Offer Method to report the information on Form 1095-C for one or more full-time employees. To be eligible to use the Qualifying Offer Method for reporting, the employer must certify that it made a Qualifying Offer to one or more of its full-time employees for all months during the year in which the employee was a full-time employee for whom an employer shared responsibility payment could apply.
- Section 4980H Transition Relief - Check this box if the employer is eligible for section 4980H Transition Relief under either:
2015 Section 4980H Transition Relief for ALEs with Fewer Than 100 Full-Time Employees, Including Full-Time Equivalent Employees (50-99 Transition Relief), or
2015 Transition Relief for Calculation of Assessable Payments Under Section 4980H(a) for ALEs with 100 or More Full-Time Employees, Including Full-Time Equivalent Employees (100 or More Transition Relief).
- 98% Offer Method - Check this box if the employer is eligible for and is using the 98% Offer Method. To be eligible to use the 98% Offer Method, an employer must certify that taking into account all months during which the individuals were employees of the employer and were not in a Limited Non-Assessment Period, the employer offered, affordable health coverage providing minimum value to at least 98% of its employees for whom it is filing a Form 1095-C employee statement, and offered minimum essential coverage to those employees’ dependents.
- Click Save.
- Click Close.
Step B - Set your Employee ACA Information
- Select Setup > Employees.
- Select an employee and click Edit.
- Select the Payroll tab.
- Select the Consent to Electronic 1095 if this employee consents to not receive a paper 1095 form and to only receive the 1095 electronically to be viewed electronically through Aatrix. If this box is selected, a signed consent form must be on file. This form can be printed from Federal & State Payroll Forms & Reports > Federal Tax Forms and selecting Electronic 1095 Consent in the Report box.
- Select the ACA Information tab.
- Select the Employer this employee is associated with for reporting on the 1094-C and 1095-C.
- Select the Plan Start Month. This setting will update the Plan Start Month in the Employee Contact Information screen in the 1094/1095 Preparer when processing the 1095-C.
- Click Add.

- Select the New Coverage Period's Year and Month.
- Click OK.
- Select the Status. The options are Full-Time, Part-Time or Not Employed.
- Select the Offer coverage code. This code will be used for Line 14 on the 1095-C .
Not Applicable (No Form): Select this option if you want an employee to be included in the ACA counts, but excluded from printing a 1095 form, for example for part-time employees.
- 1A - Qualifying Offer: Minimum essential coverage providing minimum value offered to full-time employee with employee contribution for self-only coverage equal to or less than 9.5% mainland single federal poverty line and at least minimum essential coverage offered to spouse and dependent(s).
1B - Minimum Essential Coverage (Employee Only): Minimum essential coverage providing minimum value offered to employee only.
1C - Minimum Essential Coverage (Dependents Not Spouse) - Minimum essential coverage providing minimum value offered to employee and at least minimum essential coverage offered to dependent(s) (not spouse).
1D. - Minimum Essential Coverage (Spouse Not Dependents) - Minimum essential coverage providing minimum value offered to employee and at least minimum essential coverage offered to spouse (not dependent(s).
1E - Minimum Essential Coverage (Dependents & Spouse) - Minimum essential coverage providing minimum value offered to employee and at least minimum essential coverage offered to dependent(s) and spouse.
1F - Minimum Essential Coverage NOT Providing Minimum Value - Minimum essential coverage not providing minimum value offered to employee, or employee and spouse or dependent(s), or employee, spouse and dependents.
1G - Offer of Coverage (Not Full-Time) - Offer of coverage to employee who was not a full-time employee for any month of the calendar year and who enrolled in self-insured coverage for one or more months of the calendar year.
1H - No Offer of Coverage - The employee was not offered any health coverage or employee offered coverage that is not minimum essential coverage.
1J - Minimum Essential Coverage (Conditionally Spouse, NOT Dependents) - Essential coverage providing minimum value offered to you; minimum essential coverage conditionally offered to your spouse' and minimum essential coverage NOT offered to your dependent(s)
1K - Minimum Essential Coverage (Conditionally Spouse & Dependents) - Essential coverage providing minimum value offered to you; minimum essential coverage conditionally offered to your spouse; and minimum essential coverage offered to your dependent(s).
1L - Individual Coverage HRA (Employee only) with affordability determined by primary residence ZIP code - Individual coverage HRA offered to employee only with affordability determined by using employee’s primary residence location ZIP code.
1M - Individual Coverage HRA (Employee & Dependents, not Spouse) with affordability determined by primary residence ZIP code - Individual coverage HRA offered to employee and dependent(s) (not spouse) with affordability determined by using employee's primary residence location ZIP code.
1N - Individual Coverage HRA (Employee, Spouse & Dependents) with affordability determined by primary residence ZIP code - Individual coverage HRA offered to employee, spouse, and dependent(s) with affordability determined by using employee’s primary residence location ZIP code.
1O - Individual Coverage HRA (Employee only) using primary employment ZIP code affordability safe harbor - Individual coverage HRA offered to employees only using the employee’s primary employment site ZIP code affordability safe harbor.
1P - Individual Coverage HRA (Employee & Dependents, not Spouse) using primary employment ZIP code affordability safe harbor - Individual coverage HRA offered to employee and dependent(s) (not spouse) using the employee’s primary employment site ZIP code affordability safe harbor.
1Q - Individual Coverage HRA (Employee, Spouse & Dependents) using primary employment ZIP code affordability safe harbor - Individual coverage HRA offered to employee, spouse, and dependent(s) using employee’s primary employment site ZIP code affordability safe harbor.
1R - Individual Coverage HRA that is NOT affordable - Individual coverage HRA that is NOT affordable offered to employee; employee and spouse, or dependent(s); or employee, spouse and dependents.
1S - Individual Coverage HRA (Not Full-Time) - Individual coverage HRA offered to an individual who was not a full-time employee.
1T - Individual Coverage HRA (Employee & Spouse, No Dependents)with affordability determined by primary residence ZIP code.
1U - Individual coverage HRA (Employee & Spouse, No Dependents) using primary employment ZIP code affordability safe harbor.
1I - Qualifiying Offer Transition Relief (2015 Only)
- Enter the Employee Share of Lowest-Cost Monthly Premium if you selected 1B, 1C, 1D or 1E in the Offer field. This amount is used for Line 15 of the 1095-C. Enter the amount of the employee share of the lowest-cost monthly premium for self-only minimum essential coverage providing minimum value that is offered to the employee (this amount may not be the amount the employee is paying for the coverage, for example, if the employee chose to enroll in more expensive coverage such as family coverage or if two plans were offered and the employee chose the higher cost plan).
-
Select a Section 4980H Safe Harbor Code if one of the following situations applied to the employee (this is an optional field, but should be selected if any of the situations listed below apply to the employee). In some circumstances more than one situation could apply to the same employee in the same month. For example, an employee could be enrolled in health coverage for a particular month during which he or she is not a full-time employee. However, only one code may be used for a particular calendar month. For any month in which an employee enrolled in minimum essential coverage, indicator code 2C reporting enrollment is used instead of any other indicator code that could also apply. For an employee who did not enroll in health coverage, there are some specific ordering rules for which code to use; see the descriptions of the codes below.
2A - Employee Not Employed - Select code 2A if the employee was not employed on any day of the calendar month. Do not use code 2A for a month if the individual was an employee of the employer on any day of the calendar month. Do not use code 2A for the month during which an employee terminates employment with the employer.
2B - Employee not Full-time - Select code 2B if the employee is not a full-time employee for the month and did not enroll in minimum essential coverage, if offered for the month. Enter code 2B also if the employee is a full-time employee for the month and whose offer of coverage (or coverage if the employee was enrolled) ended before the last day of the month solely because the employee terminated employment during the month (so that the offer of coverage or coverage would have continued if the employee had not terminated employment during the month). Also use this code for January 2015 if the employee was offered health coverage no later than the first day of the first payroll period that begins in January 2015 and the coverage offered was affordable for purposes of the employer shared responsibility provisions under section 4980H and provided minimum value.
2C - Employee Enrolled in Coverage Offered - Select code 2C for any month in which the employee enrolled in health coverage offered by the employer for each day of the month, regardless of whether any other code in Code Series 2 might also apply (for example, the code for a section 4980H affordability safe harbor).
2D - Employee in Section 4980H(b) - Select code 2D for any month during which an employee is in a Limited Non-Assessment Period for section 4980H(b). If an employee is in an initial measurement period, enter code 2D (employee in a section 4980H(b) Limited Non-Assessment Period) for the month, and not code 2B (employee not a full-time employee). For an employee in a section 4980H(b) Limited Non-Assessment Period for whom the employer is also eligible for the multi-employer interim rule relief for the month code 2E, enter code 2E (multi-employer interim rule relief) and not code 2D (employee in a Limited Non-Assessment Period).
2E - Multi-employer Interim Rule Relief - Select code 2E for any month for which the multi-employer interim guidance applies for that employee. This relief is described under Offer of Health Coverage definition on the IRS website at http://www.irs.gov/instructions/i109495c/ar01.html#d0e655.
Note for Codes 2F through 2H: Although employers may use the section 4980H affordability safe harbors to determine affordability for purposes of the multi-employer interim guidance, an employer eligible for the relief provided in the multi-employer interim guidance for a month for an employee should enter code 2E (multiemployer interim rule relief), and not a code for the section 4980H affordability safe harbors (codes 2F, 2G, or 2H.2F - Section 4980H - Form W-2 - Select code 2F if the employer used the section 4980H Form W-2 safe harbor to determine affordability for purposes of section 4980H(b) for this employee for the year. If an employer uses this safe harbor for an employee, it must be used for all months of the calendar year for which the employee is offered health coverage.
2G - Section 4980H - Federal Poverty Line - Select code 2G if the employer used the section 4980H federal poverty line safe harbor to determine affordability for purposes of section 4980H(b) for this employee for any month(s).
2H - Section 4980H - Rate of Pay - Select code 2H if the employer used the section 4980H rate of pay safe harbor to determine affordability for purposes of section 4980H(b) for this employee for any month(s).
2I - Non-calendar Year Transition Relief(2015 Only) -Select code 2I if non-calendar year transition relief for section 4980H(b) applies to this employee for the month. See the instructions at http://www.irs.gov/instructions/i109495c/ar01.html#d0e655under Section 4980H Transition Relief for 2015 and 2015 Section 4980H(b) Transition Relief for Employers with Non-Calendar Year Plans (Form 1095-C, line 16, code 2I), for a description of this relief. This code was valid for 2015 only.
- The Dependents section is used for Lines 17-22 on the 1095-C.
- Repeat Steps 8-10 for each coverage period for this employee.
- Click Save.
- Repeat Steps 1-16 for all employees.
Note: You can add a new coverage period to multiple employees by selecting Setup > Employees > Mass Update > ACA > Add New Coverage Period and then selecting a start month and year. You can also update the Status, Offer, Employee Share of Lowest Cost Monthly Premium, or Section 4980H Safe Harbor Code for the latest coverage period for multiple employees by selecting Setup > Employees > Mass Update > ACA Latest Coverage Period.
- You can print the Employee ACA Setup report from Reports > Reports > Payroll Setup Lists > Employees > Employee ACA Setup to list the employee ACA setup information. By default, the report will show employees that are not set up with ACA. To add ACA information for an employee, edit the employee (s) and select the ACA Information tab. To show employees that are set up, change the ACA Setup filter to Yes.
Step C - Print the ACA Forms
- Select Reports > Federal & State Payroll Forms & Reports > Federal Tax Forms.
Forms Update
If you have internet access and the latest version of Federal/State Tax Forms (Aatrix) is not installed, the following Aatrix Update screen will display when you select the menu selection above.
- If you want to immediately install the update, click Yes and follow the on screen instructions. A progress bar will display as the update continues.

- If you do not want to immediately install the update and continue processing without the required update, click No.
- The Federal Tax Forms screen will display.
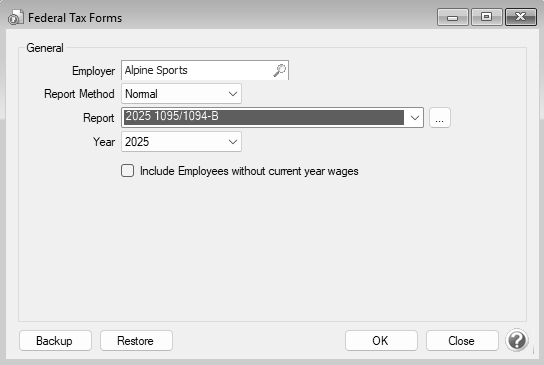
- Select the Employer you want to print the 1095-C for.
- Select Normal in the Report Method. History is used to view or edit a previously saved form.
- In the Report field, select either 2025 1095/1094-C or 20251095/1094-B. For information about the Affordable Care Act reporting forms and what the differences are between the forms, see the Frequently Asked Questions section of this document, contact your tax preparer or accountant, or use the links above provided by the IRS
- You may be prompted with the following Microsoft® Redistributables screen if you have not previously installed the technology pieces required to prepare/print/efile ACA forms.
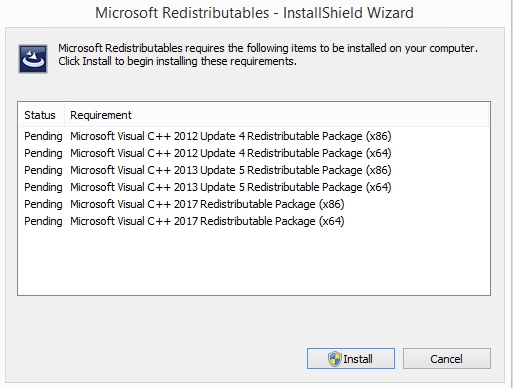
- If this Microsoft Redistributables screen displays, click Install.
- On the Welcome screen, click Next.
- On the Ready to Install the Program screen, click Install.
- On the Completed screen, click Finish.
- Select 2025 in the Year field.
- Select the Include employees without current year wages check box if you want to prepare ACA forms for employees you are not currently paying, for example retired employees or employees using cobra benefits.
- Click OK. It may take several minutes for the payroll data to be transferred to the printing process. Actual time will depend on the number of employees in your database.
Forms Update
If you have internet access and the latest version of Federal/State Tax Forms (Aatrix) is not installed, the following Forms Update screen will automatically be displayed when you select the menu selection above. Simply click on Automatic Update and follow the on screen instructions.

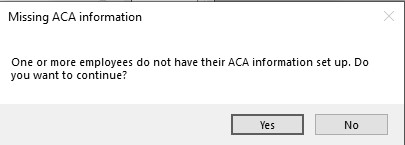
- If employees are found to be missing ACA information (coverage period) setup for the year you will receive a message asking if you want to continue, if you select Yes, the employees will print, but will not have any of the ACA-specific information generated.
-
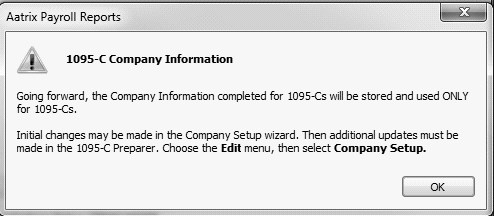
The 1095-C or 1095-B Company Information screen displays to remind you that changes are stored only for 1095s and if needed to change Company Information from Edit > Company Setup in the 1095 Preparer in Aatrix. Click OK.
-
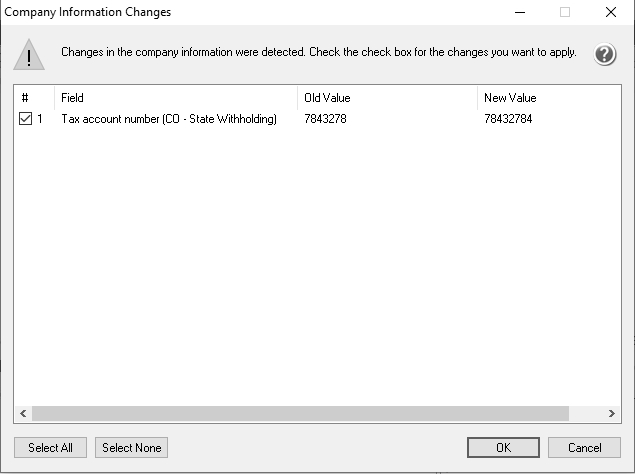
If changes have been made in CenterPoint Payroll that affect the information used on the ACA forms, the screen below displays indicating that changes were detected in the company information. Choose to either accept or reject these changes. To accept only certain changes, use the check box provided to indicate which changes to apply. Any changes that are accepted will overwrite the current data stored in the Company Setup Wizard. The Company Setup Wizard will display to allow you to review the new data updates.
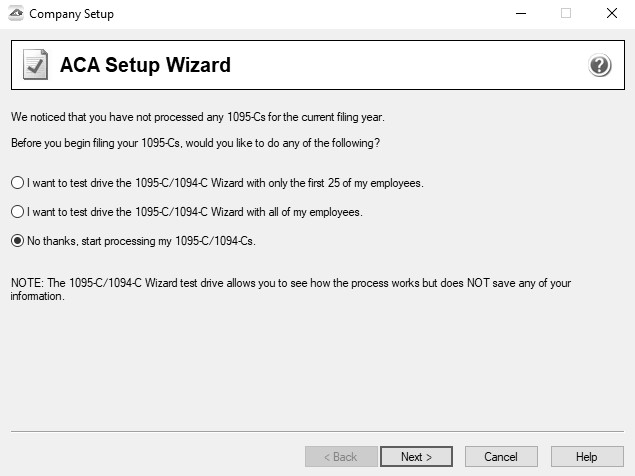
- If this is the first time 1095s are being processed this year, the ACA Setup Wizard will automatically be displayed. The wizard will guide you through the process of verifying data and efiling or printing year end forms. Select No thanks, start processing my 1095/1094s, then click Next.
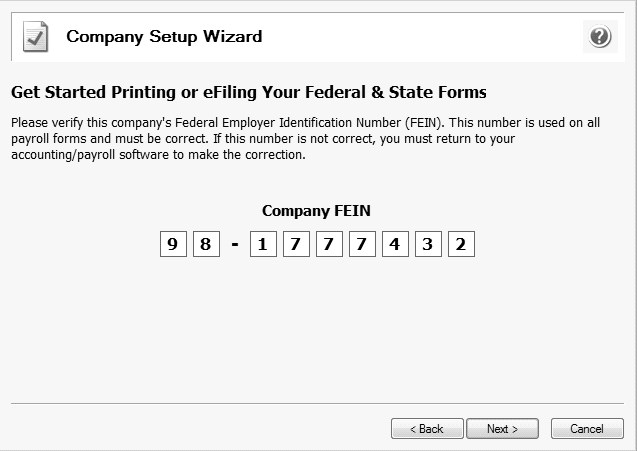
- The Taxpayer Identification Number for this company is displayed. If it's correct, click Next. If it's incorrect, click Cancel. You will need to go back into your program
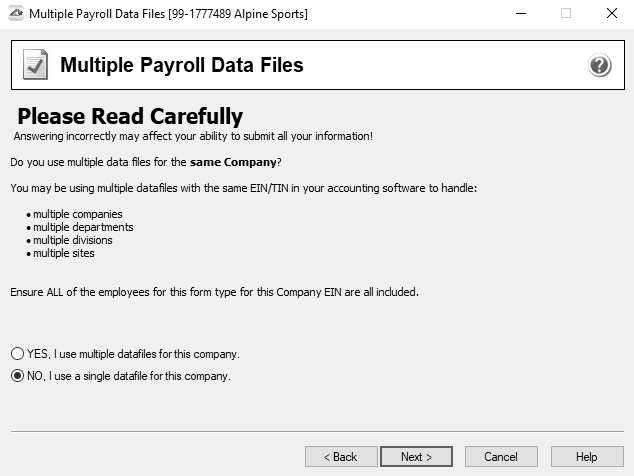
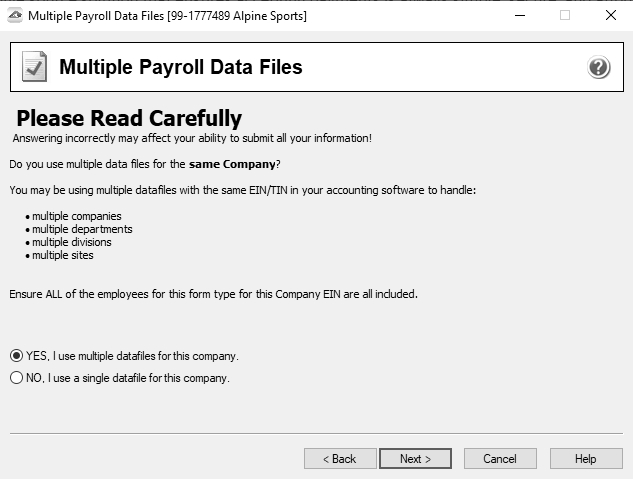
- The Multiple Payroll Data Files option will be displayed. Select Yes if you have multiple payroll data files with the same Company and see the Frequently Asked Questions section in this document for more information. Otherwise select No and click Next.
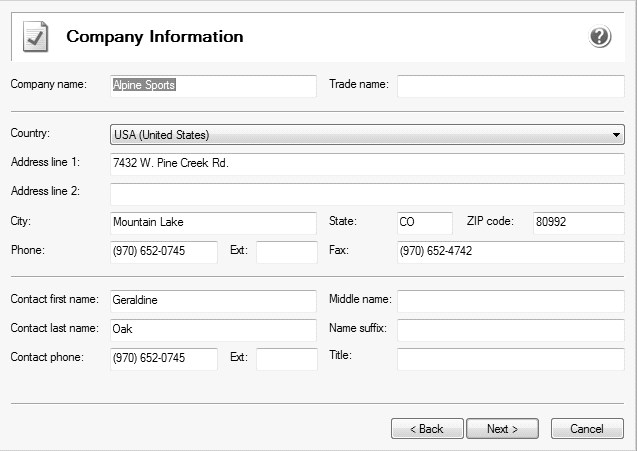
- Review your Company Information. The system will notify you if any required fields have incorrect or missing information. Click Next
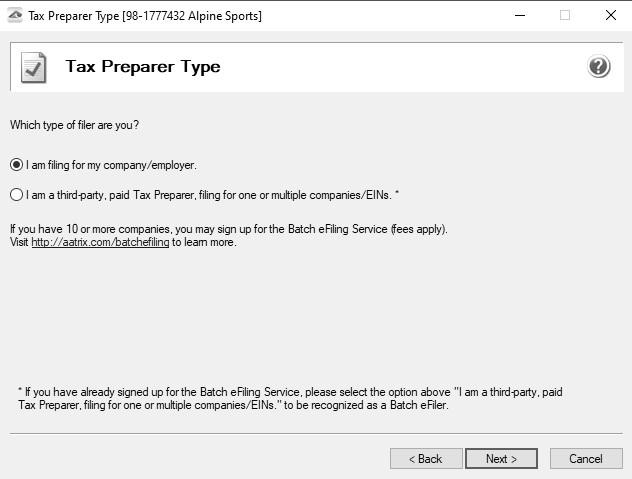
- Specify the correct Tax Preparer Type.If you are a third-party tax preparer, you will then be prompted for your information. If you have Yes selected in the Use Preparer information setting in File > Preferences > Federal/State Tax Forms > Preparer/Designee, the paid preparer information will automatically display. Otherwise, enter the information and then click Next.
- If you are a 3rd party tax preparer, you will then be prompted for your information. If you have Preparer Information (Optional) entered and Yes selected in the Use Preparer information setting in File > Preferences > Reports > Federal Tax Forms, the paid preparer information will automatically display. Otherwise, enter the information and then click Next.

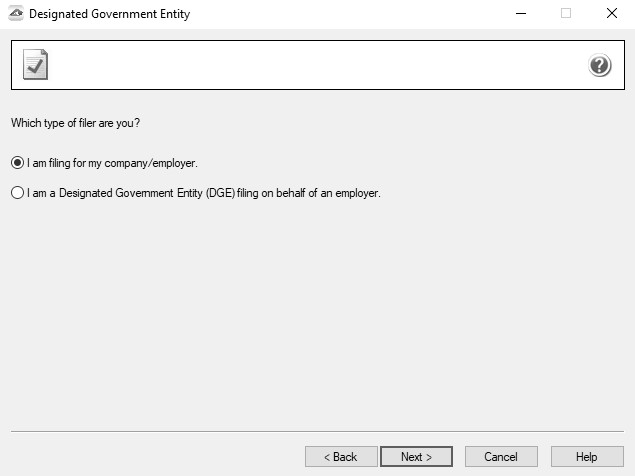
- Specify the correct Designated Government Entity type. After making the selection, click Next.
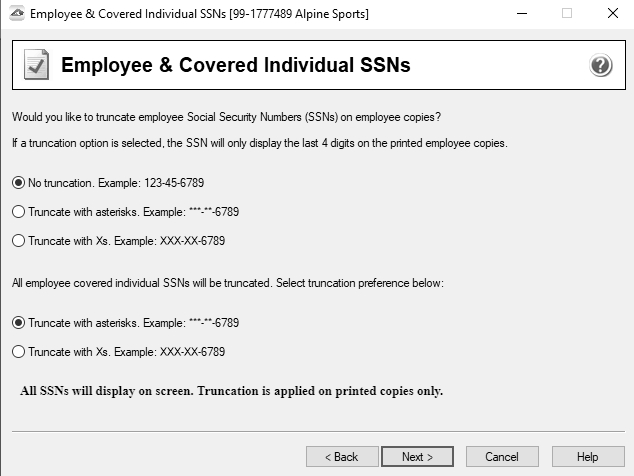
- The Employee & Covered Individual SSNs screen displays, determine if you want to truncate employee and covered individual social security numbers and how the truncation should appear, with asterisks or X's and then click Next.
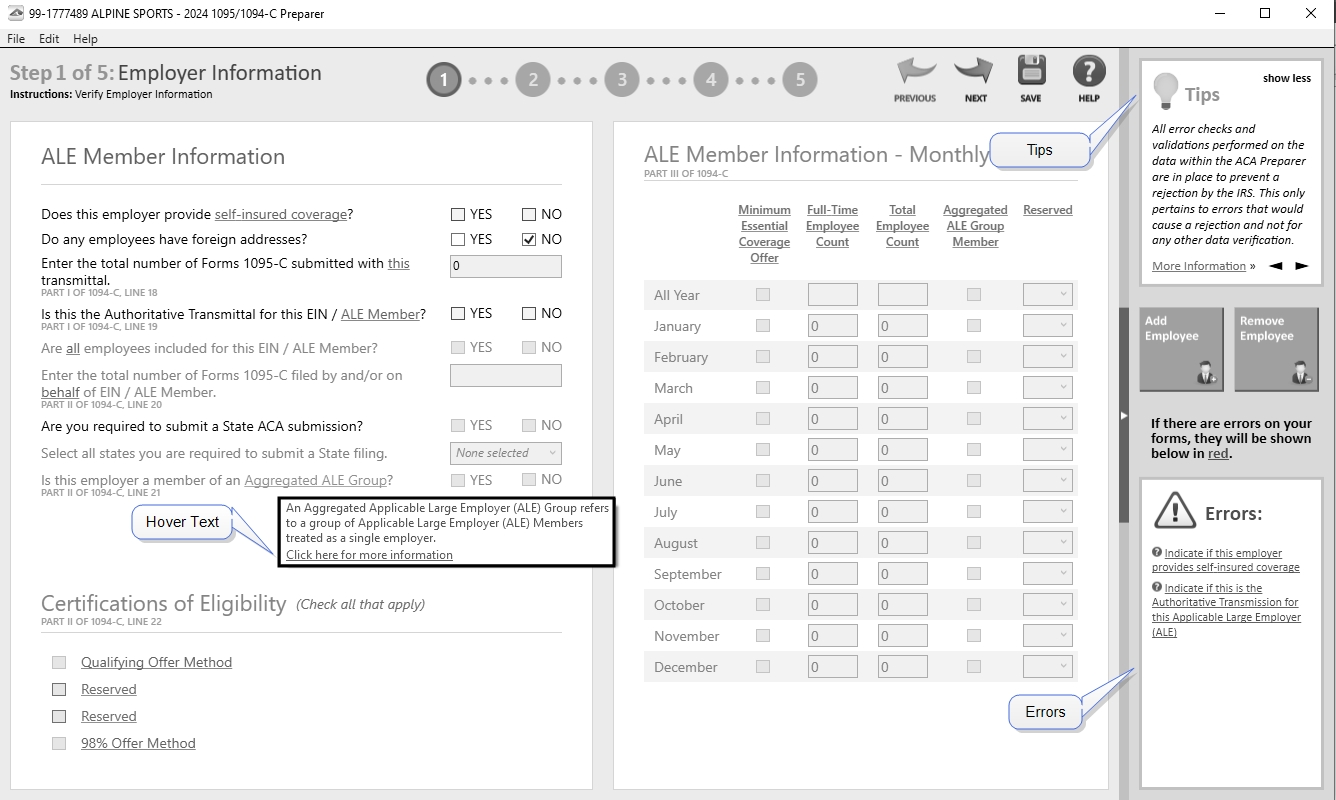
- The Employer Information screen displays. Review and update the ALE Member Information, Certifications of Eligibility, and ALE Member Information - Monthly sections accordingly and click Next.
Note: This screen does not display for 1094/1095-Bs.
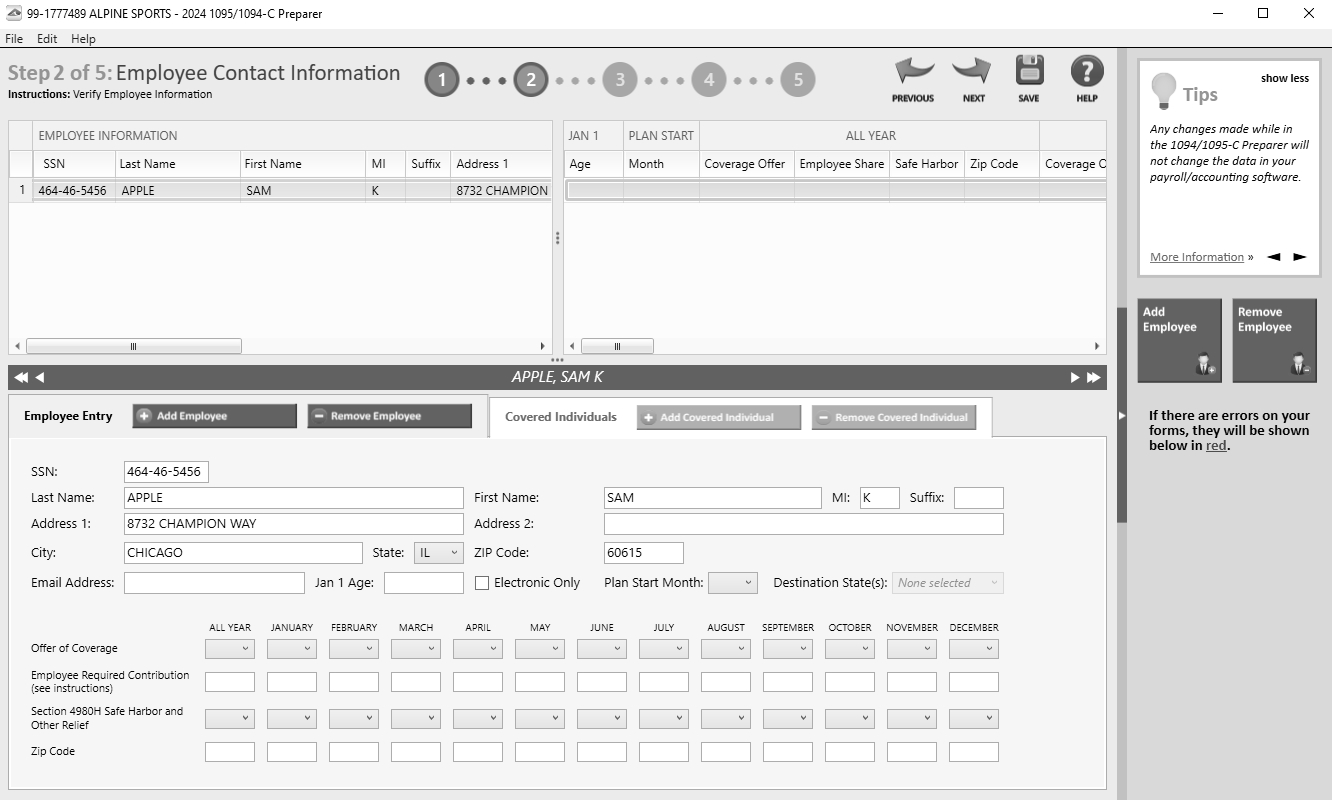
- The Employee Contact Information screen displays. Review and update any of the employee information, and then click Next. The screen is split into two sections the top displays all of the employees and the bottom displays the selected employee.
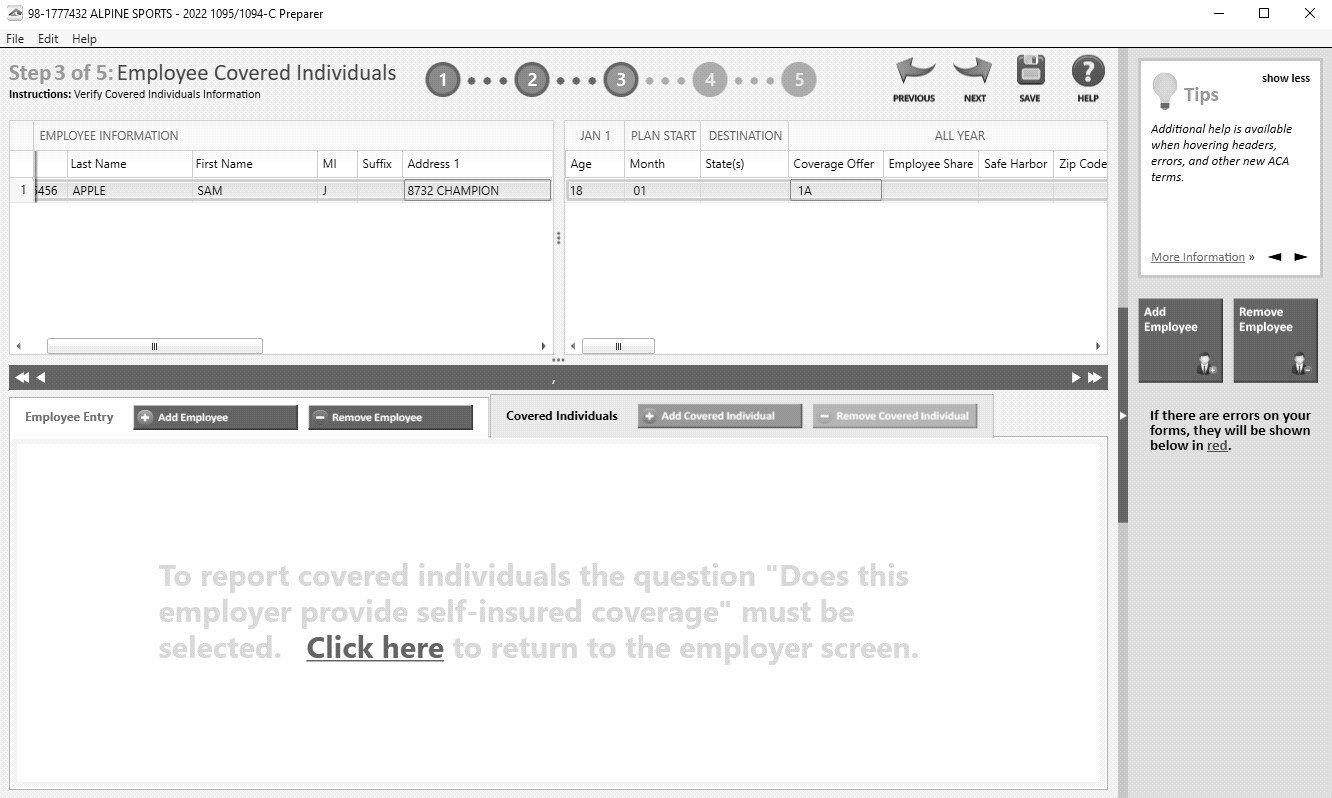
- The Employee Covered Individuals screen displays. This screen only applies if the employer provided self-insured coverage. Click Next if you did not provide self-insured coverage. If this screen applies to you and you did not select that you provide self-insured coverage, click the link to return to the employer screen or if you provide self-insured coverage and need to add covered individuals, click the Add Covered Individuals button.
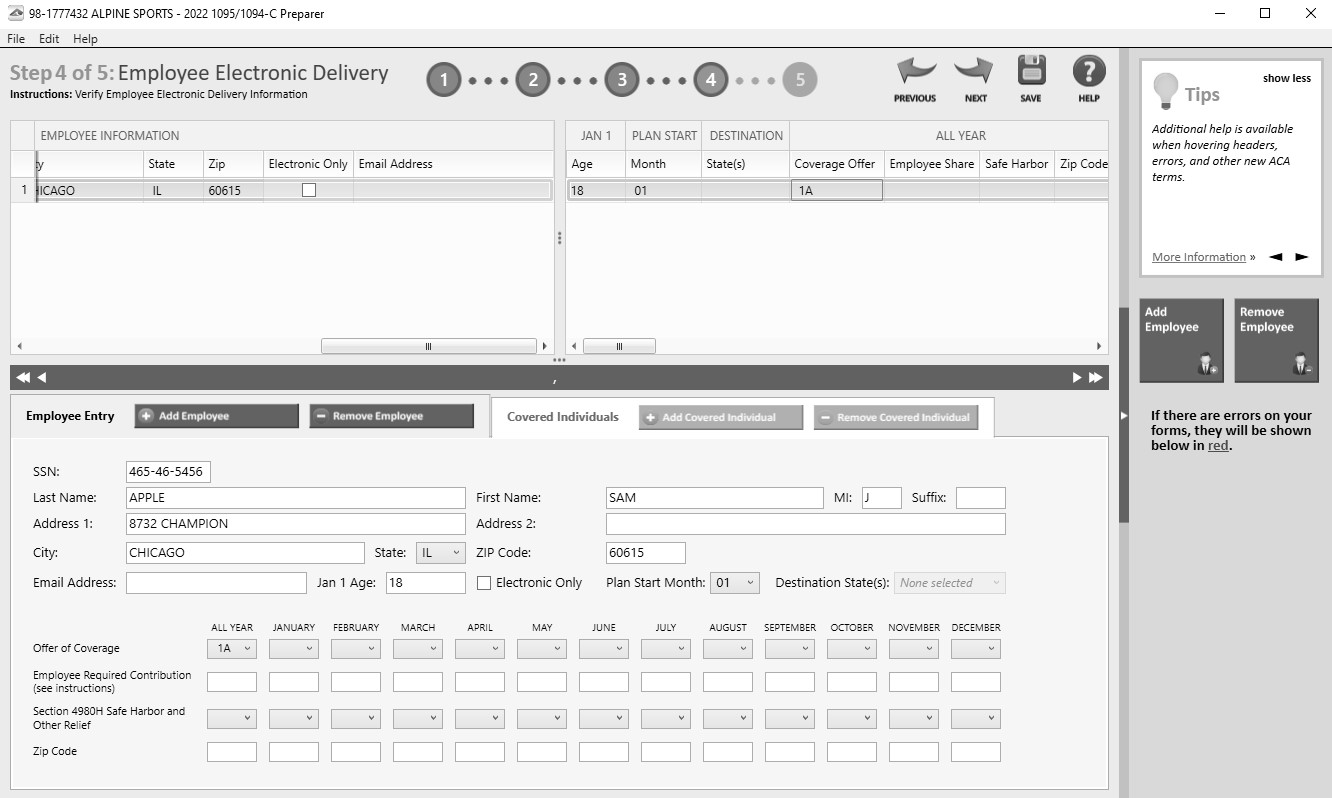
- The Employee Electronic Delivery screen displays. Verify and update the employee electronic deliver information, for example name, email address, etc, and then click Next. Any employee that has opted in to receiving an electronic version will have the Electronic Only box selected (no paper copy will be printed and mailed to the employee if the Complete ACA eFile Service is used. Note: If you change any of the information here, it is not saved in CenterPoint Payroll. If necessary, you can cancel this process and go to Setup > Employees in CenterPoint Payroll to change and the restart this process.
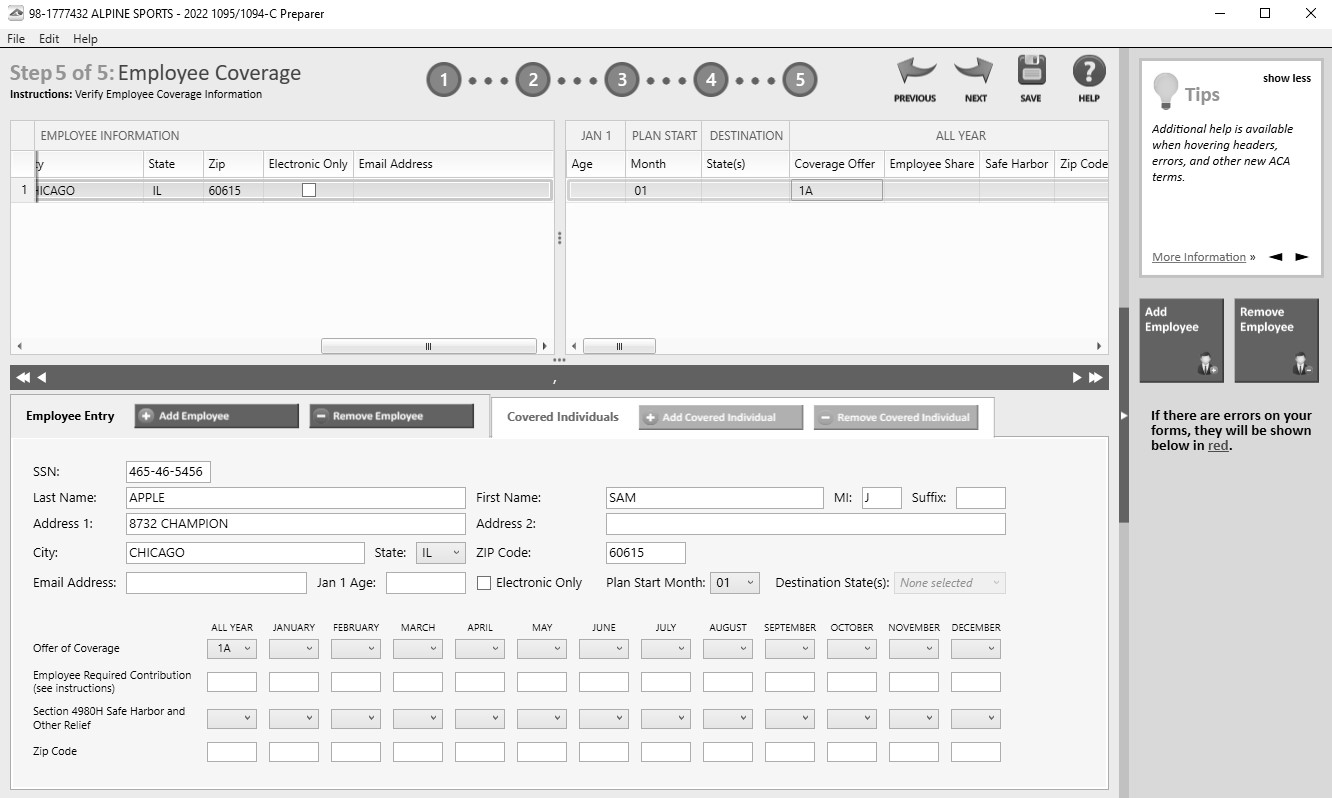
- The Employee Coverage screen displays. Verify and update the employee coverage information, and then click Next.Note: If you change any of the information here, it is not saved in CenterPoint Payroll. If necessary, you can cancel this process and go to Setup > Employees in CenterPoint Payroll to change and the restart this process.
- On the Special Offer screen, review the information and then click Close.
- The 1095/1094-C Printing and eFiling Options screen will display. E-filing options are displayed with the costs associated, but that service is optional. Printing forms is free of charge. Choose the appropriate options for your company and click Next. See the Frequently Asked Questions section of this document for information regarding discounted eFiling if you also eFile your W-2 Forms.
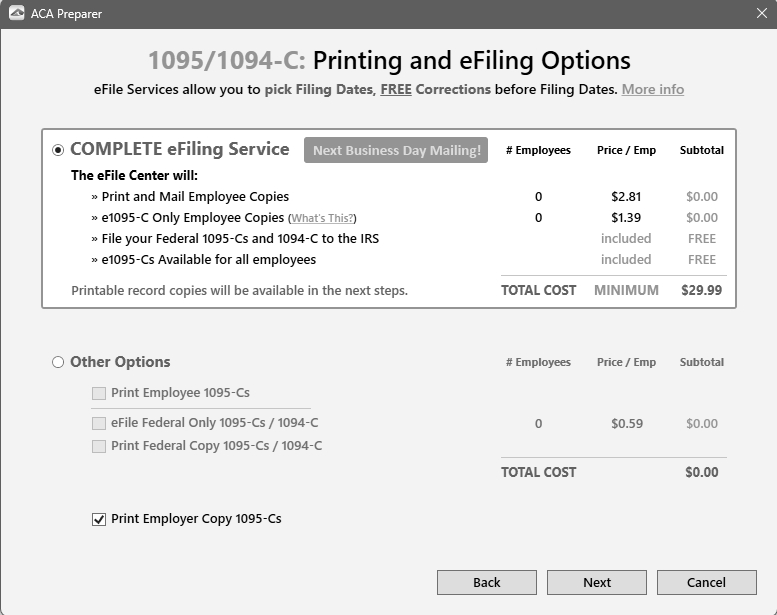
-
If you have not chosen the Complete ACA eFiling Service option, you have another chance to select that service instead of printing the W-2s yourself. Click Next to continue.
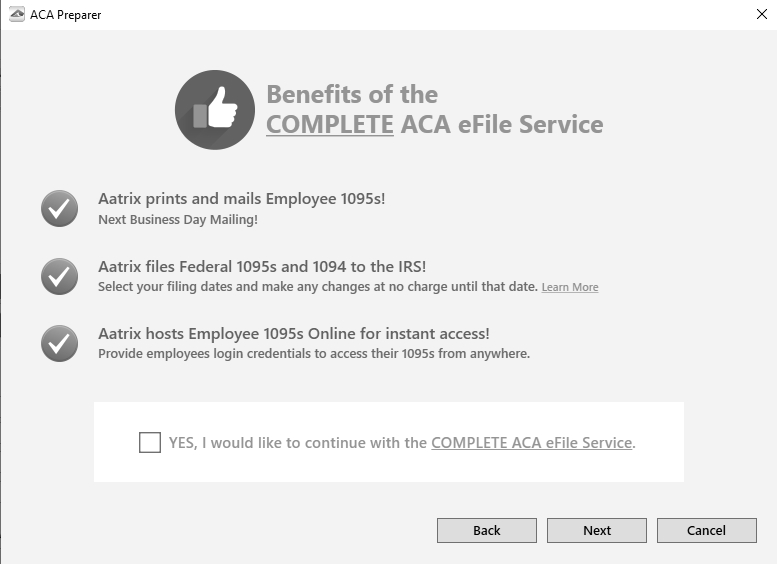
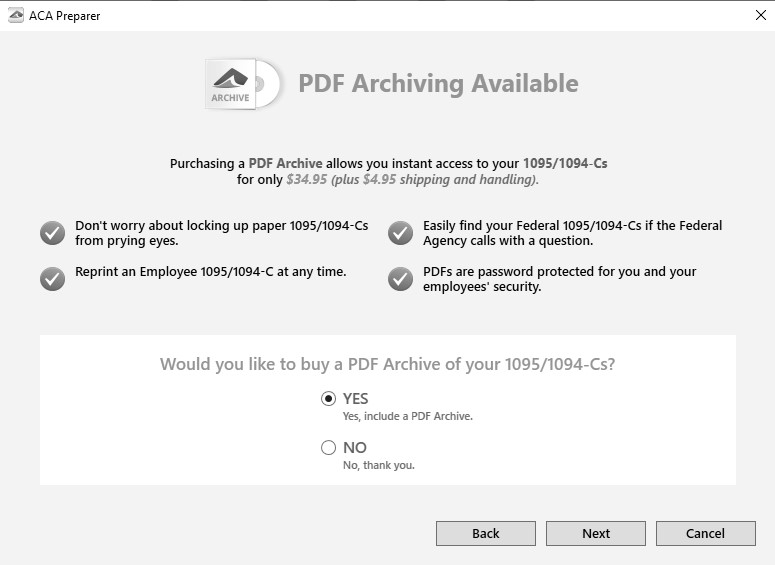
- If you chose the Complete ACA eFiling Service, you have the option to purchase a PDF archive on a USB drive of your ACA forms, select Yes, include a PDF archive to purchase an archive or select No, thank you to continue without purchasing an archive.
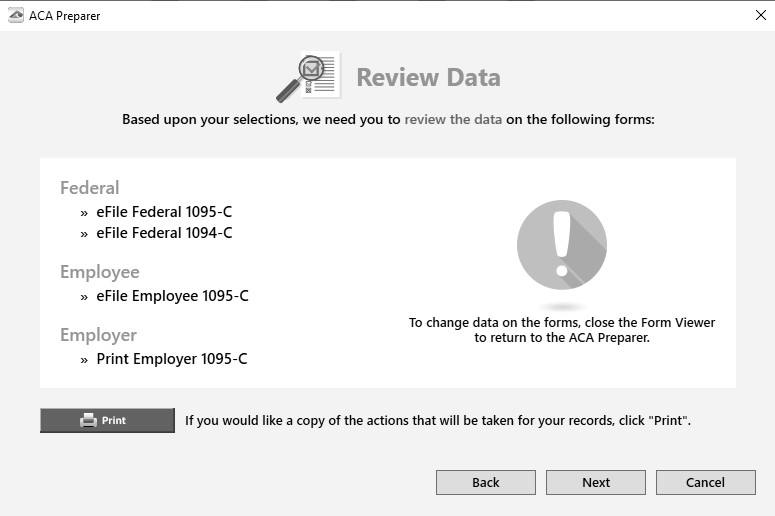
- The Review Data screen will be displayed. Note: If you select the Print button, it will create a printed version of exactly what displays on this screen. If any changes are needed, click Back. Otherwise click Next to continue.
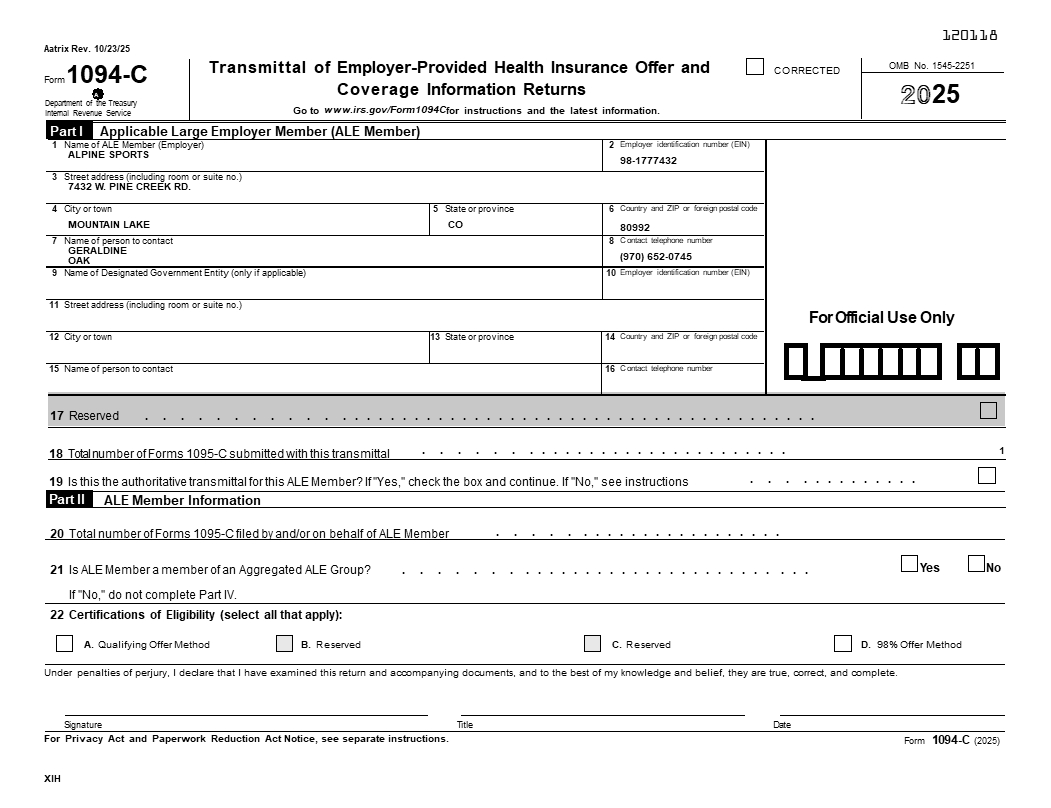
- The 1094-C Transmittal form will be displayed. The form type is displayed in the yellow bar. It also specifies how many different forms were selected to be printed. To print this first form, click Print Copy to print a copy for your own records or Print Final to print the form to file. You will be prompted to enter plain paper. Click OK. Once the data is printed, click Next Step to continue to the next selected form.
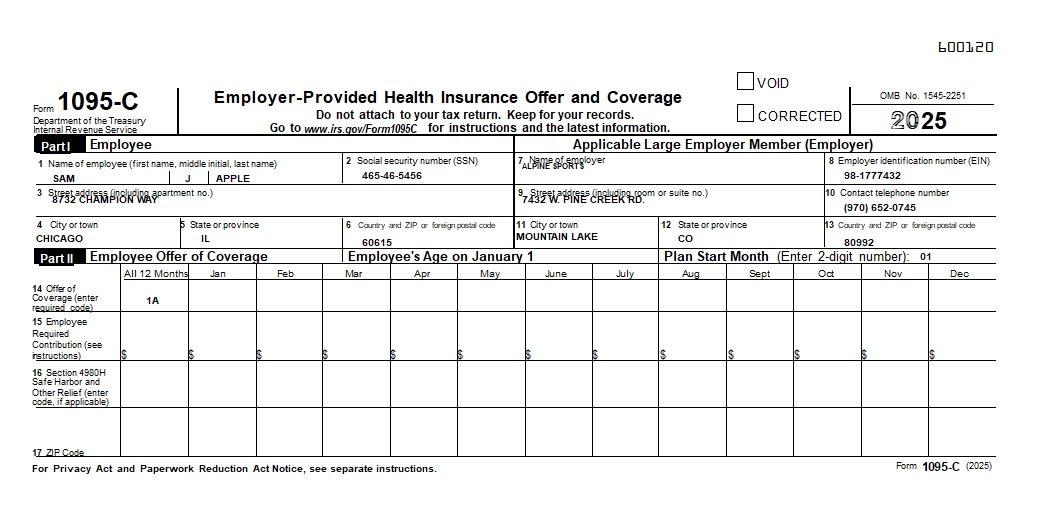
- The first 1095-C form will be displayed. The form type is displayed in the yellow bar. It also specifies how many different forms were selected to be printed. To print this first form, click Print Final. You will be prompted to enter plain paper. Click OK. Once the data is printed, click Next Step to continue to the next selected form.
- The Report viewer is self-guided. Fields that are required for your entry are outlined in either Red or Blue. You can tab between fields. Much of the information on the report is already filled in for you from the integration between CenterPoint Payroll and Aatrix.
- On the Aatrix Payroll reports screen,
- Review/edit the report.
- Review the report for accuracy of values.
- Fill out required boxes highlighted in Red.
- Blue boxes may be changed. To change the information on the Aatrix screen, click the box you want to change, change the information, and then click Save. The saved changes will print on the form, but will not change anything in CenterPoint Payroll.
- On the Aatrix Payroll reports screen,
- After you have completed all of the entry on the current page, click the Next Step button on the top of the screen.
- If you missed any information on this page, Aatrix will prompt you to enter it. The Next Step button at the top of the screen may need to be clicked multiple times until the Filing Options screen displays.
- The Instructions for the Employee 1095-C Recipient Notice will display. Click Print Final to print a copy on blank paper. To print this first form, click Print Copy/Final. You will be prompted to enter plain paper. Click OK. Once the data is printed, click Next Step to continue to the next selected form. The 1095-C Recipient Notice can be located by using the Search feature on the Internal Revenue Service website at www.irs.gov.

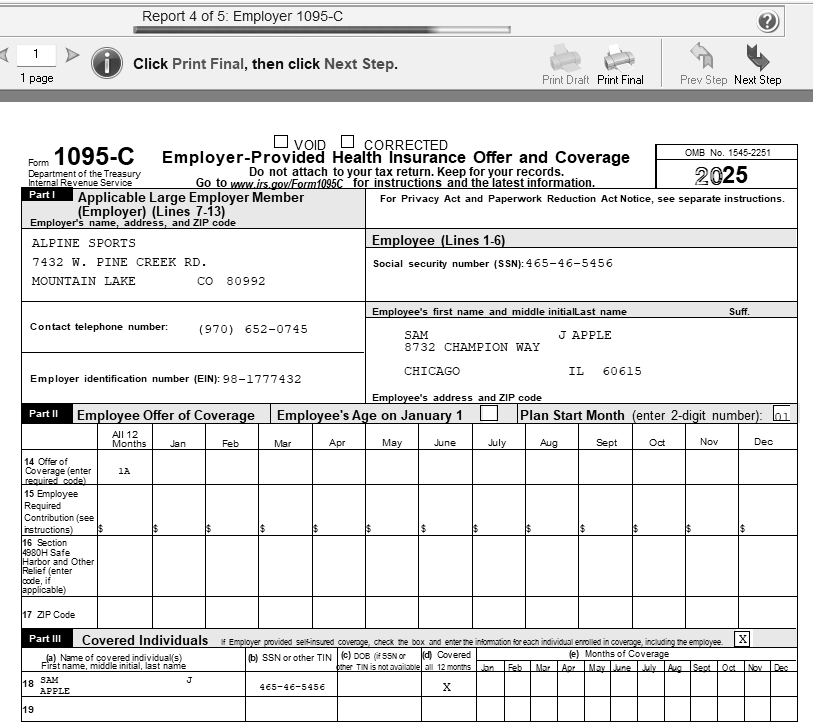
- The Employer 1095-C will be displayed. To print this first form, click Print Copy/Final. You will be prompted to enter plain paper. Click OK. Once the data is printed, click Next Step to continue to the next selected form.
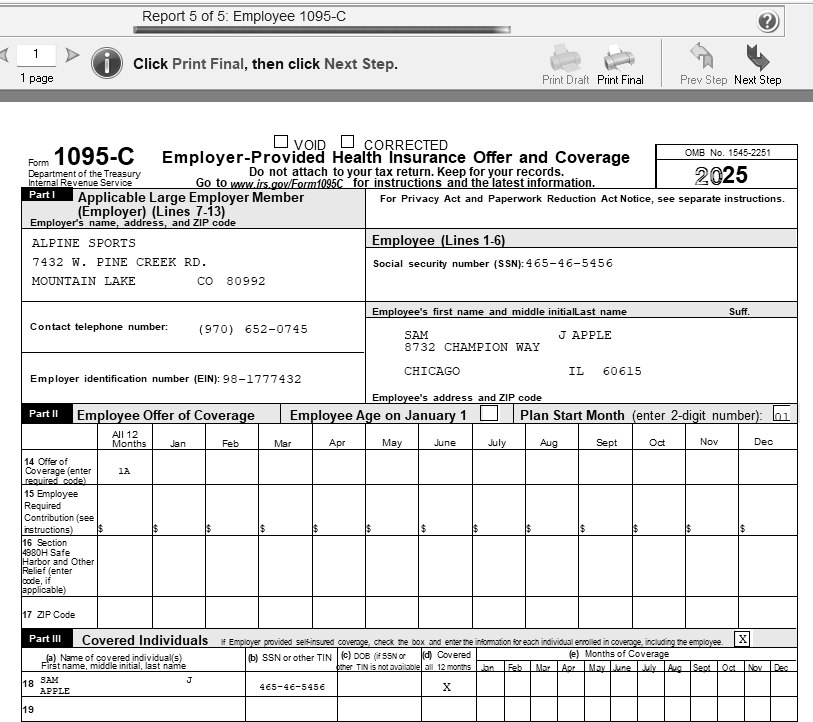
- The Employee 1095-C will be displayed. Click Print Copy/Final. You will be prompted to enter plain paper. Click OK. Once the data is printed, click Next Step to continue to the next selected form.
Efile ACA Forms
This section will not display if you have not chosen to eFile your ACA forms.
- If you have chosen to eFile any of your forms, and you have not filed previously, the Aatrix Secure eFile screen will be displayed.

-
If you are not enrolled to eFile with Aatrix:
-
From an internet browser, enter https://efile.aatrix.com to go to the Aatrix website
-
- Click Enroll in the upper-right corner to complete the enrollment process.
OR
Log in to your eFile account to add this new company under the Companies tab.
Return to the Aatrix Secure eFile screen and click Check Enrollment Status. Enter your login information, and then follow the onscreen instructions to eFile your forms.
- If you are enrolled to eFile with Aatrix, enter your login information. Verify your enrollment information. To edit your enrollment information, click Edit on the Enrollment Information screen, click Next, and then follow the onscreen instructions to eFile your forms.

- To view answers to common questions, click here or from an internet browser, enter https://www.aatrix.com/support/knowledgebase/windows/
- If you have questions about the calculated sales tax or need to apply for tax exemption for your filing, email AatrixExemptCerts@sovos.com.
- For additional information about eFiling , click here or enter https://partner.aatrix.com/red-wing-software/
- You will have the option to select to allow your employees to securely import their W-2 information into certain tax software products by approving the Aatrix Tax Form Transfer Agreement displayed during the eFiling process.
- When the eFile process is complete, the Complete screen will indicate that your filing was successfully received for processing. A confirmation email will be sent to the email address specified on this screen.
- If you have employees that opted to receive their W-2 electronically or selected the Complete eFiling Service, you will need to complete the Online Access Wizard which allows you to lookup, print, or email access letters and passwords. For detailed information, click here.
- The AFID (Aatrix Filing Identifier) is a number assigned to your submission for tracking purposes. If you contact Aatrix Support, they will request this number.
- If you eFiled your ACA forms, and have questions regarding your filing, contact Aatrix by email at helpme@aatrix.com, on their website at https://efile.aatrix.com/ by clicking Login and entering your Aatrix username and password, or on their website athttps://efile.aatrix.com/ by clicking the Search our FAQs button.
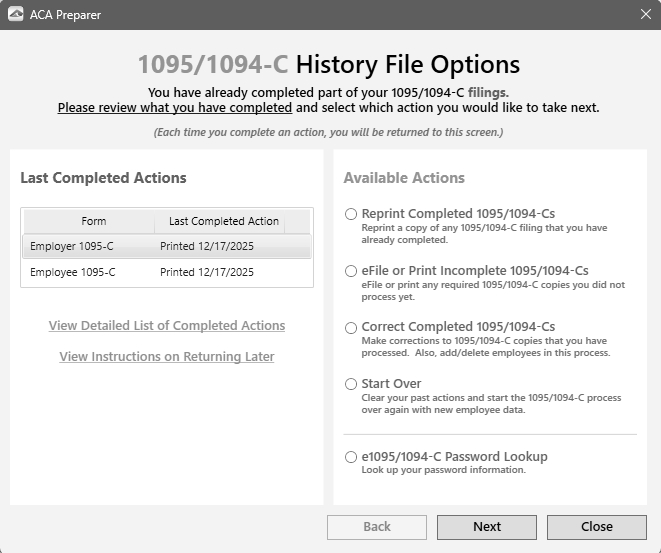
- Upon completion of the ACA forms printing process, the ACA History File Options screen is displayed. If you are finished printing forms for the time being, select Close. This screen will also be displayed if the ACA printing process is started again.
Q: What is the Affordable Care Act (ACA)?
A: The Affordable Care Act (ACA) created new reporting requirements mandatory for calendar years 2015 - 2025 and is the responsibility of the employer. Under these new reporting requirements, applicable large employers (ALE) must provide information to the IRS about the health plan coverage they offer (or do not offer) to their employees. The reporting requirement consists of two types of forms and their related transmittals. Any applicable large employer (ALE) with 50+ employees must file ACA 1095 information, including those that do not offer healthcare insurance.
Q: What are the available Affordable Care Act reporting forms and what are the differences between the forms?
A: The Affordable Care Act reporting forms are:
- Form 1095-C must be issued by employers with 50+ full time employees (including full-time equivalent employees) or who are a member of an applicable large employer (ALE) group to employees and to the IRS. Filers may submit multiple 1095-C batches to the IRS.
- Form 1094-C is the transmittal form that must be filed with form 1095-C. This transmittal may have up to three pages which must also be included when e-filing each batch to the IRS.
- Form 1095-B must be issued by a self-insured employer with less than 50 full-time employees (including full-time equivalent employees), or by the insurer to employees and to the IRS as proof of healthcare coverage.
- Form 1094-B is the transmittal form that must be filed with form 1095-B.
Q: How do I determine if I am an applicable large employer (ALE) and if I need to track and report Affordable Care Act information?
A: To determine if you are an applicable large employer (ALE), please either contact your tax preparer or accountant or use the links below provided by the IRS.
Publication 5208 Affordable Care Act: Are you an applicable large employer? - http://www.irs.gov/pub/irs-pdf/p5208.pdf
Affordable Care Act Mandates for Employers - http://www.irs.gov/Affordable-Care-Act/Employers
Questions and Answers about Information Reporting by Employers on Form 1094-C and 1095-C- https://www.irs.gov/Affordable-Care-Act/Employers/Questions-and-Answers-about-Information-Reporting-by-Employers-on-Form-1094-C-and-Form-1095-C
1094-C and 1095-C Instructions - http://www.irs.gov/instructions/i109495c
Q & A on Affordable Care Act Mandates - http://www.irs.gov/Affordable-Care-Act/Affordable-Care-Act-Tax-Provisions-Questions-and-Answers
Q: Are there any important changes to the ACA filing process for 2025?
A: There are no specific changes to the ACA filing process for 2025; however, it is important to remember that the U.S. Department of the Treasury and the IRS issued final regulations on February 21, 2023, that changed the eFile threshold from 250 to 10. The current 10-return threshold comprises an aggregate of return types (W-2, ACA, 1099 forms) covered by the regulation. Click here for more information. For specific W-2 and ACA form information, click here.
Q: I've already set up the Affordable Care Act Information in a previous year, are there any changes for 2025?
A: Yes, in CenterPoint Payroll version 19.5 a Plan Start Month was added to the ACA Information tab in Setup > Employees. The Plan Start Month will automatically pull into the 1094/1094 Preparer on the Employee Contact Information screen when processing ACA forms. The Plan Start Month can be updated for multiple employees:
Note: We recommend you do a backup of your database prior to starting the mass update process.
- Select Setup > Employees.
- On the List tab, select the employees you want to update the Plan Start Month for.
- From the What Do you want to update? screen, select ACA and click Next.
- Click Next.
- In the Change selected values to box, select the Plan Start Month you want to change the selected employees to and click Next.
- Verify that the selected employees have changed and click Next.
- At the These changes will be saved to the database, are you sure? message, click Yes.
Q: I have part-time employees that were active for the year; do I need to set up their coverage information on the ACA Information tab in CenterPoint Payroll even though I won’t be printing a 1095 form for the part-time employees?
A: If you want your ACA employee counts to be accurate, you need to set up your part-time employees with ACA coverage periods. These employees can be set to not produce a 1095 but be included in the ACA counts by selecting Setup > Employees > ACA Information tab, on the left side of the screen add a Coverage Period, and then on the right side of the screen in the Status box select Part-Time and in the Offer box, select Not Applicable (No Form).
Q: I want to send my employee’s 1095 forms electronically to be viewed online with Aatrix. How do I set up my employees to receive electronic copies?
A: Select Setup > Employees > Payroll tab and then select the Consent To Electronic 1095 check box. If this box is selected, a signed consent form must be on file. This form can be printed from Federal & State Payroll Forms & Reports > Federal Tax Forms and selecting Electronic 1095 Consent in the Report box. Additional charges apply for eFiling with Aatrix.
Q: Is there a way that I can update all my active employees to the ACA coverage period of the new year?
A: Yes, from Setup > Employees, and Edit one of your employees, then select the ACA Information tab. Click Add and add the coverage period for this year. Then, click the Copy To button and choose the employees you would like to copy that coverage period to.
Q: Is there a way that I can add new coverage periods to multiple employees at the same time?
A: Yes, to add a new coverage period to multiple employees, select :Setup > Employees > Mass Update > ACA > Add New Coverage Period and then select a start month and year.
Q: Is there a way that I can update the Status, Offer, Employee Share of Lowest Cost Monthly Premium, or Section 4980H Safe Harbor Code for the latest coverage period?
A: Yes, the Status, Offer, Employee Share of Lowest Cost Monthly Premium, or Section 4980H Safe Harbor can be updated for multiple employees at the same time by selecting Setup > Employees > Mass Update > ACA > Latest Coverage Period.
Q: After I enter all of the applicable information needed for the ACA requirements, when can I begin processing and printing the ACA forms in CenterPoint Payroll and Aatrix?
A: The final version of the ACA forms will be available in the December 20th time frame. You will automatically be prompted to perform an update for Aatrix during this week.
Q: If I choose to eFile my ACA forms, is there a charge per form/employee?
A: Yes, please click here to view the eFile pricing for ACA and minimum charge for ACA and other tax forms (the minimum charge applies to each type of form eFiled).
Q: I've decided to eFile my ACA forms and want more information about signing up to eFile and the eFile process, where can I get more information about eFiling?
A: You can obtain additional information about eFiling at https://customer.aatrix.com/redwingsoftware.
Q. What are the 2025 eFiling deadlines for ACA Forms?
A. Efiling deadlines can be located from this link: https://efile.aatrix.com/pages/public/FilingDeadlinesPublic.aspx?v=ATX000.
Q. Do I need to order ACA forms or can I print them on plain paper?
A:. You are able to print all of your ACA copies on plain paper; you do not need to print the transmittal on preprinted forms. Note: There is special perforated blank paper available that is recommended for use when printing employee copies of the ACA forms. This paper comes with the ACA instructions printed on the back of the paper (for the employee copy). This paper is available from Computer Forms, Inc. at https://redwing.computerforms.biz/c/tax_forms or by calling 800-458-0158.
Q. Do I need to print my ACA forms before I close the 2025 year and print January checks?
A.
Q. Why am I getting a “forms update” or "mandatory update" message when I try to process my ACA forms and what do I need to do?
A. At least once a quarter, including at year end, updates are created for the Federal/State Tax Forms (Aatrix) software. When you receive either of those messages, it means that Aatrix has an update available that you should install prior to continuing. If you have internet access at this computer, you can simply select Automatic Update and follow the prompts to do the update through the program.
If you don't have internet access at the computer that has
- When the download is complete, exit the website. Copy the
- Take the removable media source to the computer with
If you don’t have an internet connection at any of the computers, you can call the Red Wing Software Sales department at 800-732-9464, and we’ll send the Federal/State tax forms (Aatrix) updates to you on a CD once a quarter for a minimal annual fee.
Q. Can I change the figures on my ACA forms if they are incorrect?
A. Yes, once the data is in Aatrix Federal/State Tax Forms, you can change any figure on the reports that are highlighted blue. Any figure that is highlighted red must be changed before you can print the report. Any figure that is white cannot be changed, but it is a calculated number, so it can be changed by adjusting the fields around the white field. Note: Changing the figures on this screen will only change the printed Federal reports, it will not change the data in your payroll program.
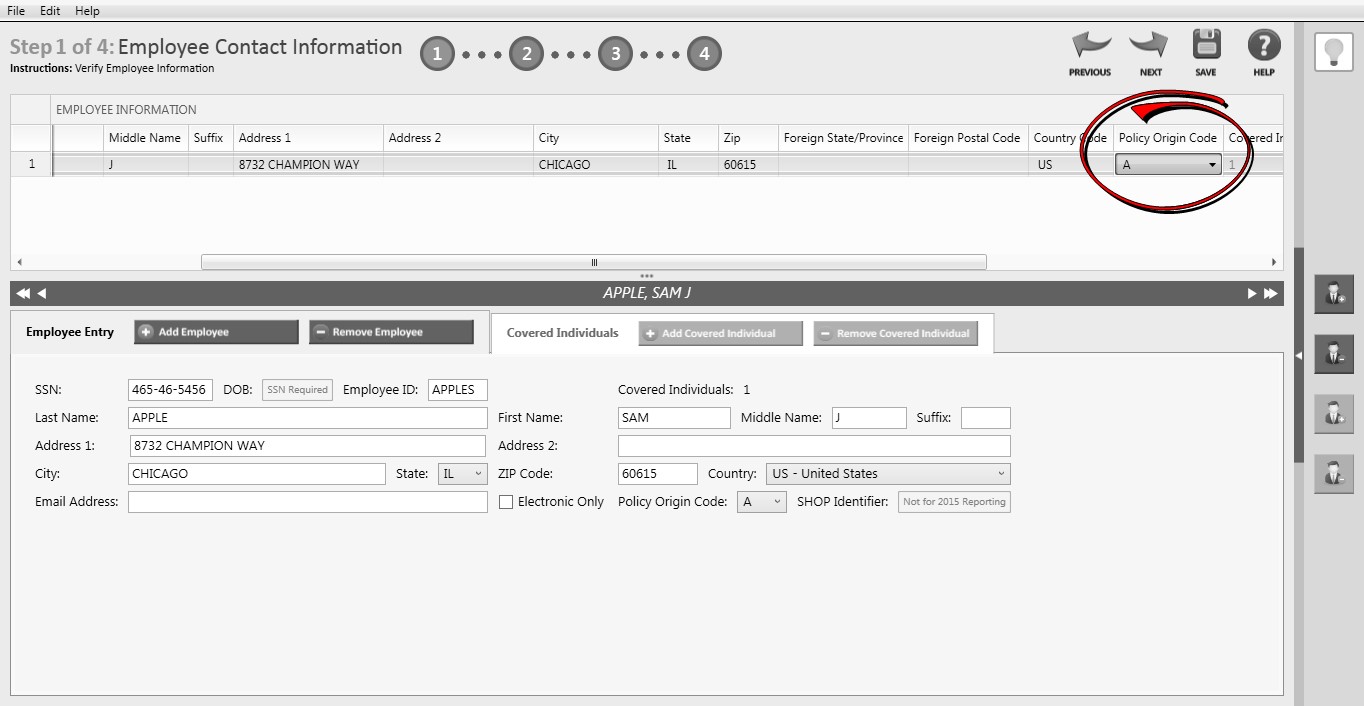
Q: I am printing 1094/1095-B forms, does anything need to be verified or changed on the Employee Contact Information screen?
A: Yes, if you are printing 1094/1095-B forms and you have not updated the Origin in Setup > Employers if you provide Self-Insured Coverage, it will be necessary to verify the Policy Origin Code and change the code to accommodate your company. Select each employee, scroll to the right to view the Policy Origin Code, and edit by selecting the appropriate code form the drop-down list. This code will always default to Code A if you do not change it. The codes are as follows:
A - Small Business Health Options Program (SHOP).
B - Employer-sponsored coverage.
C - Government-sponsored program.
D - Individual market insurance.
E - Multi-employer plan.
F - Other designated minimum essential coverage.
G -Individual Coverage HRA (Health Reimbursement Arrangement)
Q: I'm trying to eFile my ACA forms and I can't remember my Aatrix eFile username and/or password, how can I get it?
A: We recommend you contact Aatrix by calling 800-426-0854 or by clicking on the Forgot Login button.
Q: If I use the Complete eFiling Service for my W-2 forms, are there any applicable discounts for using the complete eFile service for my ACA 1095 forms?
A: Yes, the Aatrix ACA Complete eFile Service can print and mail employee copies and eFile the required reports to the IRS at a discounted rate. To qualify for discounted 1095s, follow the steps below:
- eFile your W-2s using the Aatrix W-2 Complete eFile Service.
- Select a mail date for your employee W-2s that provides you with enough time to complete your ACA filing (the mail date may be adjusted at efile.aatrix.com up to one day prior of the set date).
- eFile your ACA forms utilizing the Aatrix Complete eFiling Service and save 50%.
Q: I have multiple payroll databases for one EIN; how do I merge the databases so I get one set of ACA forms?
A: Follow the steps below to merge multiple databases into one set of ACA forms?
- Start the ACA forms process and continue until the Multiple Payroll Data Files screen displays. On the Multiple Payroll Data Files screen, select Yes, I use multiple payroll data files for the EIN and click Next to continue.
- The next Multiple Payroll Data Files screen displays, click Save, enter a name for the payroll data file, and click Close.
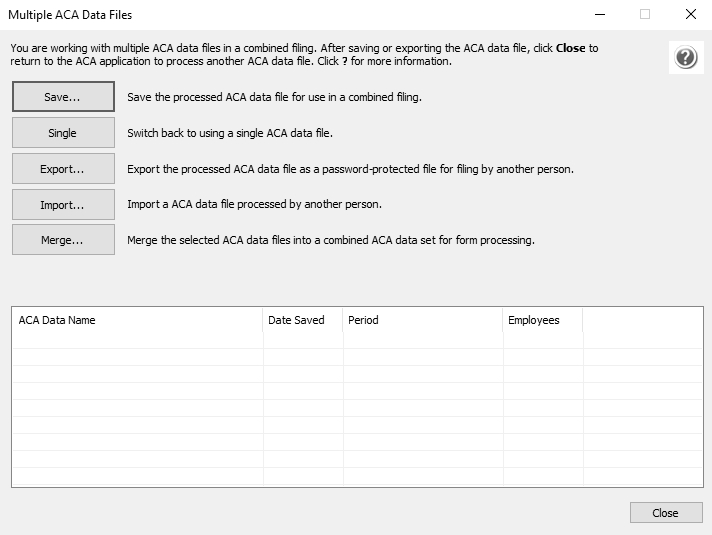
- Open the other database(s) and repeat steps 1-2 above for all databases you want to merge. When all data files are saved, continue to step 4.
- At the bottom of the Multiple Payroll Data Files screen, select each database to be merged and then click Merge.
- On the Multiple Payroll Data File Merge screen, click Yes.

- On the Multiple Payroll Data Files screen, click Continue to continue processing ACAs.
Q. I'm attempting to log in to the Red Wing Software website, but it does not recognize my Email and/or Password? What should I do?
A. Follow the instructions below for information about the Red Wing Software website.
To register on the Red Wing Software website:
The Red Wing Software website uses the same login as Red Wing Software's Web Services (Pay Advices, CenterPoint Time Clock, or Employee Portal). If you have an existing account for Web Services, enter the same user credentials to log in to the website. If you do not have an existing account for Web Services, follow the steps below:
- From a web browser, enter www.redwingsoftware.com.
- In the upper-right of the Red Wing Software home page, click Log in.
- Click Create One!
- Enter your First Name and Last Name.
- Enter an Email address and a Confirm Email address which must match the contents of the Email field for the registration to be processed.
- Enter a Password and Confirm Password. Passwords must be at least six characters and no longer than 25 characters, include one numerical character and one lower-case letter.
- Click Create.
- In the Account Number box, enter your company Account Number. Your Account Number can be located in a few different places:
- From within CenterPoint by selecting Help > About.
- On the Support Certificate that you receive upon renewing Customer Care Membership.
- Red Wing Software sends customers a renewal form for Customer Care Membership. This renewal form contains your account number.
- Invoices you’ve received from Red Wing Software contain your account number.
- If others at your company have already registered, they can sign into their account and find your company’s account number at www.redwingsoftware.com/home/myaccount.
- Continue entering your Title, First and Last Name, Email Address (which is your login) and a Password.
- Enter the displayed Security Verification code, and then click Submit.
To log in to the Red Wing Software website:
- In your web browser, enter www.redwingsoftware.com, and press Enter.
- In the upper-right of the Red Wing Software home page, click Log in.
- Enter your Email Address and your Password.
- Click Log In.
To reset a forgotten password:
- In your web browser, enter www.redwingsoftware.com, and press Enter.
- In the upper-right of the Red Wing Software home page, click Log in.
- Click the Forgot your password? link.
- Enter your Email address.
- Click Email Link.
- An email will be sent to your current email address from Red Wing Software. Open the Reset Password email and click the here link.
- Enter your Email address, your new Password, and then enter your new password again in the Confirm password box, and then click Reset.
- Continue with the To log in to the Red Wing Software website section above.
To log out of the Red Wing Software website:
- On the upper-right side of the Red Wing Software home page, click the drop-down arrow next to the My Account button.
- In the displayed menu, select Log out.
|
Document: 3264 |
|---|