***See quickbooks-interface.htm instead.
CenterPoint Payroll
- Install and Setup the QuickBooks Interface and Export Payroll Journal Entries to QuickBooks
Related Help

This document provides information on:
- Installing and Setting up the QuickBooks Interface
- Synchronizing QuickBooks with CenterPoint Standalone Payroll
- Exporting Payroll Journal Entries
- Repost Payroll Journal Entries to QuickBooks
Note: If you want to transfer employees, employers, earnings, deductions and accounts from QuickBooks to CenterPoint Payroll, see the QuickBooks Data Transfer document prior to using this document.
Installing and Setting up the QuickBooks Interface
- Close all other programs prior to starting the installation of CenterPoint.
Note: If you already have CenterPoint installed, but did not choose to install the QuickBooks interface, you will need to run the installation again before the QuickBooks interface will be available. Insert the CD into your CD drive or double-click the download installation package. When prompted, select Modify Available Options and continue with step 8.
- Insert the CenterPoint CD into your CD drive or double-click the downloaded install package CenterPointPayrollSetup.exe file.
- Wait while the contents of the setup package are verified.
- If you receive an Application Requirements screen, click Next to install the necessary requirements. Wait while the requirements are installed. If you are prompted to restart your computer, click OK. The computer will restart and the installation will automatically resume. This process may repeat depending on the number of requirements you need to install.
- On the Welcome screen, click Next to continue.
- On the License Agreement screen, select the I accept the terms of the license agreement check box, and then click Next to continue.
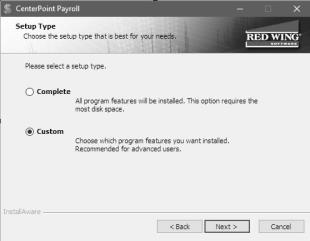
- On the Setup Type screen, select Custom, and then click Next to continue.
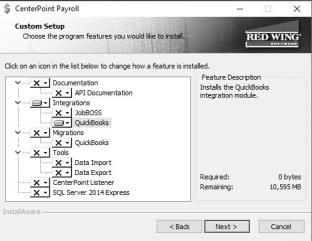
- Select the down-arrow under Integrations and next to QuickBooks, select Entire feature will be installed on local hard drive, and then click Next until the installation begins.
- When the installation is complete, open QuickBooks.
- Open CenterPoint Payroll.
- If the Module Configuration Manager does not display automatically, select File > Administration > Module Configuration Manager.
- Verify that QuickBooks Integration is selected and then click OK.
- Select File > Preferences > Interfaces > QuickBooks.
- Select the Database tab.
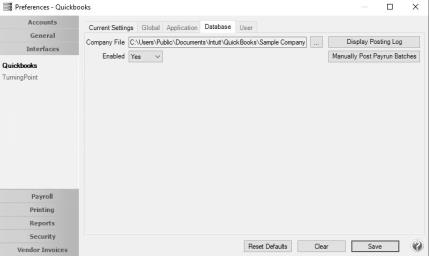
- Select the QuickBooks Company File that you want to create general journal entries in from CenterPoint Payroll. If you previously migrated QuickBooks data to CenterPoint, the Company File will already be selected.
- In the Enabled box, select Yes.
- Click Save.
- Select Setup > Payroll Details > QuickBooks Syncronization.
- In QuickBooks, a QuickBooks - Application Certificate screen will display.
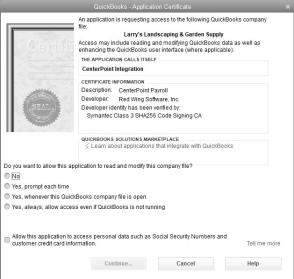
- Select Yes, always; allow access even if QuickBooks is not running.
- At the Are you sure you want to give this app access to your data even when QuickBooks isn't running? message, click Yes.
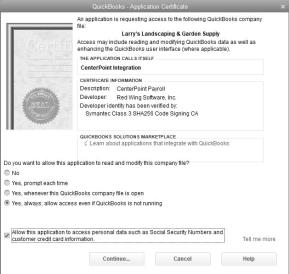
- Select the Allow this application to access personal data such as Social Security Numbers and customer credit card information check box.
- Click Continue.
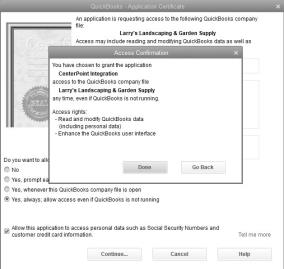
- Click Done.
- In CenterPoint, the QuickBooks CenterPoint Synchronization screen displays. This screen allows you to keep the accounts, employees, vendors that are to be paid payroll liabilities, and QuickBooks classes (CenterPoint Profit Centers) that are used in payroll transactions in sync. Information created in Quickbooks can be imported into CenterPoint, or information created in both can be mapped. New information cannot be created in QuickBooks by using this process. This tool will also allow items previously mapped to be unmapped.
-
The Tabs across the top of the QuickBooks / CenterPoint Synchronization screen allow you to select the information that can be synchronized.
Synchronizing QuickBooks with CenterPoint Standalone Payroll
Note: If you used the File > New > Data Transfer > QuickBooks menu selection to migrate your data from QuickBooks, the process of importing QuickBooks items or mapping QuickBooks items to CenterPoint items will not be initially necessary. However, importing and mapping may need to be performed if you add information to QuickBooks after your migration is completed.
It is important to synchronize each tab by using the Import Existing button when you start the QuickBooks interface. After you are posting to the QuickBooks General Ledger from CenterPoint Payroll, it may be necessary to only synchronize a specific piece of information, for example when you create a new account in QuickBooks that you want CenterPoint to post to.
Import Information
Import Existing Accounts
- Select the Accounts tab.
- In the Account Type filter, select an account type, for example Assets, Liabilities, Revenue, etc. When an account type is selected, the list of account categories will also be filtered.
- Each QuickBooks account that you wish to transfer to CenterPoint must first be assigned an account category. Select the QuickBooks accounts that you wish to assign an account category to. Selected accounts will display in blue. Multiple accounts can be selected by holding the Shift and Ctrl key while simultaneously clicking each account.
- In the Account Category box, select the account category that the account(s) should be assigned to.
- Click Assign Category.
- Repeat the process of assigning an account category to all accounts you want to import from QuickBooks to CenterPoint.
- Click the green right arrow to transfer the accounts. The accounts will display under the Current CenterPoint Accounts list.
Import Existing Employees
- Select the Employees tab.
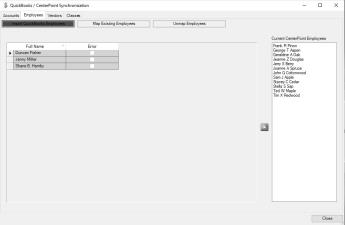
- Select the QuickBooks employees that you wish to transfer from QuickBooks to CenterPoint. Selected employees will display in blue. Multiple employees can be selected by holding the Shift and Ctrl key while simultaneously clicking each employee.
- Click the green right arrow to transfer the employees. The employees will display under the Current CenterPoint Employees list.
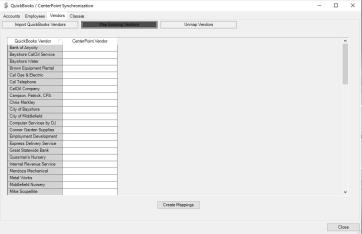
Import Existing Vendors
- Select the Vendors tab.
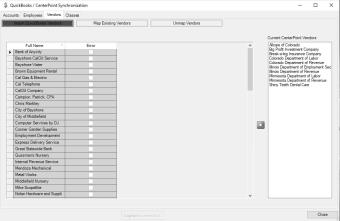
- Select the QuickBooks vendors that you wish to transfer from QuickBooks to CenterPoint. Selected vendors will display in blue. Multiple vendors can be selected by holding the Shift and Ctrl key while simultaneously clicking each vendor.
- Click the green right arrow to transfer the vendors. The vendors will display under the Current CenterPoint Vendors list.
Import Existing Classes
- Select the Classes tab.
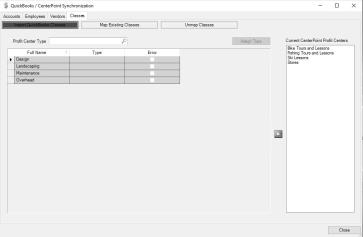
- QuickBooks classes transfer to CenterPoint profit centers.
- Each QuickBooks class that you wish to transfer to CenterPoint must first be assigned a profit center type. Select the QuickBooks classes that you wish to assign a profit center type to. Selected classes will display in blue. Multiple classes can be selected by holding the Shift and Ctrl key while simultaneously clicking each class.
- In the Profit Center Type box, select the profit center type that the class should be assigned to.
- Click Assign Type.
- Repeat the process of assigning a profit center type to all classes you want to transfer from QuickBooks to CenterPoint.
- Select the QuickBooks classes that you wish to transfer from QuickBooks to CenterPoint. Selected classes will display in blue. Multiple classes can be selected by holding the Shift and Ctrl key while simultaneously clicking each class.
- Click the green right arrow to transfer the classes. The class will display under the Current CenterPoint Profit Centers list.
Map Existing
The Map Existing button on the Accounts, Employees, Vendors, and Classes tabs can be used when you've created the same item (accounts, employees, etc.) in both QuickBooks and CenterPoint and you want to inform the programs that they should be interpreted as equivalent.
Note: Only one QuickBooks account can be mapped to one CenterPoint account.
Note: CenterPoint Payroll Liability accounts must be mapped to QuickBooks payroll or other liability accounts, if they are mapped to an Accounts Payable account, the export of the payroll journal entries from CenterPoint to QuickBooks will not be successful.
Map Existing Accounts
- Select the Accounts tab.
- Click Map Existing Accounts. Only unmapped accounts will display.
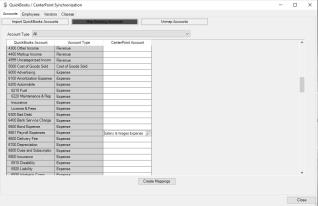
- Select the QuickBooks account that you wish to assign an equivalent (map) CenterPoint account to.
- In the CenterPoint Account box, enter the account or click the Lookup icon to display a list of accounts to select from.
- Repeat for all accounts you wish to map.
- Click Create Mappings.
Map Existing Employees
- Select the Employees tab.
- Click Map Existing Employees. Only unmapped employees will display.

- Select the QuickBooks employee that you wish to assign an equivalent (map) CenterPoint employee to.
- In the CenterPoint Employee box, enter the employee or click the Lookup icon to display a list of employees to select from.
- Repeat for all employees you wish to map.
- Click Create Mappings.
Map Existing Vendors
- Select the Vendors tab.
- Click Map Existing Vendors. Only unmapped vendors will display.
- Select the QuickBooks vendor that you wish to assign an equivalent (map) CenterPoint vendor to.
- In the CenterPoint Vendor box, enter the vendor or click the Lookup icon to display a list of vendors to select from.
- Repeat for all vendors you wish to map.
- Click Create Mappings.
Map Existing Classes
- Select the Classes tab.
- Click Map Existing Classes. Only unmapped classes will display.
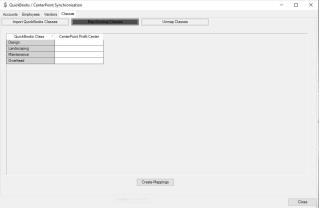
- QuickBooks classes map to CenterPoint profit centers.
- Select the QuickBooks class that you wish to assign an equivalent (map) CenterPoint profit center to.
- In the CenterPoint Profit Center box, enter the profit center or click the Lookup icon to display a list of profit centers to select from.
- Repeat for all classes you wish to map.
- Click Create Mappings.
Unmap Existing Items (Accounts, Employees, Vendors, or Classes)
Items (Accounts, Employees, etc.) previously mapped can be unmapped by using the Unmap button on each of the respective tabs.
- Select the tab.
- Click the Unmap button.
In the example below, the Account tab was selected and the Unmap Accounts button was clicked.
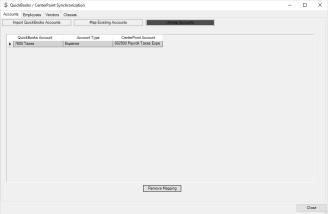
- The screen displays only mapped QuickBooks to CenterPoint items.
- Select the item(s) you want to unmap. Multiple items can be selected by holding the Shift and Ctrl key while simultaneously clicking each item.
- Click Remove Mapping to unmap the selected items between QuickBooks and CenterPoint.
- Once mapping is removed, items can be re-imported to a new item or remapped to a different existing item if needed.
Exporting Payroll Journal Entries
When CenterPoint Payroll is posted, the payroll journal entries will automatically export and create QuickBooks general journal entries for the employee checks, employer payroll liabilities, and other current liabilities. Each CenterPoint employer expense transaction creates a QuickBooks general journal entry transaction for payroll or other liabilities in QuickBooks. The QuickBooks general journal entry will be summarized by account and class.
Note: CenterPoint Payroll Liability accounts must be mapped to QuickBooks payroll or other liability accounts, if they are mapped to an Accounts Payable account, the export of the payroll journal entries from CenterPoint to QuickBooks will not be successful.
The CenterPoint employee name associated with the payroll journal entries will display in the Memo field instead of the Name field. The Memo field can be added to the QuickBooks Bank Reconciliation and with the check number that transfers, the information necessary to complete the reconciliation will be available in QuickBooks.
- In CenterPoint Payroll, select Processes > Pay Employees and complete a pay run. See the Processing a Pay Run/Pay Employees help topic for more information.
- On the 6. Print Checks tab, when you click Post & Print pay checks/advices will print, the pay run will post, and you will receive a message indicating that the post to QuickBooks was successful.
- If you void a pay check, a reversing journal entry will be posted to QuickBooks.
If the posting to QuickBooks was NOT successful, you will get a message that the Posting to QuickBooks failed and explains the reasons why it was not successful.
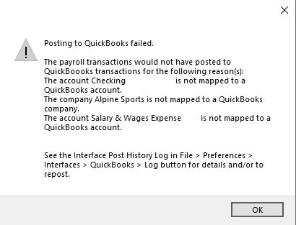
After the information in the message is corrected, for example by mapping the CenterPoint Checking account and Salary & Wage Expense to a QuickBooks account, the pay run can be reposted to QuickBooks at any time, see the To Repost to QuickBooks/Check Posting Log section below for more information.
Repost Payroll Journal Entries to QuickBooks
Pay runs can be reposted whether or not they were originally successful. If a pay run failed, it will not be successful until the issue causing failure is corrected.
- Select File > Preferences > Interfaces > QuickBooks > Database tab.
- Click Display Posting Log.
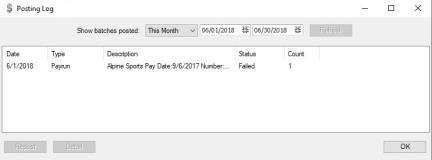
- Select a date range to view attempted postings for.
- A list of pay runs that have attempted to post to QuickBooks will be listed.
- Select the pay run and click Detail to see a detail error log and list of attempts for that pay run.
- Click Repost to post to QuickBooks.
If a pay run was posted before the interface was enabled, it can be posted to QuickBooks from the Manually Post Payrun Batches button in the File > Preferences > Interfaces > QuickBooks > Database tab screen. Once a pay run has attempted to post to QuickBooks, regardless of success, it will not display from the Manually Post Payrun Batches screen and will instead appear in the regular Posting Log.
|
Document: 3339 |
|---|