CenterPoint Payroll
- Payroll Employee Mass Update
| Document #: | 3380 | Product: | CenterPoint® Payroll |
|---|
This document provides examples for using the Setup > Payroll Details > Employee Mass Update menu can be used to update more than one employee's information at the same time. You can mass update various types of information deductions and benefits, earnings, payroll information, or taxes. You can update employees currently assigned to the item, update existing information and if the item is not assigned to an employee it can be added, or items can be added if they are not already assigned to employees.
Change Rates for Multiple Employees
Assign New Deduction/Benefit Rates
Add a new Earning to Multiple Employees
Add an existing Workers' Compensation Class to Multiple Employees where the Tax is Missing
Change Rates for Multiple Employees
Rate changes for one employee can be done from the employee detail screens. When you have multiple employees with pay increases or insurance premium changes, save time using Employee Mass Update.
Enter Pay Increases
- Select Setup > Payroll Details > Employee Mass Update.
- The list of employees display. Select the employees you wish to update.
- Click Select All to select all employees or select multiple employees by pressing the CTRL key while you make your selections.
- When you select the earnings to update, an option is available to update only existing records. That means only employees already assigned to this earnings will be updated.
- Click Mass Update.
- In the Category box, select Earnings.
- In the Employer box, select the employer you want to update earnings for.
- On the right side of the screen, in the Method box, select the mass update method. In this example, we will select Update Existing Records Only.
- Update Existing Records Only - Updates the earnings information on employees currently assigned to the earnings.
- Update Existing/Add Missing Records - Updates all selected employees with the details. If the earning is not assigned to an employee, it is added. If the earning is currently assigned, it updates the details.
- Only Add Record if Missing - Updates all selected employees that currently are NOT assigned to the earnings. If the employee is currently assigned, no changes are made.
- Select the earnings account you wish to update. The earnings detail displays at the right.
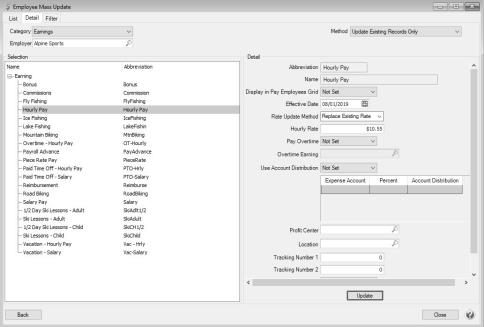
- Enter the changes for this earning. For example, in this example the new rate of $10.55 should replace the existing Hourly Pay rate effective 8/1/19.
- The Effective Date allows you to track past earnings rates for each employee.
- In the Effective Date box, select the date the new rate begins. The new rate is applied in a pay run with a pay date on or after the effective date.
- In the Rate Update Method, select the method you want to use to update the rate.
- Add to Existing Rate - Adds the amount entered in the rate field to the existing rate of an employee. The result is the employees can have different rates but all selected employees are increased by the specified amount.
- Replace Existing Rate - Assigns the new amount entered in the rate field to each selected employee. The result is all selected employees would have the same rate.
- Enter other details you want updated to each selected employee.
- Detail fields with no change should remain empty or not set. For example, an empty Expense Account box will not remove the expense account previously assigned to each employee. It will remain unchanged.
- Details entered in other earnings fields will update all employees with the same detail. For example, if Salary Expense is entered in the Expense Account box then all employees Expense Account for this earning is updated to Salary Expense.
- Click Update when changes are completed.
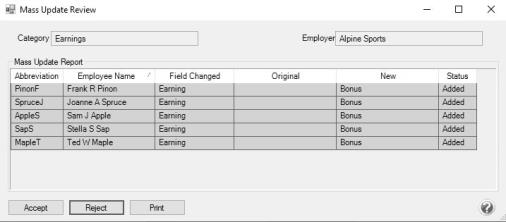
- A list of changes displays for verification.
- Each change lists an employee with the original information and the new information. The status indicates "Update".
- Each added detail lists the employee with the new information and the status "Added.
- If more than one detail is updated or added, the employee is listed for each change.
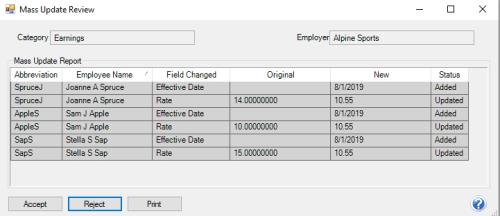
- Click Accept.
- Click Reject to cancel the changes.
- Click Print to print the list.
Assign New Deduction/Benefit Rates
- Select Setup > Payroll Details > Employee Mass Update.
- The list of employees display. Select the employees you wish to update.
- Click Select All to select all employees or select multiple employees by pressing the CTRL key while you make your selections.
- When you select the deduction/benefit to update, an option is available to update only existing records. That means only employees already assigned to this deduction/benefit will be updated.
- Click Mass Update.
- In the Category box, select Deductions/Benefits.
- In the Employer box, select the employer you want to update deduction/benefit for.
- On the right side of the screen, in the Method box, select the mass update method. In this example, we will select Update Existing Records Only.
- Update Existing Records Only - Updates the deduction/benefitinformation on employees currently assigned to the deduction/benefit.
- Update Existing/Add Missing Records - Updates all selected employees with the details. If the deduction/benefit is not assigned to an employee, it is added. If the deduction/benefit is currently assigned, it updates the details.
- Only Add Record if Missing - Updates all selected employees that currently are NOT assigned to the deduction/benefit. If the employee is currently assigned, no changes are made.
- Select the deduction/benefit account you wish to update. The deduction/benefit detail displays at the right.
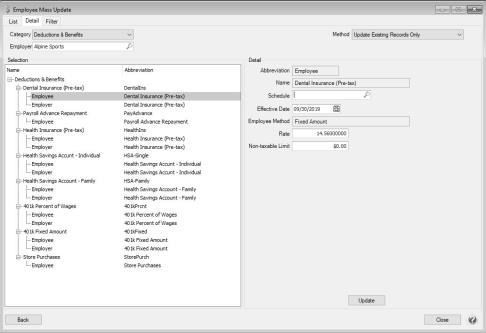
- Enter the changes for this deduction/benefit. For example, in this example the new rate of $14.56 should replace the existing Employee rate effective 9/30/19.
- The Effective Date allows you to track past deduction/benefit rates for each employee.
- In the Effective Date box, select the date the new rate begins. The new rate is applied in a pay run with a pay date on or after the effective date.
- In the Rate Update Method, select the method you want to use to update the rate.
- Add to Existing Rate - Adds the amount entered in the rate field to the existing rate of an employee. The result is the employees can have different rates but all selected employees are increased by the specified amount.
- Replace Existing Rate - Assigns the new amount entered in the rate field to each selected employee. The result is all selected employees would have the same rate.
- Enter other details you want updated to each selected employee.
- Detail fields with no change should remain empty or not set. For example, an empty Expense Account box will not remove the expense account previously assigned to each employee. It will remain unchanged.
- Details entered in other earnings fields will update all employees with the same detail. For example, if Insurance Expense is entered in the Expense Account box then all employees Expense Account for this earning is updated to Insurance Expense.
- Click Update when changes are completed.
- A list of changes displays for verification.
- Each change lists an employee with the original information and the new information. The status indicates "Update".
- Each added detail lists the employee with the new information and the status "Added.
- If more than one detail is updated or added, the employee is listed for each change.
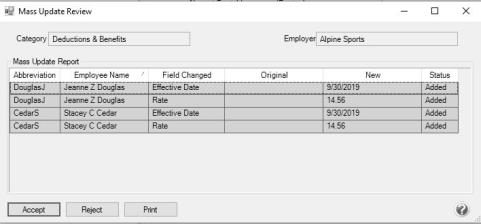
- Click Accept.
- Click Reject to cancel the changes.
- Click Print to print the list.
Add a new Earning to Multiple Employees
- Select Setup > Payroll Details > Employee Mass Update.
- The list of employees display. Select the employees you wish to update.
- Click Select All to select all employees or select multiple employees by pressing the CTRL key while you make your selections.
- When you select the earnings to update, an option is available to update only existing records. That means only employees already assigned to this earnings will be updated.
- Click Mass Update.
- In the Category box, select Earnings.
- In the Employer box, select the employer you want to update earnings for.
- On the right side of the screen, in the Method box, select the mass update method. In this example, we will select Only Add Record if Missing.
- Update Existing Records Only - Updates the earnings information on employees currently assigned to the earnings.
- Update Existing/Add Missing Records - Updates all selected employees with the details. If the earning is not assigned to an employee, it is added. If the earning is currently assigned, it updates the details.
- Only Add Record if Missing - Updates all selected employees that currently are NOT assigned to the earnings. If the employee is currently assigned, no changes are made.
- Select the earnings account you wish to update. The earnings detail displays at the right.
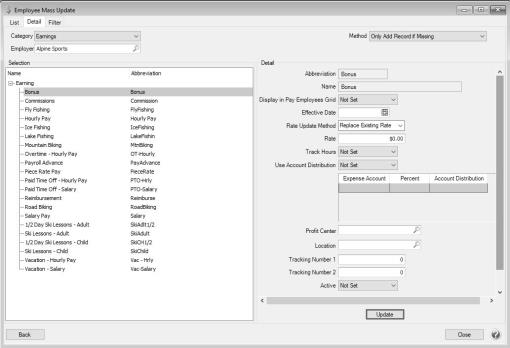
- Enter the changes for this earning. For example, in this example a new Bonus earning should be added to all employees.
- The Effective Date allows you to track past earnings rates for each employee.
- In the Effective Date box, select the date the new rate begins. The new rate is applied in a pay run with a pay date on or after the effective date.
- In the Rate Update Method, select the method you want to use to update the rate.
- Add to Existing Rate - Adds the amount entered in the rate field to the existing rate of an employee. The result is the employees can have different rates but all selected employees are increased by the specified amount.
- Replace Existing Rate - Assigns the new amount entered in the rate field to each selected employee. The result is all selected employees would have the same rate.
- Enter other details you want updated to each selected employee.
- Detail fields with no change should remain empty or not set. For example, an empty Expense Account box will not remove the expense account previously assigned to each employee. It will remain unchanged.
- Details entered in other earnings fields will update all employees with the same detail. For example, if Salary Expense is entered in the Expense Account box then all employees Expense Account for this earning is updated to Salary Expense.
- Click Update when changes are completed.
- A list of changes displays for verification.
- Each change lists an employee with the original information and the new information. The status indicates "Update".
- Each added detail lists the employee with the new information and the status "Added.
- If more than one detail is updated or added, the employee is listed for each change.
- Click Accept.
- Click Reject to cancel the changes.
- Click Print to print the list.
Add an existing Workers' Compensation Class to Multiple Employees where the Tax is Missing
- Select Setup > Payroll Details > Employee Mass Update.
- The list of employees display. Select the employees you wish to update.
- Click Select All to select all employees or select multiple employees by pressing the CTRL key while you make your selections.
- When you select the tax to update, an option is available to update only existing records. That means only employees already assigned to this tax will be updated.
- Click Mass Update.
- In the Category box, select Taxes.
- In the Employer box, select the employer you want to update tax for.
- On the right side of the screen, in the Method box, select the mass update method. In this example, we will select Only Add Record if Missing.
- Update Existing Records Only - Updates the tax information on employees currently assigned to the earnings.
- Update Existing/Add Missing Records - Updates all selected employees with the details. If the tax is not assigned to an employee, it is added. If the tax is currently assigned, it updates the details.
- Only Add Record if Missing - Updates all selected employees that currently are NOT assigned to the tax . If the employee is currently assigned, no changes are made.
- Select the tax account you wish to update. The tax detail displays at the right.
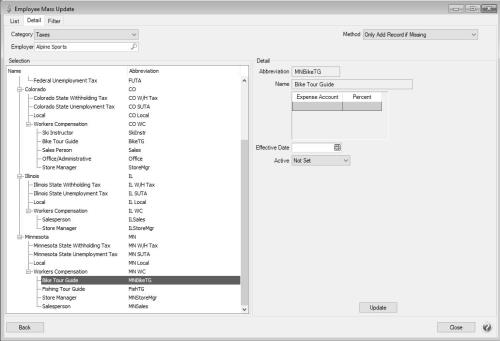
- Enter the changes for this tax. For example, in this example Minnesota Workers' Compensation Class Bike Tour Guide should be added to multiple employees.
- The Effective Date allows you to track past taxes for each employee.
- In the Effective Date box, select the effective date for the workers' compensation class.
- Enter other details you want updated to each selected employee.
- Detail fields with no change should remain empty or not set. For example, an empty Expense Account box will not remove the expense account previously assigned to each employee. It will remain unchanged.
- Details entered in other earnings fields will update all employees with the same detail. For example, if Tax Expense is entered in the Expense Account box then all employees Expense Account for this earnings is updated to Tax Expense.
- Click Update when changes are completed.
- A list of changes displays for verification.
- Each change lists an employee with the original information and the new information. The status indicates "Update".
- Each added detail lists the employee with the new information and the status "Added.
- If more than one detail is updated or added, the employee is listed for each change.
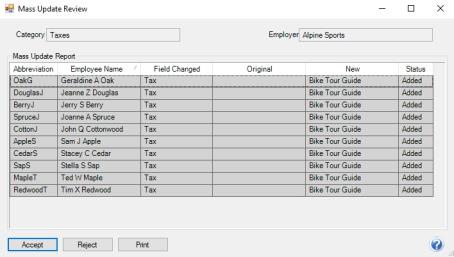
- Click Accept.
- Click Reject to cancel the changes.
- Click Print to print the list.