Entering Work Group Time Sheets
Work Group Time Sheets Video - Duration: 4 min 50 sec_24.jpg)
Processing a Payroll with Time Sheets Video - Duration: 15 min 36 sec
Processing a Payroll - Print and Post Checks Video 6- Duration: 8 min 24 sec
| Document #: | 3382 | Product: | CenterPoint® Payroll |
|---|
Some employers have groups of employees that do all the same work for the same hours. For example, a produce farmer may have a group of workers who are picking produce in the same field for the same amount of time. Instead of having to enter separate time sheets for each of the employees for the same work and hours, work group time sheets allow you to select a group of employees and enter their time once. That time will then copy to all of the employees’ records.
- Select Processes > Work Group Time Sheets or Processes >Payroll > Work Group Time Sheets.
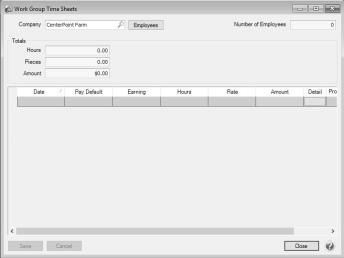
- In the Company box, select the company that you wish to enter the work group time sheets for.
- Click the Employees button. The employee list displays.
- Select the employees
that will be doing the same work for the same pay (select multiple employees
or customers by pressing the CTRL key while you make your selections), and then click the green arrow
 button to move them to the right-side of the screen. The list can be filtered by clicking the
  icon and selecting from the following filters: Abbreviation, Firstname, LastName, Department, and Employment Status.
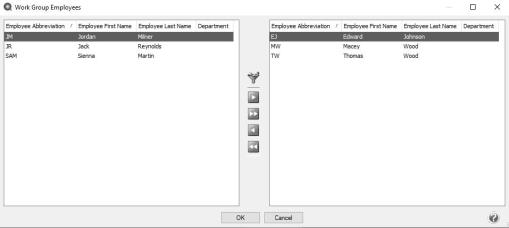
- When you have selected all of the employees you wish to enter the work group time sheet for, click OK.
- You will be returned to the Work Group Time Sheets entry screen. Entering time on this screen is the same as Entering Time Sheets from Processes > Time Sheets.
- Enter your time-in and time-out details by date (Entering time on this screen is the same as Entering Time Sheets from Processes > Time Sheets.)
- To customize the data entry grid, right-click on the grid and select Add/Remove columns, select the columns to display and order accordingly, and then click OK.
- You can use Pay Defaults to make your time sheet entry easier.
- If you need to reduce the amount of the time sheet entry, enter hours into the Breaks column. This column is only available when using the start/stop times. For example, Start Time = 08:00, Stop Time = 17:00, Breaks = 1.5, Hours = 7.5 (calculated).
- If you need to delete a time sheet entry (date) on a time sheet, right-click and select Delete Row.
-
The Tab key moves between fields.
- To move between hours and minutes on the start/stop times, press the space bar. By default, start and stop times are entered in military time format. If you would rather enter time in standard AM/PM format, go to File > Preferences > Payroll > Time Sheets and change the Time Format setting to AM/PM.
- If you want the Hours Offered and Hours Worked fields to auto-flll with default salary earning type hours, set the Default Hours for Salary Earning to Yes and verify/change the default hours in File > Preferences > Payroll > Salary Hours.
- If the Offered column is displayed in your grid and it is zero, it will be auto-filled with the entry you make in the Hours column. The total of the Hours Offered column for the selected employee will display in the Totals section in the Offered box.
- If you want to change the default expense account for an earning for a time sheet entry, it is not necessary to do that in Setup because an Expense Account column can be added to the Time Entry grid. This column is active when there is a single expense account associated with the earning and account distributions are not being used, otherwise the column is disabled and displays the first expense account associated with the earning entry. A single expense account selection is permitted in this column. Accounts selected in this column will override existing expense accounts with single entry at 100% distribution.
- When you click the Detail button, the Time Entry Detail screen displays.
- On the Detail tab, you can enter details for columns that were not included on the grid. The items on this tab represent the Date, Earning, and units involved in calculating the pay. The units can be hours for hourly earnings, pieces for piecework, or gross receipts for tips. You also have the options to allocate the pay to a department (filled in by default from the employee record) and by project. The tab also includes a Notes field that can be used to add notes regarding this time entry. If the time sheet was imported from CenterPoint Time Clock, the Notes will display from notes entered in the time clock entry.
- The Accounting & Taxes tab display all the defaults that were setup on the Employee Detail screen for this earning. You can override the selections made by selecting to use an account distribution, dividing the labor cost among multiple accounts, selecting different profit centers/departments, production centers/locations, production year/tracking number 1, production series/tracking number 2, project, etc.
- This tab also displays the defaults for taxes and includes the tax state for this employee, the SUTA state for this employee, and the worker’s compensation class. (All of these are set up on the employee record and will default here.) They may be changed as necessary or if defaults were not entered in on the employee record, they can be entered here.
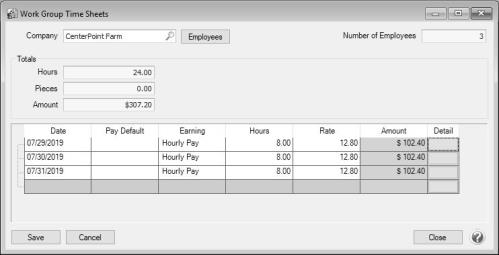
- Click Save when you complete entering the time sheet. This will copy all of the time entries to all of the selected employees. To view or modify the work group time entries before they are imported into a pay run, select Processes > Time Sheets or Processes > Payroll > Time Sheets.