CenterPoint Payroll
- Earnings
Earnings Video - Duration 10 min 14 sec_24.jpg)
| Document #: | 3134 | Product: | CenterPoint® Payroll |
|---|
Earnings are the various cash earnings or gross wages available for your employees. Typical earnings are hourly, salary, overtime, bonus, vacation, piecework, payroll advances, etc. The CenterPoint Payroll system comes with several predefined earnings. Additional earnings are normally set up before you set up employers or employees, but new ones can be added at any time.
When you create a new earning, it is automatically added to all employers in the database.
When an earning is created, you determine which taxes are applied and what deductions are taken out for the earning. If you create a new database, some default earnings have been created for you already. You may need to check and see which taxes and deductions are applied. If you add deductions\benefits or taxes you may need to re-visit these screens to make sure the right taxes and deductions\benefits are applied. If you migrated from another product, the earnings should be established for you already.
Tabs General tab Taxes Deductions & Benefits
This topic includes instructions on how to:
Additional Topics Included
- Change an Existing Earning
- Change/Verify an Earning on an Employer
- Activate/Deactivate an Earning for an Employer
- Activate/Deactivate an Earning for an Employee
- Delete an Earning
- Delete an Earning from an Employer
- Delete an Earning from an Employee
Step A - Create an Earning
- On the Setup menu, point to Payroll Details, and then click Earnings.
- Click New. If the new earning will be similar to an existing earning, select the similar earning and click Copy instead of New.
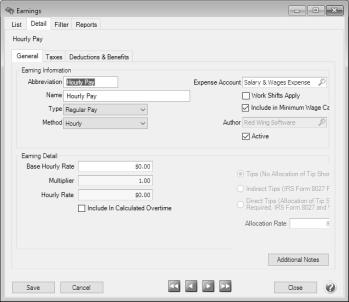
- In the Abbreviation box, enter up to ten characters of information that you can easily identify the earnings by. For example, HP for Hourly Pay or S for Salary.
- In the Name box, enter up to 35 characters of required information that describes the earning.
- In the Type box, select a type. The type assigns the taxability and deductibility to an earning and are also used for reporting purposes. The type options are:
- Regular Pay
- Manual Overtime - This type of earning is used to enter the number of hours over the Regular earning number of hours your employer has determined to be overtime. For example, if your employer determines that overtime is earned after 40 hours and an employee works 45 hours, the Regular earning will be entered with 40 hours and the Manual Overtime earning will be entered with 5 hours or if your employer determines that overtime is earned after an employee works 8 hours in a day and an employee works 10 hours, the Regular earning will be entered with 8 hours and the Manual Overtime earning will be entered with 2 hours. If you want CenterPoint Payroll to automatically calculate overtime, see the Calculated Overtime explanation in this section.
- Payroll Advance - Moves all taxes, deductions, and benefits to the Exclude From column on the Taxes tab. Allows payroll advances to be tracked by employee.
- Third Party Sick Pay - Allows non-accounting entries to be made for Government reporting purposes and makes a default journal entry for employer share of FICA and Medicare. When you create an earning with the type of Third Party Sick Pay, click the Taxes tab, for Social Security and Medicare Tax, select the Subject To But Don't Withhold (Employee Only) check boxes. When you need to make the entries for third party sick pay, enter the third party sick pay earning in a separate pay run for the applicable employee. On the Process tab, select Assign Numbers Manually, and then on the Assign Check Numbers screen click OK (without assigning check numbers). Click Post.
- Paid Leave - Paid leave earnings are used to track the number of hours used for each type of leave. To accurately calculate available leave, it is recommended that you setup a separate earning for each Leave type (vacation, sick time, paid tie off PTO, etc.) offered.
- Tips - When this type is selected, the following selections display and you will need to determine which type of tips apply to this earning:
- Tips (No Allocation of Tip Shortfall Required) - Allows you to enter tips to be included in boxes 1, 3, 5, 7, 16 and 18 of the employee W-2 form and withhold taxes (taxes will be withheld only to the point where the pay check will not be negative). A wages journal entry is not recorded.
- Indirect Tips (IRS Form 8027 Required) - Allows you to enter tips to be included in boxes 1, 3, 5, and 7 of the employee W-2 form and withhold taxes (taxes will be withheld only to the point where the pay check will not be negative). A wages journal entry is not recorded.
- Direct Tips (Allocation of Tip Shortfall is Required, IRS Form 8027 and W-2 Box 8) - Used for directly tipped employees such as wait persons, bartenders, and bell persons. Allows you to enter tips to be included in boxes 1, 3, 5, 7, 16, and 18 of the W-2 form and withhold taxes (taxes will be withheld only to the point where the pay check will not be negative). Allows you to enter tips on the Time Sheet or Pay Employee screens and additional information for entering Gross Receipts will display (gross receipts are used with the Shortfall Allocation calculation). By Federal law, the default allocation rate is 8% of gross receipts. You can choose to enter tips and manually enter a shortfall amount or enter tips and allow CenterPoint Payroll to allocate the tip shortfall. A wages journal entry is not recorded.
- Other Taxable - Select this option for an earning that does not fit into another Type selection that you pay employee wages with that you want to be included in Federal and State taxable wages and reported on your W-2 form.
- Other Not Taxable Select this option for an earning that does not fit into another Type selection that you pay employee wages with that you DO NOT want to be included in Federal and State taxable wages and reported on your W-2 form.
- Calculated Overtime - When this type is selected, the following selections will display:
- Select the Expense Account that calculated overtime will affect when the employee is paid.
- Under Earning Detail, enter the Number of Days in an Overtime Period. The default value is 7 days.
- Enter the Overtime Period Start Date to set a specific period the calculations should start. This is the first day of the first overtime period that will be included in the first pay run where calculated overtime is used. For example, if overtime is calculated weekly Sunday - Saturday, the Overtime Period Start Date must be set to Sunday or if overtime is calculated biweekly Wednesday - Tuesday, the Overtime Start Date must be set to a Wednesday of the right numbered week.
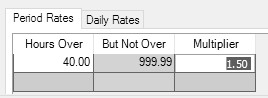
If you calculate overtime for a period (not daily), select the Period Rates tab. Enter your specific overtime calculation settings by using the Hours Over, But Not Over, and Multiplier settings.
- For example, overtime is paid at 1.5 times the regular rate when an employee works over 40 hours. The regular rate is the average of the rates paid on any earnings with the Calculate Overtime check box selected (see Step B). Enter the information below in the tab:
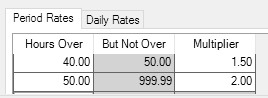
- Or, overtime is paid at 1.5 times the regular rate when an employee works from 40 -50 hours and 2.00 times the regular rate for all hours over 50 hours. The regular rate is the average of the rates paid on any earnings with the Calculate Overtime check box selected (see Step B). Enter the information below in the tab:
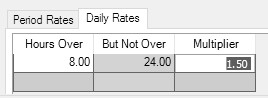
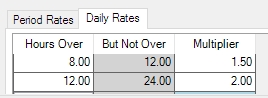
If you calculate overtime daily, select the Daily Rates tab. Enter your specific overtime calculation settings by using the Hours Over, But Not Over, and Multiplier settings.
Note: For daily overtime to be automatically calculated by CenterPoint, all earnings that are included in overtime calculations must be entered on time sheets.- For example, if you pay overtime when an employee works more than 8 hours in a day at 1.5 times the regular rate. The regular rate is the average of the rates paid on any earnings with the Calculate Overtime check box selected (see Step B). Enter the information below in the tab:
- Or, if you pay overtime when an employee works more than 8 hours but not more than 12 hours in a day at 1.5 times the regular rate and 2.00 times the regular rate for all hours over 12. The regular rate is the average of the rates paid on any earnings with the Calculate Overtime check box selected (see Step B). Enter the information below in the tab:
 Note: You can create multiple calculated overtime earnings if you have employees that have different overtime calculations. For example, most employees are paid weekly overtime, but some employees with Flexible Schedules have 14 day overtime periods or employees that work three 12 hour days are handled differently than employees that work 8 hour days.
 - In the Method box, select one of the method options:
- Salary - When this method is selected, an Earning Detail section is added to the Earnings screen that includes the Effective Date, the Schedule (Annual, Monthly, Semi-monthly, Daily, Weekly, Biweekly, Semi-monthly, Monthly, Quarterly, Semi-annually, or Annually), the Base Salary Rate, and a Require Hours To Be Tracked check box (used to calculate taxes based on work hours (some tax jurisdictions require this option), calculate minimum wage, and keep track of whether minimum wage requirements are being met, and is also used for payroll reports that require hour tracking).
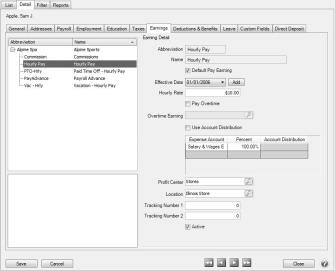
- Hourly - When this method is selected, an Earning Detail section is added to the Earnings screen that includes the Effective Date, Base Hourly Rate (allows you to enter a rate of pay and apply that rate to a number of hourly earnings the employee may have setup on the earnings screen), Pay Overtime check box that when selected will calculate overtime by multiplying the Base Hourly Rate by the Multiplier, and the Overtime Earning account that overtime should post to.
- Piece Rate - When this method is selected, an Earning Detail section is added to the Earnings screen that includes the Effective Date, Base Piece Rate (allows you to enter a rate of pay and apply that rate to a number of piece rate earnings the employee may have setup on the earnings screen), Unit of Measure, and a Require Hours To Be Tracked check box (used to calculate taxes based on work hours (some tax jurisdictions require this option), calculate minimum wage, and keep track of whether minimum wage requirements are being met, and is also used for payroll reports that require hour tracking).
- Fixed Rate - When this method is selected, an Earning Detail section is added to the Earnings screen that includes the Rate, and a Require Hours To Be Tracked check box (used to calculate taxes based on work hours (some tax jurisdictions require this option), calculate minimum wage, and keep track of whether minimum wage requirements are being met, and is also used for payroll reports that require hour tracking).
- In the Expense Account box, select the expense account for this earning. All pay calculated using this earning will be charged to this expense account.
- Select the Work Shifts Apply check box to associate this earning with a work shift and adjust the earning accordingly in Time Sheets or Pay Employees.
- The Include In Minimum Wage Calculation check box is used to include/exclude the earning in the minimum wage calculation. Earning Types of Regular Pay, Overtime Pay and Tips Pay will automatically select the check box and earning types of Payroll Advance, Third Party Sick Pay, Paid Leave, Other Taxable and Other Not Taxable do not select the check box. You can select or unselect the check box for any earning type.
- The Active check box will automatically be selected. When the check box is not selected, the Earning will not be listed as a selection in Setup > Payroll Details > Employers unless the Employer already has the Earning selected.
- Complete Earning Detail section. The options change based on the method displayed in Step 5. The options are listed below:
- Base Salary Rate - When the Salary method is selected, an Earning Detail section is added to the Earnings screen that includes the Base Salary Rate, the Schedule (Daily, Weekly, Biweekly, Semi-monthly, Monthly, Quarterly, Semi-annually, or Annually), Multiplier, the Rate (will be the same as the base rate unless the earning is an overtime earning with an hourly, piece rate, or salary method and the base rate has been multiplied by the multiplier value which would result in the rate being a different value than the base rate), and a Require Hours To Be Tracked check box (used to calculate taxes based on work hours (some tax jurisdictions require this option), calculate minimum wage, keep track of whether minimum wage requirements are being met, and is also used for payroll reports that require hour tracking).
- Base Hourly Rate - When the Hourly method is selected, an Earning Detail section is added to the Earnings screen that includes the Base Hourly Rate (allows you to enter a rate of pay and apply that rate to a number of hourly earnings the employee may have setup on the earnings screen), Multiplier, and Hourly Rate (will be the same as the base rate unless the earning is an overtime earning with an hourly, piece rate, or salary method and the base rate has been multiplied by the multiplier value which would result in the rate being a different value than the base rate).
- Base Piece Rate - When the Piece Rate method is selected, an Earning Detail section is added to the Earnings screen that includes the Base Piece Rate (allows you to enter a rate of pay and apply that rate to a number of piece rate earnings the employee may have setup on the earnings screen), Multiplier, Piece Rate (the rate will be the same as the base rate unless the earning is an overtime earning with an hourly, piece rate, or salary method and the base rate has been multiplied by the multiplier value which would result in the rate being a different value than the base rate), Unit of Measure, and a Require Hours To Be Tracked check box (used to calculate taxes based on work hours (some tax jurisdictions require this option), calculate minimum wage, keep track of whether minimum wage requirements are being met, and is also used for payroll reports that require hour tracking).
- Fixed Rate - When this method is selected, an Earning Detail section is added to the Earnings screen that includes the Rate and a Require Hours To Be Tracked check box (used to calculate taxes based on work hours (some tax jurisdictions require this option), calculate minimum wage, keep track of whether minimum wage requirements are being met, and is also used for payroll reports that require hour tracking).
- Include in Calculated Overtime - This selection displays for all earnings except those with a Third Party Sick Pay, Payroll Advance, or Overtime types. If this check box is selected, the earning will be used to determine and then calculate the rate used to pay overtime.
- To add notes to this earning, click Additional Notes, enter the notes, and then click OK.
- Select the Taxes tab. The taxes tab allows you to specify which taxes are calculated on this earning,
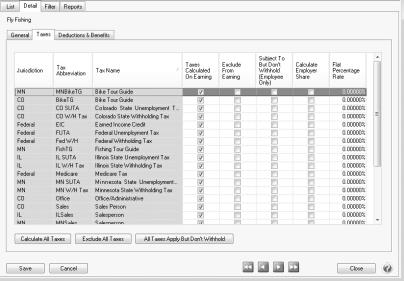
- For each tax, select the appropriate column accordingly:
- Taxes Calculated On Earning - As long as that tax is applied to the employee, the tax will be calculated. This column will be selected for all earnings except for an earning with a Payroll Advance type. Select this option if this earning should have the selected taxes calculated when it is assigned to an employee. To select all of the taxes to be calculated for this earning, click Calculate All Taxes.
- Exclude From Earning - This column will not be selected for most earnings (except for an earning with a Payroll Advance type). Select this column to exclude calculating tax for this earning. To select all taxes to be excluded from the tax calculation, click Exclude All Taxes.
- Subject To But Don't Withhold (Employee Only) - Select this column if the earning is subject to taxes for 943, 941, W-2, or state tax reporting but not withheld from the employee. To select all of the taxes to be subject to tax but not withheld, click All Taxes Apply But Don't Withhold.
- Calculate Employer Share - Select this column to force the calculation of taxes for the employer when they have otherwise been excluded from the Earning (by selecting the Exclude from Earning column), for example for third party sick pay (if the insurance company sends the W-2 for third party sick pay and you exclude the Federal and State withholding, Social Security and Medicare, but then the employer's share of Social Security and Medicare needs to be calculated).
- Flat Percentage Rate - This column is used in conjunction with the Taxes Calculated on Earning column. When the Taxes Calculated on Earning column is selected and a flat percentage rate is entered (greater than zero), the flat percentage rate entered will be used instead of the normal rate. When this column is selected, the flat percentage rate will always override a calculated amount (tax tables). If an earning is set to use the Flat Percentage Rate tax calculation for state or local tax withholding and the tax is set to Round Results for the employer, the tax will round to the nearest dollar.
Alternatively, you can click the Calculate All Taxes, Exclude All Taxes, or All Taxes Apply But Don't Withhold buttons to check all the taxes for that column.
When employees are added into CenterPoint Payroll, you will need to select which taxes will be available. You may have to return to this screen and make some adjustments. The default is that any new taxes will be marked as Taxes Calculated on Earning, so you will only have to adjust if it differs.
The first three columns on the Taxes tab help identify the tax. The Tax Jurisdiction column will display the State abbreviation for State Taxes and will display Federal for Federal Taxes. The Tax Abbreviation and Tax Name also help identify the tax.
- Click the Deductions & Benefits tab.
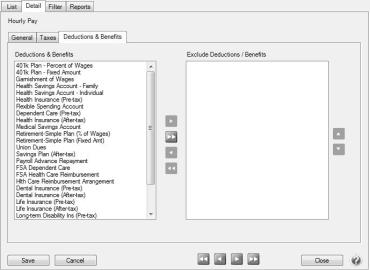
- On the left side of this screen, all of the deductions/benefits that have been setup display. To exclude a deduction or benefit from this earning, in the Deductions & Benefits column, highlight the deduction/benefit and use the arrow keys in the middle of the screen to move the deduction or benefit to the Exclude Deductions / Benefits column on the right side of the screen. The default for newly added deductions/benefits would be to calculate them on this earning. You may have to revisit this screen if additional benefits and deductions are added after adding this earning.
- Click Save to save the earning and return to the List tab, or click Close to save the earning and close the Earnings screen. The earning will automatically be added to all employers in the database.
- At the Do you want to add this earning to employees? message, click Yes
- Select the employee that this earning should be added to and then click the right arrow
 . .
. . - Click Add.
- At the Are you sure you want to add the earning to selected employees? message, click Yes.
- Click OK.
Step B - Add an Earning to an Employee Record
Follow the instructions below to add earnings to individual employee records. If you have an earning that should be added to multiple employees, see Step C - Add an Earning to Multiple Employees e option instead.
- Select Setup > Employees.
- Select the employee requiring the earning and click Edit.
- Select the Earnings tab.
- Select the Employer on the left side of the screen.
- The list of available earnings will then be displayed at the bottom of the screen. Select the appropriate earnings. The selected items will then automatically be included in the list of earnings for this employee at the top of the screen.
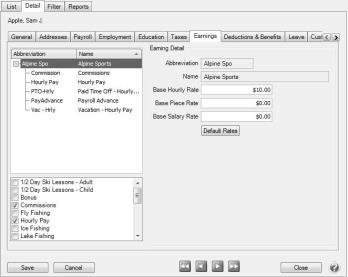
- Select the earning under the company. The details for that earning are displayed to the right.
- The fields displayed in the Earning Detail are dependent on which options were selected when the earning was originally setup (Setup > Payroll Details > Earnings). Complete the fields with information specific to this employee.
- Click Save. Repeat Step B for each employee that needs an earning added to their employee record.
Step C - Add an Earning to Multiple Employee Records
- Select Setup > Earnings.
- Select the earning you want to add to multiple employee records.
- Right-click and select Add to Employees.

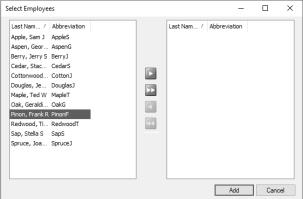
- Select the employees that this earning should be added to and then click the right arrow . To select all employees, click the double-right arrow
 .
. - Click Add.
- At the Are you sure you want to add the earning to selected employees? message, click Yes.
- The number of employees the earnings was added to will display, click OK.
- To review earning details for the employees, select Setup > Employees > Earnings tab. From the upper-left side of the screen, select the earning that was added, and then on the right side of the screen review the details.
Change an Existing Earning
- On the Setup menu, point to Payroll Details, and then click Earnings.
- Select the earning you want to change, and then click Edit.
- Edit or view the earning detail.
- To edit another earning, click the green arrow buttons to display the previous/next earning.
- Click Save to save the earning and return to the List tab, or click Close to save the earning and close the Earnings screen. To return to the List tab without saving the earning, click Cancel. To close the Earnings screen without saving the earning, click the X in the upper-right corner.
Change/Verify an Earning on an Employer
- On the Setup menu, point to Payroll Details, and then click Employers.
- Select the employer you want to verify/change an earning for, and then click Edit.
- Click the Earnings tab.
- In the Selected Items Window (upper-left), select the earning you want to verify/change. The earning will display under Earning Detail on the right-side of the screen.
- Under Earning Detail, enter the specifics about this earning for this employer including expense accounts and rates. All types of earnings have similar details:
- Account - For each earning, you will have to identify the account that it is posted to. On this particular earning, the box is labeled Expense Account; however, you may select any account. When you pay wages, your bank account is credited and the account in this box represents the account to be debited. Usually, this is an expense account, costs of good account, or work in process account)
Note: If you select an account that is not of the expected account type, you will receive a message. If you choose to assign the unexpected account type, click Yes. If you want to assign a different account, click No to assign a different account. For example, in an Expense Account box, CenterPoint is expecting an Account Type of Expense; however, you may have a valid reason to assign a Work in Process Account which has an Account Type of Asset instead of an Expense Account.- Active – After an earning has been used, it cannot be deleted. It can, however, be made inactive by clearing the check mark in the Active box. It will, therefore, no longer be available for data entry until it is made active again.
- Different types of earnings have specific details:
- Hourly Earnings:
- Hourly Rate – Entering an hourly rate on this screen creates a default for this earning. As this earning is assigned to employees in the employee setup, this employer level default automatically fills in on the employee record. However, it can be overridden on the employee record. This is NOT where you would do a mass update of an hourly rate for your employees.
- Pay Overtime - If you pay overtime for this earning, select the check box to indicate that you pay overtime to employees that this earning is assigned to. If the Pay Overtime check box is selected, it will enable the Overtime Earning field where you can select the earning to record overtime to.
- Salary Earnings:
- Rate – Entering a rate on this screen creates a default for this earning. As this earning is assigned to employees in the employee setup, this employer level default automatically fills in on the employee record. However, it can be overridden on the employee record. This is NOT where you would do a mass update of a rate for your employees. In the Rate box, enter in the appropriate rate that corresponds to the selection box on the right. The choices in this box are to enter rates of these types: Daily, Weekly, Bi-Weekly, Monthly, Semi-Monthly and Annual.
- Require Hours to Be Tracked - If you are required to track hours or want to track hours always on this earning, then select this check box. This selection will stop entries made without entering the hours worked.
- Piece Rate:
- Base Rate – Entering a base rate on the employer record creates a default. When this earning is assigned to an employee, it will fill this base rate in as a default. The base rate can then be overridden at the employee level. This is NOT where you would go to update the rate for all employees who get this rate. That would be done in Mass Update.
- Unit of Measure – Select from a list of pre-defined units of measurement to provide a better description of each piece. If the unit of measurement is not in the list, right-click and select New to create a new one.
- Require Hours to Be Tracked - If you are required to track hours or want to track hours always on this earning, then select the Require Hours to Be Tracked check box. This will stop entries made without entering the hours worked.
- Overtime Earnings:
- Base Hourly Rate – Entering a base hourly rate on the employer record only sets a default. When this earning is added to the employee record, the default base hourly rate set here will automatically be copied into the employee record. It can then be overridden.
- Multiplier – For earnings with a type of overtime and a method of hourly, piece rate, or salary, enter a Multiplier. For example, if an employee earns $10.00 per hour and an employer pays 1.5 times that base hourly rate for overtime earnings or $15.00 per hour, enter 1.5 in the Multiplier box.
- Hourly Rate – A rate will be calculated by multiplying the Base Hourly Rate * Multiplier and displayed in the Hourly Rate box
- Hourly Earnings:
- Click Save to save the employer and return to the List tab, or click Close to save the employer and close the Employers screen.
Activate/Deactivate an Earning on for an Employer
If an earning is marked as inactive on an employer, it will not available to assign it to employees. This would normally be done only if you will no longer be adding this earning to new employees.
- On the Setup menu, point to Payroll Details, and then click Employers.
- Select the employer you want to activate or deactivate an earning for, and then click Edit.
- Click the Earnings tab.
- In the Selected Items Window (upper-left), select Earnings.
- Select the earning that you want to activate or deactivate.
- Under Earning Information (right), check the Active check box to activate the earning. Uncheck the Active box to deactivate. An active earning is available to add to employees. If you deactivate an earning it will remain active for employees currently using the earning, but the earning will not be available to add to additional employees.
- Click Save to save the employer and return to the List tab, or click Close to save the employer and close the Employers screen.
Activate/Deactivate an Earning for an Employee
If an earning is marked inactive on an employee, it will no longer be calculated when processing payrolls for this employee.
- On the Setup menu, click Employees.
- Select the employee you want to activate an earning for, and then click Edit.
- Click the Earnings tab.
- In the Selected Items Window (upper-left), select the Employer this earning should be activated or deactivated for.
- In the Selected Items Window, select the earning you want to activate or deactivate.
- Under Earning Detail (right), check the Active check box to activate this earning. Uncheck the Active box to deactivate the earning.
- Click Save to save the employee and return to the List tab, or click Close to save the employee and close the Employees screen.
Delete an Earning
- On the Setup menu, point to Payroll Details, and then click Earnings.
- Select the earning you want to delete, and then click Delete.
- At the "Are you sure you want the item deleted?" message, click Yes.
Delete an Earning from an Employer
An earning can only be removed from an employer if it's not assigned to any employees.
- On the Setup menu, point to Payroll Details, and then click Employers.
- Select the employer you want to delete an earning from, and then click Edit.
- Click the Earnings tab.
- In the Selected Items Window (upper-left), select Earnings.
- In the Items Available for Selection Window (lower-left), select the check box next to the earning you want to delete to clear the check box. You cannot delete an earning from an employer if it has added to any employees.
- At the "Are you sure you want to delete this item?" message, click Yes.
- Click Save to save the employer and return to the List tab, or click Close to save the employer and close the Employers screen.
Delete an Earning from an Employee
- On the Setup menu, click Employees.
- Select the employee you want to delete an earning from, and then click Edit.
- Click the Earnings tab.
- In the Selected Items Window (upper-left), select the Employer this earning is for.
- In the Items Available for Selection Window (lower-left), select the check box next to the earning you want to delete to clear the check box.
- At the "Are you sure you want to delete this item?" message, click Yes.
- Click Save to save the employee and return to the List tab, or click Close to save the employee and close the Employees screen.