CenterPoint® Fund Accounting
- Create a Vendor
Related Help
_24.jpg) Vendor General/Address tabs Video - Duration: 14 min 17 sec
Vendor General/Address tabs Video - Duration: 14 min 17 sec
Vendor - Credit Cards/Custom Name Fields tabs Video - Duration 3 min 24 sec
Vendor - Email/Print tab Video - Duration 5 min 04 sec
Vendor ACH Payments tab Video - Duration 5 min 51 sec

Vendors are individuals or companies who you purchase goods and/or services from. Vendors are used when entering Vendor Invoices (AP) and Payments.
Tabs General Addresses Credit Cards Custom Name Fields Email/Print ACH/Payments
- Select Setup > Vendors.
- Click the New button at the bottom of the screen.
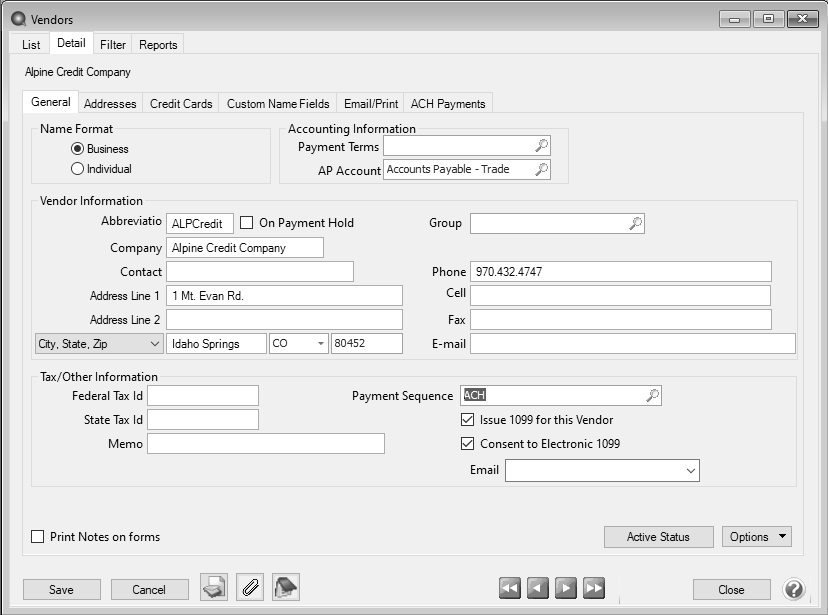
- Select an appropriate Name Format. The Name Format selection is used to format the Name box to accept an individual's name, or a company name.
- Under Accounting Information, select an appropriate Payment Term. The Payment Term is used in invoicing to calculate the Invoice Due Date.
- In the AP Account field, select the default AP Account for this vendor. If an AP Account is not entered, the default from Preferences (File > Preferences > Vendor Invoices > Default Accounts) will be used.
- In the Abbreviation box, enter up to ten characters that will easily identify the vendor.To set how duplicate abbreviations are handled by CenterPoint, right-click and select Allow Duplicates (Use this option to reuse and not require the value in the Abbreviation box.), Warn if Duplicate (Use this option to receive a warning if a duplicate abbreviation is used. A confirmation message will display. To continue using the duplicate value, click Yes.), or No Duplicates Allowed (Use this option to require a unique value in the Abbreviation box. A message will display. Click OK to return and enter a unique value.).
- Select the On Payment Hold check box to place a hold on all payments to this vendor. When a vendor is on payment hold, their invoices will not display on the Pay Invoices Due screen and when saving a payment on the Payments screen a "You cannot save this transaction because the Vendor is on payment hold." message displays because the vendor is on hold.
- Select the user-definedGroup to assign the vendor to, for example Wholesale, Retail, Referral Partner. Groups are used in reporting and as a filter to limit the range of vendors in many reports.
- Enter the vendors full company name or individual's name (the format of this field will depend on which option was selected in step 3).
- Enter the appropriate address information.
- Enter the Vendors Phone, Fax, and E-mail address (if applicable).
- The Federal and State Tax Id fields are optional, but are used when printing tax reports (for example, 1099's) or processing ACH files.
- The Memo field is used when printing checks. Include up-to 50 characters of information that you want to print on the check portion of a printed check (for example, your account number).
- In the Payment Sequence box, enter a numbering sequence if this vendor should use a different default numbering sequence than is used by default in Processes > Purchases > Payments rather than the default numbering sequence for the Payments screen. For example, if this vendor is paid online rather than being issued a paper check, select an online payments sequence. To create a new numbering sequence, right-click, select New, and follow the Numbering Sequence topic for additional information.
- If you want to print a 1099 for this vendor, select the Issue 1099 for this Vendor check box.
- Select the Consent to Electronic 1099 check box if this vendor consents to receiving only a 1099 form that can be viewed through Aatrix (the vendor will not receive a paper form). If this box is selected, a signed consent form must be on file. This form can be printed from Federal & State Payroll Forms & Reports > Federal Tax Forms and selecting Electronic 1099 Consent in the Report box.
- If the email address you want to include with the electronic consent is listed in the Email drop-down list, select the address, or enter a new email addresses.
- To select which companies/funds this name is active in, click the Active Status button, select the companies/funds the name is active in (the default is active for all companies/funds), and then click OK.
- To add notes to this vendor, click the Notes icon (
 ), enter the notes, and then click OK. When notes are added from the Additional Notes icon, the icon will display with a yellow background.
- If you want to select which fields are necessary for data entry, click the Options button and then select Set Tab Stops
- Select the Print Notes on forms check box to print notes entered on the Additional Notes screen on a purchase order or check when the Payee Notes field is added in Setup > Forms Designer > Check Stub Form Designer or Purchase Order Form Designer
- In the Location Type box, click and select a location type, or type a location type. Name location types are a way to categorize addresses for a name. Typical location types are shipping, billing, business, etc. To create a new location type, right-click and select New, and then follow the Name Location Types topic. To set a location type as the default, right-click and select Set As Default. To clear the default location type, right-click and select Clear Default.
- In the Address Name box, enter up to 50 characters of required information that describes the address (for example: Corporate Office, Warehouse, Home, etc.).
- In the Contact box, enter up to 30 characters of optional information that describes the contact at this address. If the Print Contact on Forms check box is selected, the Contact Name will print on forms instead of the name entered on the General tab.
- In the Address Line 1 and Address Line 2 boxes, enter the street address and any other information, for example, suite number or post office box number for this location type.
- If your preferences are set to use the automatic Zip Code/Postal Code Lookup for addresses, in the Zip/Postal Code box enter the zip code or postal code. Then, select the appropriate city/state or city/province from the list. If your preferences are not set to use the automatic Zip Code/Postal Code Lookup for addresses, enter the City/State/Zip, City/Province/Postal Code, or Address 3 Foreign Address information.
- Select the Print Contact on Forms check box, the Contact Name will print on forms instead of the vendor name entered on the General tab.
- If this address is not active, unselect the Active check box.
- Under Use this Address as the Default for, select any combination of Billing, Shipping, Business, or Pay To.
- Business - The address that is entered on the General tab is referred to as the Business address.
- Billing - This address is used for billing statements and invoices.
- Shipping - This address is the address that can be used if the shipping address is different than the business address.
- Pay To- This address defaults with the Name field in transaction entry screens.
- Under Communication Methods for this Address, in the Information box, enter the information specific to the communication method (for example, phone number, cell phone number, e-mail address, etc.).
- The Custom Name Fields tab can be used to track additional information regarding a vendor. Custom fields are optional.
- Click on the Email/Print tab. The Email Addresses and Options fields that are active will depend on the modules that you have purchased and registered and if the name is a vendor a customer. Use these options to set up multiple e-mail addresses where invoices, statements, sales orders, purchase orders, checks (advices), receipts
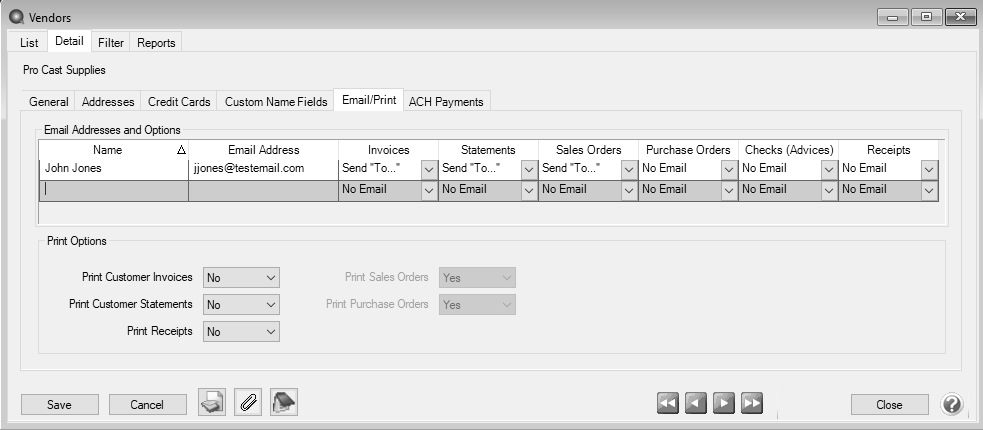
The Print Options fields that are active will depend on the modules that you have purchased and registered and if the name is a vendor a customer. The available fields are: Print Customer Invoices, Print Customer Statements, Print Receipts, Print SalesOrders, and Print Purchase Orders. Use these options to determine if invoices, statements, sales orders, and purchase orders should be printed for this vendor. The Print Options settings will be used to set the default image on transaction entry screens. A printer image with a check mark on it will mean the form will Print and a Printer image with a cross-through on it will mean the form will not print.
- Click the ACH Payments tab. If you plan to electronically transfer payments to payees, see the ACH Setup & Processing document for more information.
- To activate ACH electronic payments for this vendor, select the Activate ACH Transactions check box.
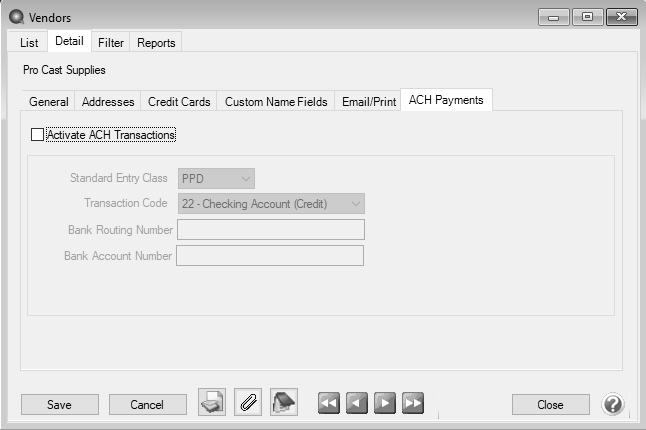
- Standard Entry Class (SEC) code to designate how the transaction was authorized by the originator. Select one of the options below:
- PPD (Preauthorized Pay/Deposit) - for credits and debits that process against consumer accounts for entries such as payments to vendors and direct deposit.
- CCD (Corporate Credit or Debit) - for credit and debit entries processed against non-consumer accounts for transactions such as payments to vendors and collections from customers.
- CTX (Corporate Trade Exchange) - use CTX, like CCD, to facilitate business-to-business transfer of funds as either debits or credits.
- Select one of the Transaction Codes below to identify the type of entry that should be included in the ACH file for the vendor. A pre-note is the commonly used term for an Automated Clearing House (ACH) pre-notification. It is a zero dollar ACH entry that should be sent at least six banking days prior to the first live ACH credit being sent. Under NACHA Operating Rules (also known as ACH rules), a pre-note’s purpose is to “validate” the routing number and account number of the receiving bank or credit union.
- 22 - Checking Account (Credit)
- 23 - Prenote Checking (Credit)
- 32 - Saving Account (Credit)
- 33 - Prenote Savings (Credit)
- 52 - Loan Account (Credit)
- 53 - Loan Prenote (Credit)
- In the Bank Routing Number box, enter the bank transit/routing number for this vendor (assigned by the American Banking Association) for where the ACH deposit is to be made. This number is eight digits plus a ninth "check" digit. CenterPoint will verify that the routing number is a valid ABA number and display a warning if it is not. You can choose to continue with your entry if the number is invalid.
- In the Bank Account Number, enter the bank account number
- Click Save. Click Close.
|
Document: 3005 |
|---|