CenterPoint® Fund Accounting
- Shortcuts/Time Savers in Transaction Entry
Related Help
_24.jpg) Lookups Video - Duration: 11 min 20 sec
Lookups Video - Duration: 11 min 20 sec
Customer Lists Using Filters Video - Duration: 5 min 22 sec
Right-click Options Video - Duration: 4 min 10 sec
File Attachments Video - Duration: 8 min 17 sec

CenterPoint offers multiple ways to customize the setup and transaction entry screens. These modifications and processes will enable you to enter transactions more efficiently.
Keyboard and Function Keys (Hot Keys)
Using the Set as Default option
Dates
The Date field in transaction entry screens will default to today's date. The date can be changed by pressing F4 or clicking the calendar icon to display a calendar or by simply entering the correct date for the transaction.
There are various ways that the date can be entered.
- If only the day of the month is entered in a Date field, the current month and year will automatically be used. For example, if it's February, 2024 and 25 is entered in a date field the system will auto-fill the date with 2/25/2024.
- If the month and day is entered (02/25 for example), the system will auto-fill the current year. The month and day can be entered with or without a slash or hyphen as a separator. If it is entered without the separator, then two digits must be entered for both the month and day (0225).
- Or the full month, day and year date can be entered (12/25/24). Again, the date can be entered with or without a separator. If entered without a separator, each field must be entered as two or four characters.
Keyboard and Function Keys (Hot Keys)
The keyboard can be used to move through the transaction entry screen. Using specific keyboard keys and combinations provides a way for you to do things that would normally be done with the mouse.
- Move the cursor to the next field by pressing Tab.
- Move the cursor to the previous field by pressing Shift + Tab .
- When you press Enter in a list box the selection is accepted, on a command button the action is performed, and acts like a Tab key if the Pressing Enter Acts Like Tab Key selection is set to Yes in the File > Preferences > General > Defaults preference.
- Move up or down in list boxes by using the Arrow keys.
- In a field with a list box, press the Alt + Down Arrow to display the list.
- On a command button press the Space bar to perform the action or on a check box toggles the selection.
- In a text field, pressing Delete removes the highlighted text.
- In a text field, pressing Home positions the cursor at the beginning of the text field and pressing End positions the cursor at the end of the text field.
- In a screen where the VCR buttons


 are available (Names, Accounts, Employees, etc.) press Alt + Home to move to the first record in the list, press Alt + End to move to the last record in the list, press Alt + ← to moves to the previous record in the list, or press Alt + → to move to the next record in the list.
There are a variety of function keys available in transaction entry. Using the function keys provides a way for you to do things that would normally be done with the mouse.
- Any field that has a Lookup button
 (for example, Pay to the Order of, Account, etc.) that can be selected with a click of the mouse button, can also be selected by pressing F4 on the keyboard.
 - In numeric and amount fields, pressing F9 will open a calculator. After using the calculator, press F9 again to input the sum of the calculation into the field in CenterPoint.
- Pressing F4 in a Date field, will display a calendar that can be used to select the date.
- Hot keys can be used instead of clicking on buttons with the mouse. The underscored letter on a button is a hot key. For example, the Save button in transaction screens has the letter S underscored. Pressing the Alt key + the letter S, will Save the transaction the transaction or post the transaction (on some transaction screens) without having to use the mouse to click on the Save or Post button. The Options button in transaction screens has the letter O underscored. Pressing the Alt key + the letter O, will open the menu for the Options button without having to use the mouse to click on the Options button.
Lookups
Many of the fields in transaction entry display a Lookup button that provides you with a list of items that can be used for that field. The data in those lists can be searched to find the item you need. Unless custom lookup options have been specified for that field, CenterPoint will search the data based on the options selected in File > Preferences > General > Defaults.
The Lookup Settings in File > Preferences > General > Defaults define how entering data into the Lookup box searches the information in the associated list. The options for how the lists are searched are:
- Use Auto-Complete - As you enter characters in a Lookup box, CenterPoint attempts to match the characters entered in a list. If a match is made, the record will automatically display. By selecting this option all lookup boxes by default will use the auto-complete feature. This selection can be overridden on a field-by-field basis throughout the system. Auto-complete fills in the field as you type. It looks for the first match of the characters typed in and fills the field with it. If that is not the match that you want, continuing to type in additional characters usually narrows it down to the selection you are looking for.
- Allow to Query For Items On Multiple Fields - Enter characters and press the Tab key to display a filtered list of matched records. The query will attempt to match the characters in the name or abbreviation. If nothing is found, the query searches for the character string within the name or abbreviation. If this option is selected, you can have CenterPoint lookup a record based on multiple fields. For example, an account with an account number of 1234 and an abbreviation of ELEC and an account name of Electricity can be looked up by either typing in the number, abbreviation, or name. The auto-complete option only allows lookup on one field, so it would have to be either Number or Abbreviation or Name, but not any combination of them.
- Initial Search Contents
- Begins With - will search only the first characters of the columns specified under Searched By Columns.
- Contains - will search the entire string for the match. For example, if the name is State of Minnesota and you enter State, a match is completed or
Several custom lookup options are available for any field containing a Lookup button. The options will allow you to specify which fields to search for matches and how the information will be displayed. To access the Lookup Options, right-click in any Lookup field and select Options.
- To change the columns in the list that the lookup searches when data is entered on a field-by-field basis:
- In the following example, the Customer lookup box will search the Contact column as well as the default Last Name, First Name, and Abbreviation columns for all cusotmers that contain the data entered into the Customer lookup box
- From the Customer lookup box, right-click and select Options.
- Select Use Setting For This Control.
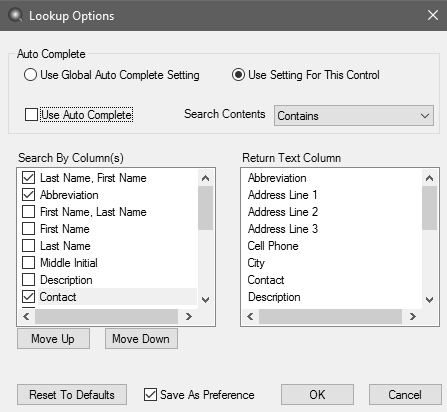
- Under Search By Column(s), select Contact.
- Select Save asPreference and click OK.
- To change the initial search contents for lookups on a field-by-field basis:
- In the following example, during invoice entry, Items are searched by entering a specific word in the Item box.
- From the Item lookup box, right-click and select Options.
- Select Use Setting For This Control.
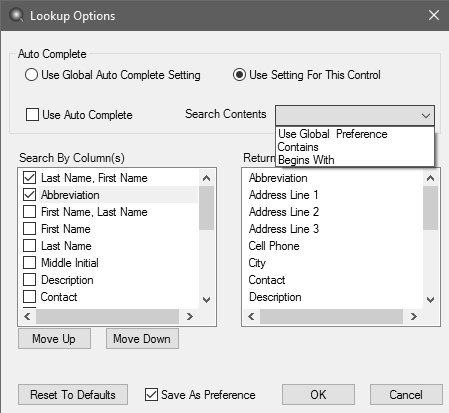
- In the Search by Contents box, select Contains.
The options available for customizing field-by-field lookups using the Search by Contents box are::
- Use Global Preference - uses the Lookup Field Settings preferences set in File > Preferences > General > Defaults.
- Begins With - will search only the first characters of the columns specified under Searched By Columns.
- Contains - will search the entire string for the match. For example, if the name is State of Minnesota and you enter State, a match is completed.
- Select Save as Preference and click OK.
When the Lookup button
- After pressing F4 or clicking on the Lookup button
- Select Add/Remove Columns.
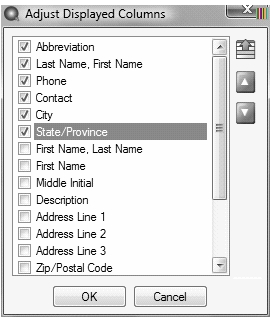
- Select each of the columns that you would like displayed in the Lookup screen for this field. Use the Move Up and Move Down arrows on the right to decide the order the columns will be displayed.
- Click OK.
Set As Default Option
If you typically use the same company or bank account in the transaction entry screens, these selections can be set as the default so that you do not have to select or enter the information for each transaction. To access this option, select the list item (Company, for example) that you want this screen to display automatically as the default for this database, right-click, and then select Set As Default. This option is available in a variety of fields throughout the transaction entry screens.
Tab Stops
It is easy to customize your transaction entry screens by setting tab stops. Tab stops allow you to choose which fields the cursor stops at in each transaction entry screen. For example, if you never change the bank account or the batch, remove the tab stops so your cursor skips those data entry boxes.
To set tab stops
- On any transaction entry screen, click Options, and then click Set Tab Stops.
- On the Set Tab Stops screen, select the fields to stop at during transaction entry.
- Click OK.
Customize the Columns Displayed in the Transaction Entry Grids
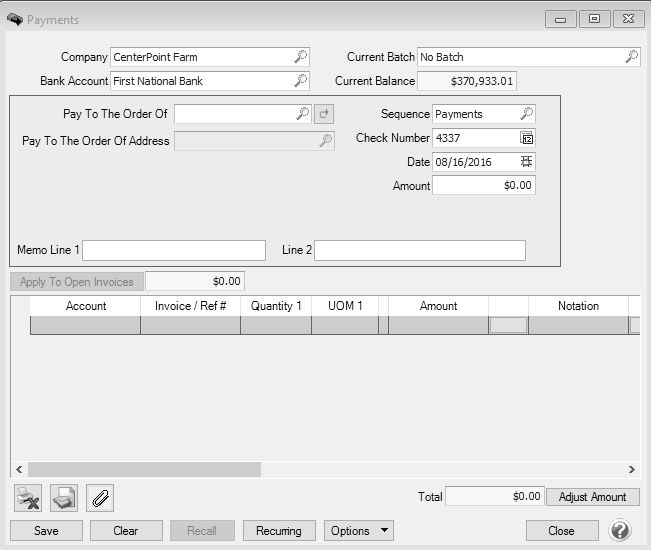
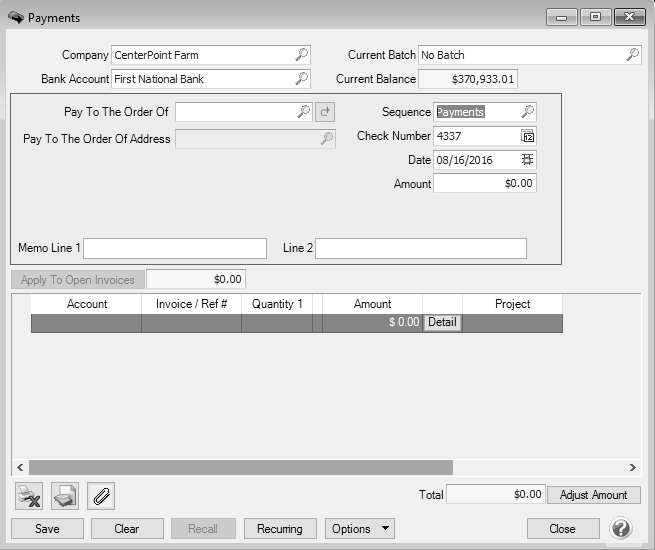
Each transaction entry screen includes a variety of columns organized in a grid. The columns displayed in this area, within each transaction entry screen and to the transaction detail grid (viewed by clicking the (+) sign to expand the journal entry), can be customized for the needs of your company. The selections can be changed at any time. In our example, we will customize the grid found in the Payments screen.
- Position your mouse over any cell in the grid found in the bottom portion of the screen.
- Right-click and select Add/Remove Columns.
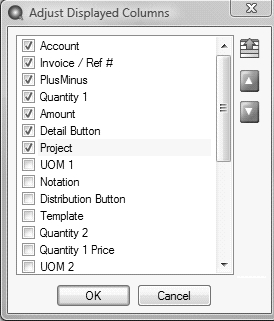
- The list displays all available columns that can be included in your data entry screen. Items that have a check mark will display in the grid. Remove or insert check marks as needed.
- Use the Move Up and Move Down to arrange the order the columns will display on the main grid.
Invoice/Ref # column - If you choose to have this column display in your data entry grid and you want to repeat the previous line's Invoice/Ref# entry, right-click in the Invoice/Ref # column and select Repeat Previous Value.
If you want to reorder the lines you entered on the transaction in a particular order, include the Line Sequence column in your data entry grid.
Each line will automatically be assigned a line sequence number. The first line is assigned 10, the second 20, and so on.
To reorder the lines, change the sequence number to the order in which you want the lines to print or display. For example, if you want the second line to print before the first line, change the line sequence to be 5, 6, 7, 8 or 9. To view the reordered lines, click Options, and then select Refresh.
Recall a Transaction
The Recall feature in CenterPoint can be used to save data entry time in any transaction entry screen. After entering a name on a transaction, clicking the Recall button automatically fills in all details from the last transaction including accounts, values, notations, and any details of the transaction. If the Recall button is selected again, the second most recent transaction for that name will be displayed. Recall is useful for activities that are the same amount and same details each transaction.
The Recall functionality can be used by manually selecting the Recall button in a transaction entry screen or an individual Name can be set to automatically Recall Last Transaction in a specific transaction entry screen.
Manually Using the Recall Button in Transaction Entry:
- On any transaction entry screen, after entering Name click Recall at the bottom of the screen to display the most current transaction entered for this name. Click Recall again to display the next most current, etc.
Note: When you click Recall, transactions are displayed in reverse chronological order.
- The current date is assigned and if applicable, the check number is incremented based on its numbering sequence. Make any needed modifications to the transaction and click Save.
Setting Up a Name to Automatically Recall Last Transaction in a Specific Transaction Entry Screen
- On any transaction entry screen, after entering Name click Recall at the bottom of the screen to display the most current transaction entered for this name. Click Recall again to display the next most current, etc.
Note: When you click Recall, transactions are displayed in reverse chronological order.
- The current date is assigned and if applicable, the check number is incremented based on its numbering sequence. Make any needed modifications to the transaction.
- Right click on the Name field and select Transaction Settings > Recall Last Transaction and click Save.
- For each subsequent transaction entered in this screen for this name will automatically recall the previous entry.
Recurring Transactions
Monthly utility bills, insurance payments, annual rent payments are all examples of recurring transactions. These types of transactions can be identified in CenterPoint as recurring transactions, which eliminates the job of reentering the same details each time you need to process the transaction.
In the Payments and Receipts screen, the recurring transaction flag is set, after entering a transaction, but before clicking Save. For example, in the Payments screen; after the expense rows are entered and BEFORE you click Save, click the Recurring button at the bottom of the screen.
In Customer Invoices and Vendor Invoices (A/P), an invoice is identified as a recurring entry by selecting a recurring batch in the Current Batch field.
Please refer to the various recurring transaction documents we have available in the Help for step-by-step instructions on the setup and use of recurring transactions. In the Help, in the Search bar, enter recurring, and then click  to display the documents.
Review Transactions
To review transactions entered on a transaction screen, click Options, and then click Review Transactions. Transactions can be modified from this screen by selecting the transaction and then clicking Edit. From the drop-down list next to the Edit button, the number of results to display can be defined. The options are 10 (default), 25, 50 or 100 results.
To review transactions in a Transaction Search screen for a selected name, entry screen, and current year, right-click on the name and select Review Transactions.
During invoice and sales order entry (Processes > Sales > Customer Invoices or Customer Invoices (Detail)) and (Processes > Sales > Sales Orders), many fields are available in the data entry grid. If you included all of the available fields, you would need to scroll left/right to view each of them. Another option is to display the Information Grid at the bottom of the screen. You can then select which fields display in the normal data entry grid (normally just those that you need to enter information into) and which fields display in the Information Grid at the bottom. The Information Grid will display additional information regarding the line that is selected in the data entry grid. To display the Information Grid, click the Options button and then select Show Information Grid. The grid can be customized to display all columns (except for button type columns) that the standard data entry grid displays, but they will be read-only. The grid can also be resized and will be saved so that the next time the screen is displayed the same columns are displayed on the read-only grid.
Scanning and Attaching Documents
Files can be attached to the following setup screens: Customers, Vendors, Names, and Employees or the following Transaction screens: Purchase Orders, Payments, Vendor Invoices(A/P), Sales Orders, Receipts, Customer Invoices (both basic and detail), and General Journal Entries. Files can be attached by scanning the documents, dragging and dropping existing files from your computer, or by selecting an existing file from your computer via the Scan and Paperclip buttons..

For detailed information about attaching documents to transactions, see the Scanning and Attaching Documents topic.
|
Document: 3053 |
|---|