CenterPoint® Fund Accounting
- Enter Quick Transactions
Related Help
_24.jpg) Quick Transactions Video - Duration: 10 min 33 sec
Quick Transactions Video - Duration: 10 min 33 sec

This Quick Transactions feature in CenterPoint provides a means of entering multiple transactions in the same screen and posting them all at once. Only one transaction type can be entered at the same time, for example Payments, Receipts, or Vendor Invoices. This option can be useful in environments with heavy data entry oriented such as a Service Bureau, or can be used for entering a group of transactions such as the monthly EFTs from your bank statement.
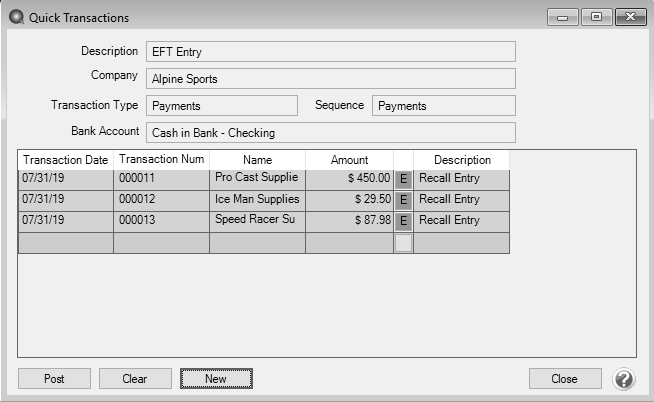
Quick transaction entry can be used to enter transactions that represent common entries where the only values that change are amounts, transaction number, and transaction dates. The common entries are set once on the Quick Transaction Information screen. Once the common entries are set, an unposted transaction batch is created (The batch comment is taken from the Description field on this Quick Transaction Information screen, the batch date is taken from the system date, and the batch user from the currently logged in user.) and the quick transaction grid displays.
Transactions are entered into the grid where the Transaction Date, Transaction Number, Name and Amount are the only data entered. Each row in the grid represents one transaction. Each transaction created will be of the Transaction Type, Company, and Sccount set once on the Quick Transaction Information screen. An exception to that is that for AP
All transactions created are set to not print documents (checks
Quick Transactions provides no capabilities to save and edit a batch, nor does it provide a way to edit the transactions once posted except by viewing them on the regular transaction screen.
The transaction types that can be entered in the Quick Transaction screen are:
- Cash Payment
- Cash Receipt
- AP Invoice
- AR Invoice
- On the Processes menu, click Quick Transactions.
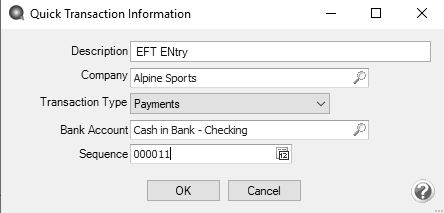
- On the Quick Transaction Information screen, enter a required Description for the transactions.
- In the Fund
box, enter the
- Select the Transaction Type.
- If the transaction type selected is:
- Cash Payment or Cash Receipt, select the Bank Account (the default value will be the bank account set for the company).
- AP Invoice - Select the Default AP Account (the default value will be the default AP account set in preferences).
- AR Invoice - Select the Default AR Account (the default value will be the default AR account set in preferences).
- In the Sequence box, enter or select the type of sequence you want to use for the Transaction Numbers for the transactions.
- Click OK to display the quick transaction grid and create an unposted transaction batch. The batch comment is taken from the Description field on this Quick Transaction Information screen. The batch date is taken from the system date and the batch user from the currently logged in user.
- Enter the Transaction Date
- The Transaction Number column for a new row defaults to the next number in the Sequence selected on the Quick Transaction Information screen. The values increment with each new row. Changing a value on a row, will not affect the sequence.
- Enter the Name for this transaction.
- If you enter a name into the Name box and it does not exist, the Lookup screen automatically displays, from this screen you can either Create a New Name or Create a One-Time Use Name:
Create a One-Time Use Name - If you enter a name into the Pay to the Order of box and it does not exist, the Lookup screen automatically displays. Click New One Time Use. The New One Time Use screen displays with the name that you entered automatically displaying in the Name box. Complete the additional details to create the one time use name and then click Save (the one time use name will be automatically marked as a vendor and customer). When creating a new name through the New One Time Use screen, the name is automatically saved as an inactive name in all companies so it does not appear in Name lookups (unless you chose to lookup inactive names).
- Create a New Name - If you enter a name into the Pay to the Order of box and it does not exist, the Lookup screen automatically displays. Click New . The Names Setup screen displays with the name that you entered automatically displaying in the Company box. Complete the additional details to create the name and then click Save. When creating a new name through the Name Setup screen, you can identify a name as a customer, vendor, employee, or salesperson. Doing so determines which data entry screen that name will be visible on. If a name is not marked as a vendor, it will not appear on the Payments screen. Likewise, if a name is not marked as a customer, it will not appear on the Receipts screen.
- If the name is set to create transactions using a default recurring transaction, the recurring transaction is created and the amount is distributed accordingly. The Status column will display the name of the recurring transaction.
- If the name is not set to use recurring entries, the most recent past transaction for the name, company, entry screen and amount will display. The entire amount is placed on the first subdivision of the transaction. Any subsequent subdivisions will have the amount set to zero. The status column will display Recall Entry.
- Enter or verify the Amount for the transaction.
-
If a transaction has not been created by a recurring or recalled transaction, click Edit.
 Note: All transactions created are set to not print documents (checks
- Complete the transaction on the appropriate transaction screen for the transaction type and click Save. The Status column will display Manual Entry and the Edit button will change to a green background.
- Once a transaction has been created, the transaction number, date, name and amount cells on that row are disabled. The transaction may be edited only with the Edit button. To delete a transaction, right-click and select Delete Row.
- Click Post to post all of the transactions.
-
Click Close.
|
Document: 3383 |
|---|