CenterPoint® Fund Accounting
- Customize the Quick List
Related Help
_24.jpg) Navigating in CenterPoint Video - Duration: 7 min 20 sec
Navigating in CenterPoint Video - Duration: 7 min 20 sec

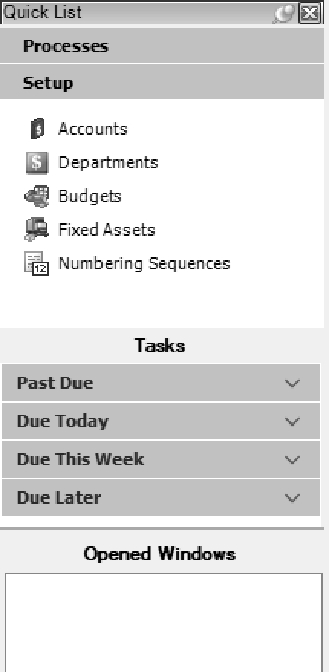
The Quick List is the user customizable menu that is on the left side of the main CenterPoint screen.
Red Wing Software has set up a default Quick List for you. The Quick List becomes a way for you to customize the menus in CenterPoint. You can customize it with groups that contain the most commonly used items in the software, to duplicate menu items in an order that makes sense to you, and to quickly launch menu selections without having to remember their locations. In the Quick List, you can move, resize, add items, change the way images display, or group items together in a logical sequence. It is completely customizable by you.
The Quick List is divided into groups with each group having an unlimited number of items. For example, Processes is the group and has items like Payments, Receipts, General Journal, etc. You can add any menu item as an item in a group. A user can also add a specific report to the Quick List.
Add a New Group to the Quick List
Remove an Existing Quick List Group
Rename an Existing Quick List Group
Move the Quick List Back to the Default Position
What Is the Quick List?
The Quick List is the user customizable menu that is located, by default, on the left-hand side of the screen.
Add a New Group to the Quick List
- Position your mouse over any area in the Quick List and right-click.
- Select Add Group and enter a Name for the Group.
- Click OK.
Add Menu Items to a Group
- Position your mouse over the Group you'd like to add an item to.
- Right-click and select Manage Items.
- The Manage Quick List Items displays the CenterPoint menu on the Menu Items tab. Expand the menu you wish to access.
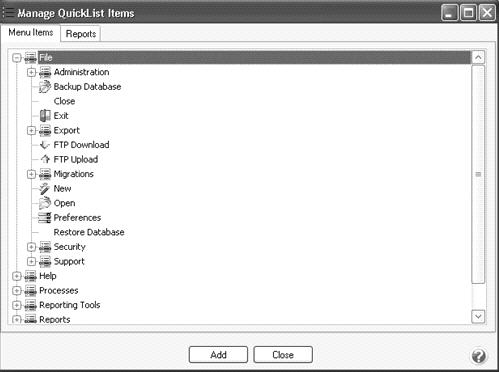
- Select a menu item and click Add. Click OK.
Add a Report to a Group
- Position your mouse over the Group you'd like to add an item to. Right-click and select Manage Items.
- The Manage Quick List Items displays the CenterPoint menu.
- Select the Reports tab.
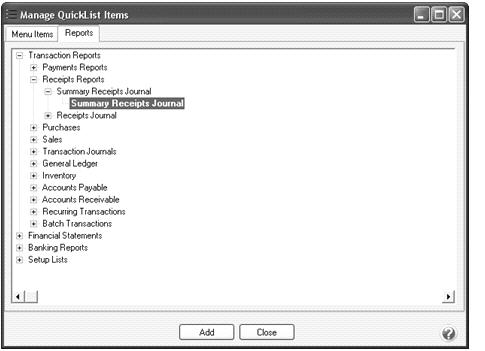
- Select the report to add to the Quick List and click Add. Click OK.
Remove an Existing Quick List Group
- Position your mouse over the existing Group that you'd like to remove. Right-click and select Remove Group.
- Click OK on the Confirm Group Remove box.
Rename an Existing Quick List Group
- Position your mouse over the existing Group that you'd like to rename.
- Right-click and select Rename Group.
- The existing name will be displayed. Modify or replace the name for this Group and press Enter to complete the process.
Move the Quick List
- The Quick List will display, by default, on the left side of the screen as a vertical bar. But it can be moved. If it's moved to the top or bottom of the screen it will automatically switch to a horizontal bar.
- To move the Quick List, simply "drag and drop" it to the location you'd like. This is done by left clicking on the blue bar of the Quick List, and dragging it to the appropriate location while still holding down on the left click. When it's in the appropriate location, release the left mouse button.
Move the Quick List Back to the Default Position
- Select View > Reset Quick List Position.
Display Options for the Quick List
- Right-click on the blue bar at the top of the Quick List and select one of the display options:
- Dockable – Attached to the side or top of the screen and does not ‘float.’ It remains visible at all times. It is not necessarily visible at all times if docked. A Quick List can be dockable and set to auto-hide at the same time.
- Hide – Hides the Quick List all together. To get the Quick List back, select View > View Quick List.
- Floating – This allows you to place the Quick List wherever you want on the screen. A Quick List can be floating and dockable however. If it is both, then it allows you to drag to other sides of the available window and redock it. If the Quick List is not set as dockable or floating, then it is truly a free standing list that you can placed anywhere on the screen.
- Auto-Hide – Makes the Quick List hide until you hover over it on the side of the screen that it is docked on. With this option, the entire screen is available for CenterPoint’s screens to fill.
Working with Tasks
The Tasks panel located on the QuickList provides a reminder of Dynamic Tasks that are due, past due, and coming due soon for Accounts Payable invoices, Credit Card Liabilities, or Payroll Liabilities or scheduled one-time User Tasks or Recurring User Tasks of items from which the menus to perform the task can be launched and sequenced to form a workflow, for example all the tasks involved in completing a pay run can be listed in order and recur on the same day of the week every two weeks.
For detailed information on using the Task panel, see the Tasks topic.
|
Document: 3076 |
|---|