CenterPoint Fund Accounting
- Garnishments
Related Help

A garnishment is a mandated deduction withheld from an employee’s wage. An example is child support. The employer withholds the garnishment from the employee’s wages. The amount withheld is paid by the employer to the appropriate agency.
A payroll liability account is assigned to the garnishment deduction. When the employee’s payroll check posts, the payroll liability account is increased by the amount of the garnishment. The employer pays the invoices when due.
The liability account assigned to the Garnishment deduction controls who the liability is paid to. If multiple employees need garnishments deducted and they are paid to different agencies, then multiple deductions and liability accounts must be setup.
Step A - Create a Deduction for the Benefit (one-time setup):
- Select Setup > Payroll Details > Deductions & Benefits.
- Click New.

- Enter an Abbreviation
- In the Name box, enter up to 35 characters of required information that describes the deduction/benefit.
- Select Garnishment in the Type box.
- In the Sequence box, enter the order the garnishment should be deducted from the check, for example Sequence 1 will be deducted before a garnishment assigned a Sequence 2.
- In the Liability Account box, select the liability account this deduction/benefit should post to. The Liability Account also controls who the garnishment is paid to.
- To add notes to this deduction/benefit, click Additional Notes, enter the notes, and then click OK.
- For a garnishment, the W-2 Box - Options will normally be left blank on a garnishment.
- In the Employee Method box, select the default Garnishments (Disposable Wages) or to calculate a garnishment as a percentage of the employees gross wages, select Garnishment (Gross Wages).
- In the Schedule box, select when the garnishment should be deducted from the employee's pay. For example, if this garnishment is withheld every pay check, use the schedule Monthly Pay Periods 1,2,3,4,5. If it's withheld only once a month, select Only 1st Pay Period of Month.
- The Rate, Up to Amount and Minimum Net Pay boxes should all remain at zero when setting up the garnishment. When the garnishment is added to an employee, the rates and amounts will be specified on their record.
- Employee Deduction Limits provide an additional way to stop the calculation. If the garnishment has an annual limit or a lifetime limit, click on the Limits tab and select the Use Limit box. The amounts should remain zero. When the garnishment is added to an employee, the limits can be specified on their record.
- Click Save.
Step B - Add the Garnishment to the Employee Record
- Select Setup > Employees.
- Select the employee requiring the garnishment and click Edit.
- Select the Deductions & Benefits tab.

- The list of available deductions and benefits list at the bottom of the screen. Select the garnishment deduction in the bottom list. The garnishment will then automatically be included in the list of deductions and benefits for this employee at the top of the screen.
- Select the garnishment from the employees list (upper-left) and click on the Employee line within it. The Deduction/Benefit Detail for this garnishment will be displayed on the right side of the screen.
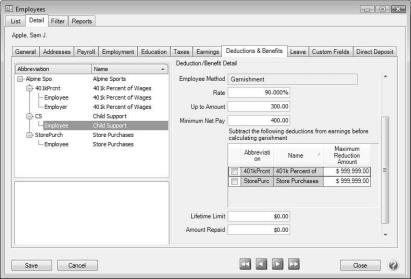
- Enter the percentage that was ordered for this garnishment in the Rate field.
- In the Up to Amount box, enter the dollar amount that the contribution will be calculated up to when using a percentage. For example, if the garnishment is 5% of an employee's gross pay, with the garnishment amount not to exceed $500, enter $500 in this box. If the garnishment was ordered as an amount, enter the ordered amount in the Up to Amount field.
- In the Minimum Net Pay box, enter the dollar amount that the net pay will not be allowed to fall below.
- Select any deduction that should be subtracted prior to calculating this garnishment.
- If appropriate, specify the Limits.
- Click Save.
|
Document: 3376 |
|---|