CenterPoint® Fund Accounting
- Create a Customer
Related Help
_24.jpg) Customer - General/Address tabs Video - Duration: 12 min 23 sec
Customer - General/Address tabs Video - Duration: 12 min 23 sec
Customer - Credit Cards/Custom Name Fields tabs Video - Duration 4 min 18 sec
Customer - Email/Print tab Video- Duration 6 min 01 sec
Customer - Accounting tab Video- Duration 5 min 58 sec
 View or Print as PDF
Customers are individuals or companies who purchase goods and/or services from your company. Customers are used when entering customer invoices and receipts.
Prerequisite
You must have the Accounts Receivable module purchased and registered in the module configuration manager (File > Administration > Module Configuration Manager) prior to creating customers.
Tabs General Addresses Accounting Credit Cards Custom Name Fields Email/Print
- Select Setup > Customers. Click the New button at the bottom of the screen.
- Select an appropriate Name Format. The Name Format selection is used to format the Name box to accept an individual's name, or a company name.
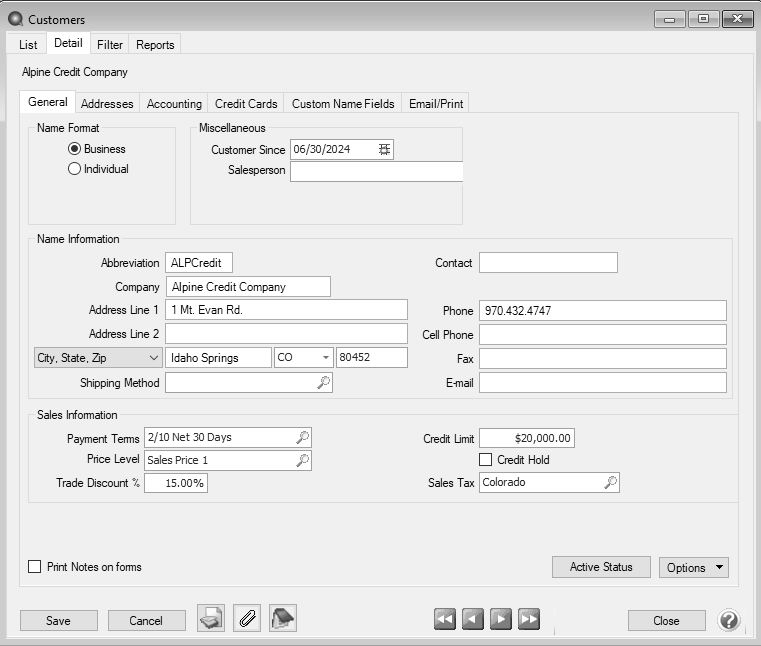
- Under Miscellaneous Information, the Customer Since will default to the current date, change if needed.
- If sales or customers are tracked by salesperson, assign the appropriate Salesperson.
- In the Abbreviation box, enter up to ten characters that will easily identify the customer. To set how duplicate abbreviations are handled by CenterPoint, right-click and select Allow Duplicates (Use this option to reuse and not require the value in the Abbreviation box.), Warn if Duplicate (Use this option to receive a warning if a duplicate abbreviation is used. A confirmation message will display. To continue using the duplicate value, click Yes.), or No Duplicates Allowed (Use this option to require a unique value in the Abbreviation box. A message will display. Click OK to return and enter a unique value.).
- Enter the customers full company name or individual's Last Name/Suffix/First Name/Middle Initial (the format of this field will depend on which option was selected in step 3).
- Enter the appropriate address information.
- Enter the customer's Phone, Fax, E-mail address and Shipping Method (if applicable). If you’ve selected to e-mail invoices/billing statements to this customer, an e-mail address is required.
- If this is a taxable customer, select the appropriate Sales Tax. This will be used when invoices are entered for the customer. If the customer is non-taxable, put a check mark in the Not Subject to Tax check box on the Accounting tab and enter their Exemption Id.
- On the General Tab, select an appropriate Payment Term. The Payment Term is used in invoicing to calculate the Invoice Discount Due Date and Due Date.
- Select the appropriate Price Level for this customers sales. Three different default prices can be assigned to each Sales Item, this field specifies which of those prices should be used for this customer.
- If this customer should receive a Trade Discount on all sales, enter the percentage. Trade discounts will automatically deduct the specified percent from the assigned price for an item.
- If applicable, enter a Credit Limit amount for this customer.
- A customer can also be put on a Credit Hold by selecting the check box. If a customer is on credit hold, new invoices cannot be saved/posted unless they are paid in full; the File > Preferences > Customer Invoices > Credit Limits preference allows you to optionally require outstanding balances to be fully paid.
- To select which companies/funds this customer is active in, click the Active Status button, select the companies/funds the customer is active in (the default is active for all companies/funds), and then click OK.
- To add notes to this customer, click the Notes icon (
 ), enter the notes, and then click OK. When notes are added from the Additional Notes icon, the icon will display with a yellow background.
- If you want to select which fields are necessary for data entry, click the Options button and then select Set Tab Stops.
-
Select the Print Notes on forms check box to print notes entered on the Additional Notes screen on a sales order and invoice (basic and detail), when the Customer Notes field is added in Setup > Forms Designer > Sales Order Form Designer or Invoice Form Designer.
- In the Location Type box, click and select a location type, or type a location type. Name location types are a way to categorize addresses for a name. Typical location types are shipping, billing, business, etc. To create a new location type, right-click and select New, and then follow the Name Location Types topic. To set a location type as the default, right-click and select Set As Default. To clear the default location type, right-click and select Clear Default.
- In the Name box, enter up to 50 characters of required information that describes the address (for example: Corporate Office, Warehouse, Home, etc.).
- In the Contact box, enter up to 30 characters of optional information that describes the contact at this address. If the Print Contact on Forms check box is selected, the Contact Name will print on forms instead of the name entered on the General tab.
- In the Address Line 1 and Address Line 2 boxes, enter the street address and any other information, for example, suite number or post office box number for this location type.
- If your preferences are set to use the automatic Zip Code/Postal Code Lookup for addresses, in the Zip/Postal Code box enter the zip code or postal code. Then, select the appropriate city/state or city/province from the list. If your preferences are not set to use the automatic Zip Code/Postal Code Lookup for addresses, enter the City/State/Zip, City/Province/Postal Code, or Address 3 Foreign Address information.
- Select the Print Contact on Forms check box, the Contact Name will print on forms instead of the name entered on the General tab.
- Under Use this Address as the Default for, select any combination of Billing, Shipping, Business, or Pay To.
- Business - The address that is entered on the General tab is referred to as the Business address.
- Billing - This address is used for billing statements and invoices.
- Shipping - This address is the address that can be used if the shipping address is different than the business address.
- Pay To- This address defaults with the Name field in transaction entry screens.
- If this address is not active, unselect the Active check box.
- Under Communication Methods for this Address, in the Information box, enter the information specific to the communication method (for example, phone number, cell phone number, e-mail address, etc.).
- Click on the Accounting tab. Select the appropriate default Accounts Receivable. If this is left empty, CenterPoint will use the Accounts Receivable account assigned in the Preferences (Files > Preferences > Transactions > Accounts Receivable).
- Select the Statement Type for this customer, the options are Balance Forward or Open Item. Balance Forward is the default statement type.
- Select the user-definedGroup to assign the name to, for example Wholesale, Retail, Referral Partner. Groups are used in reporting and as a filter to limit the range of names in many reports.
- If you want this customer to be subject to finance charges when they are calculated
- Enter additional information in the Memo box. This information will display in Processes > Sales > Customer Invoices in the Memo 2 box.
- The Credit Cards tab is used when a customer and your business have agreed to keep a customer's credit card on file for current or future purchases. To add a credit card to the customers file, click the New button.
- Select the Credit Card Type (Credit Card Types are set up in Setup > Names > Credit Card Types).
- Enter the Name of the credit card, the Name on Card, Card Number, Security Key, and Expiration Date/Year.
- If more than one credit card is stored for a customer, determine which to Use as Default Credit Card.
- Credit cards can be deleted from a customer after used to pay for an invoice.
- The Custom Name Fields tab can be used to track additional information regarding a customer that aren't already stored in a field in Setup > Customers, for example Web Login, Office Hours, Business Type, etc. Custom Name Fields are optional. To view a list of all Custom Name Fields and the Name the field is being tracked on, select Reports > Setup Lists > Names > Names Custom Field (the report can also be filtered for a specific Custom Name Field).
- Click New to add a custom field.
- Enter an Abbreviation and Name for the type of information being tracked.
- Select the type of information being tracked, Text, Date, Numeric, or Percentage. If the type is Numeric, also enter the Number of Decimals.
- Click on the Email/Print tab. The Email Addresses and Options fields that are active will depend on the modules that you have purchased and registered and if the name is a vendor a customer. Use these options to set up multiple e-mail addresses where invoices, statements, sales orders, purchase orders, receipts
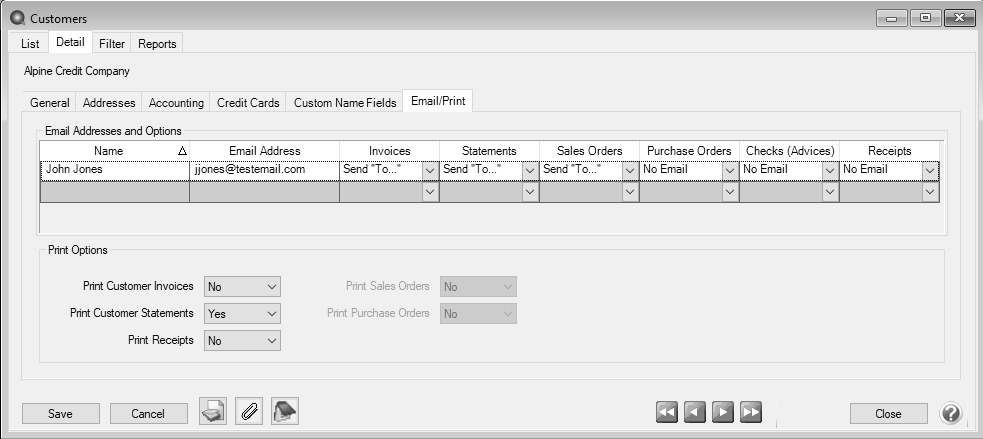
The Print Options fields that are active will depend on the modules that you have purchased and registered and if the name is a vendor a customer. The available fields are: Print Customer Invoices, Print Customer Statements, Print Receipts, Print Sales Orders, and Print Purchase Orders. Use these options to determine if invoices, statements, sales orders, and purchase orders should be printed for this customer. The Print Options settings will be used to set the default image on the Print button on the Customer Invoices (Basic), Customer Invoices (Detail), Receipts, Sales Orders and Purchase Orders entry screens. A printer image with a check mark on it will mean the form will Print and a Printer image with a cross-through on it will mean the form will not print.
- Click Save.
|
Document: 3004 |
|---|