CenterPoint® Fund Accounting
- Emailing Billing Statements
Related Help
_24.jpg) Customer Statements Video - Duration: 8 min 04 sec
Customer Statements Video - Duration: 8 min 04 sec
 View or Print as PDF
CenterPoint allows you to e-mail your customer billing statements. The statement is attached to an e-mail as a PDF file using the selected form design.
Step 1: One Time Setup of Email Preferences
Step 2: Define a Default Subject and Message for Emailed Billing Statements (Optional Setup)
Step 3: Customer Email/Print Defaults
Step 1: One Time Setup: Email Preferences
This step can be skipped if you are already e-mailing invoices.
- Select File > Preferences > Email Setup > Email Setup.
- Select the Database tab at the top.
- Enter your “To/From” Email Address. This is the e-mail address used only for testing the SMTP settings. The Sent From address for customer billing statements (when you e-mail a group of billing statements ) is set in Setup > General > Email Addresses, see Step 4 for more information.
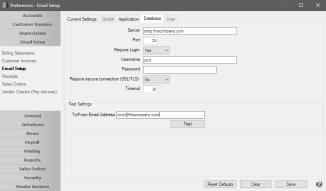
- Once the To/From Email Address is entered, the system will try to auto fill the Server and Port. If it's unable to fill the info, you'll have to get the information from your network administrator. They can also let you know what you should select in the Require Login and Require secure connection (SSL\TLS) field.
- Click Test. An e-mail will be sent indicating the SMTP options have been set correctly. Verify that you received the CenterPoint: Testing SMTP Configuration e-mail.
Note: If you didn't receive the e-mail, then the settings in step 4 must be corrected.
- Once the e-mail is received, select Save in the Preferences screen.
Step 2: Define a Default Subject and Message for E-mailed Billing Statements (Optional Setup)
If you'd like to use the same e-mail subject and message each time you -email a billing statement, it can be added to the preferences. Otherwise, when e-mailing a statement, you'll have the opportunity to enter the subject and message at that time.
- Select File > Preferences > Email Setup > Billing Statements.
- Select the Database tab at the top.
- Enter a default Subject and Message.
Note: To create paragraphs, press your Ctrl and Enter keys at the same time.
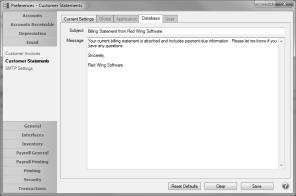
- Click Save.
Step 3: Customer Email/Print Defaults
Prior to e-mailing a billing statement to a customer, the customer file must include an e-mail address and e-mail form options on the Email/Print tab.
If your customers don't currently have e-mail addresses on the Email/Print tab in their record, use the following steps to update their records individually.
- Select Setup > Names or Setup > Customers.
- Find the appropriate customer and click Edit.
- Enter the appropriate information in the E-mail field.
- Click the Email/Print tab.
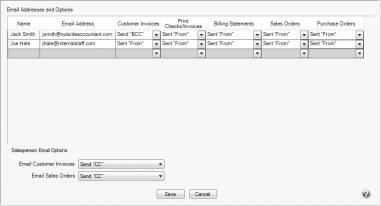
- The Email Addresses and Options fields that are active will depend on the modules that you have purchased and registered and if the name is a vendor or a customer. Use these options to set up multiple e-mail addresses where invoices, statements, sales orders, and purchase orders can be sent for this customer. You can also select how each e-mail is to be sent, No Email, Send "To..." (directly to the recipient), Send "CC..." (as a carbon copy), or Send "BCC..." (as a blind carbon copy, for example, the person sending the email may want to enter their own e-mail address so they have an audit trail of emails sent ). The Email Addresses and Options settings will be used to set the default image on the Email button on the Customer Invoices (Basic), Customer Invoices (Detail), Receipts, Sales Orders and Purchase Orders entry screens. An envelope image with a check mark on it will mean the form will be emailed and an Envelope image with a cross-through on it will mean the form will not be emailed.

The Print Options fields that are active will depend on the modules that you have purchased and registered and if the name is a vendor a customer. The available fields are: Print Customer Invoices, Print Customer Statements, Print Receipts, Print SalesOrders, and Print Purchase Orders. Use these options to determine if invoices, statements, sales orders, and purchase orders should be printed for this customer. The Print Options settings will be used to set the default image on the Print button on the Customer Invoices (Basic), Customer Invoices (Detail), Receipts, Sales Orders and Purchase Orders entry screens. A printer image with a check mark on it will mean the form will Print and a Printer image with a cross-through on it will mean the form will not print.
- Click Save.
Step 4 - Sent From and Optional E-mail Addresses
The Setup > General > Email Addresses menu selection is used to set the name and e-mail address customer invoices and print checks/invoices (when you e-mail a group of invoices) are sent from. This menu allows you to select other Sent From e-mail addresses for the different forms that you send via e-mail.
You can optionally add e-mail addresses where messages and attached documents can be sent to; including the salesperson that was selected when the invoice is entered and saved, internal staff, outside accountants, or other addresses that are not related to the customer the transaction is entered for. You can also select how each e-mail is to be sent, directly to the recipient, as a carbon copy, or as a blind carbon copy or set a default "From" email address for each document type (invoice or print checks/invoices).
- Select Setup > General > Email Addresses.
- Enter the Name, the Email Address, and select how Billing Statements should be sent, No Email, Send "From..." (the default e-mail address the customer invoice or print checks/invoices is sent from), Send "CC..." (as a carbon copy), or Send "BCC..." (blind carbon copy).
- Click Save.
Step 5: Emailing a Billing Statement
When processing billing statements, the E-mail/Print button will process e-mailed and printed statements at the same time. It will e-mail statements to customers who are setup to e-mail and will print copies for those that are setup for printing.
- Select Processes > Sales > Billing Statements.
- Choose the appropriate Billing Statement and Billing Statement Selections.
- Click E-mail/Print.
- The default E-mail Billing Statements form will be displayed. Modify if needed and click Continue.
- Then select the printer for the statements that need to be printed and click OK.
|
Document: 3232 |
|---|