CenterPoint® Accounting for Agriculture
- Products
Related Help
_24.jpg) Understanding and Using Products Video- Duration: 8 min 6 sec
Understanding and Using Products Video- Duration: 8 min 6 sec
Note: For detailed "Product" information, see other Product videos in the Products section here.

| Document #: | 3352 | Product: | CenterPoint® Accounting for Agriculture |
|---|
Examples Using Products
Products provide traceability on your raised crop product inputs from the pre-purchase of ingredients through the harvested crop. Products describe the inventory without adding long lists of accounts to track each ingredient. The accounts involved in the flow of the product are assigned product through the account category’s balance details. Each account used for your crop inputs will maintain a subledger account balance for each product used. As the product moves from pre-purchase to the next step of being delivered to the farm, the product detail flows with it. No additional accounts are needed.
For example, the farm purchased 50 units Pioneer XYZ Seed and 40 units Pioneer ABC Seed. The purchase increases an asset account “Prepaid Seed”. The balances display:
|
Prepaid Seed |
50 |
Pioneer XYZ |
|
Prepaid Seed |
40 |
Pioneer ABC |
Next the Pioneer ABC Seed was delivered to the farm.
- The Prepaid Seed is credited (decreased) 40 units Pioneer ABC
- The Corn Seed Raw Material account is debited (increased) 40 units Pioneer ABC
|
Prepaid Seed |
-40 |
Pioneer ABC |
|
Corn Seed RM |
40 |
Pioneer ABC |
Next the Pioneer ABC Seed was applied to two fields.
- The Corn Seed RM account is credited (decreased) 40 units Pioneer ABC
- The Corn Seed WIP account is debited (increased) 25 units Pioneer ABC to Field 1; and Corn Seed WIP account is debited (increased) 15 units Pioneer ABC to Field 2.
|
Corn Seed RM |
-40 | Pioneer ABC |
|
|
Corn Seed WIP |
25 | Pioneer ABC |
Field 1 |
| Corn Seed WIP | 15 | Pioneer ABC | Field 2 |
The same accounts are used for all varieties of Corn Seed. The product maintains the individual varieties.
The final step at harvest moves the Corn Seed WIP account balance to the cost of goods account. The cost of goods account receives the product and the production center details stored in the WIP account. The end result provides a way to report all costs assigned to a production center detail WITH a list of products applied to that field.
Products provide traceability of all applied products on any field. This information can fulfill regulation report requirements, as well as management decisions. In addition, the product stores customized fields for required information, and details helpful for your own needs.
This document discusses the following topics:
Setup: Create Custom Product Fields
Edit/Change a Custom Product Field
Setup: Create Product Categories
Edit/Change a Product Category
Setup: Assign Product Type to Accounts
Setup: Assign Product to Account Categories
Setup: Assign Product to Prepaid Product Purchase and Raw Material Account Categories
Setup: Assign Product and Production Center Details to Work in Process Account Categories
Adding Product column in Transaction Entries
Transaction: Pre-buy or Purchase Products
Purchase Products where the Field Location is Known
Transaction: Deliver Product to Farm
Transaction: Apply Crop Inputs by Product
Transaction: Apply Crop Inputs by Field
Setup: Create Custom Product Fields
Each individual ingredient used in your operation is a product. Products are organized by product categories. Products are created with a few common properties, but allow the user to identify other properties they wish to track on the different types of products. Custom product fields are used to define other properties that describe products.
Examples of custom product fields might be required information such as an EPA Registration number or active ingredients in a chemical. Custom product fields can also be used for the grower’s own use such as recording growing days on seed varieties or drought tolerance scores. Each product category can maintain a different set of customized properties.
- On the Setup menu, point to Products, and then click Custom Product Fields.
- Click New.
- In the Abbreviation box, enter up to ten characters of optional information that you can use to easily identify the product by (for example, EPA # for EPA Registration #).
- In the Name box, enter up to 30 characters of required information that describes the product.
- Select the Type of Data for the product. The options are Date, Numeric, Percentage, or Text.
- Number of Decimals is active with Numeric or Percentage selected in the Type of Data. Enter the number of decimals you wish to track for this product. If tracking only whole numbers, the Number of Decimals is 0.
- Click Save to save the product and return to the List tab, or click Close to save the product and close the product screen.
Click the Copy button to create a new product by copying an existing one. Select the product you wish to copy. Click Copy. All fields will be auto-filled with the information from the original product, but can be modified.
Edit/Change a Custom Product Field
All information on an existing custom product field can be modified. Posted activity will stay with the product.
- On the Setup menu, point to Products, and then click Custom Product Fields.
- Select the product you wish to change and click Edit (or double click on the product).
- Edit the details as needed.
- Click Save to save the product and return to the List tab.
Delete a Custom Product Field
The delete button completely removes a product from the list.
- On the Setup menu, point to Products, and then click Custom Product Fields.
- Select the product you wish to change and click Delete.
- A warning message displays. Select Yes to delete the item. Select No to make no change.
- Click Save to save the product and return to the List tab.
Setup: Create Product Categories
Product Categories organize your list of products by the type of product. Each product category is assigned a product type from a predefined list. For example, the product type “Crop Seed” is assigned to the product categories of Corn Seed and Soybean Seed. The product type “Crop Fertilizer” is assigned to the product categories of Liquid Fertilizer and Dry Fertilizer.
- On the Setup menu, point to Products, and then click Product Categories.
- Click New.
- In the Abbreviation box, enter up to ten characters of optional information that you can use to easily identify the product category by (for example, CornS or BeanS).
- In the Name box, enter up to 30 characters of required information that describes the product category such as Corn Seed or Soybean Seed.
- Product Types describe the use of the product. Select the Product Type from the lookup list. (In this example, select Crop Seed.)
- Product Properties at the bottom portion of the screen list the custom product fields.
- Under Available Product Properties, select the product properties you wish to track for this product and move it to the Selected Product Properties.
- To move one product property from the Available Product Property to the Selected Product Property, double click or drag-and-drop or use the green right arrow.
- To move multiple product properties, select multiple items and click the green right arrow or drag-and-drop.
- To add a new product property, right click under Available Product Properties and select New Item.
- To remove Selected Product Properties, double click or select the item and use the left arrow to return the item to the Available Product Properties.
- Click Additional Notes in the lower right to store optional product category information.
- Click Save to save the product category and return to the List tab, or click Close to save the product property and close the product screen.
Click the Copy button to create a new product category by copying an existing one. Select the product category you wish to copy. Click Copy. All fields will be auto-filled with the information from the original product category, but can be modified.
Edit/Change a Product Category
All information on an existing product category can be modified. Posted activity will stay with the product.
- On the Setup menu, point to Products, and then click Product Categories.
- Select the product category you wish to change and click Edit (or double-click on the product).
- Edit the details as needed.
- Click Save to save the product category and return to the List tab.
Delete a Product Category
The delete button completely removes a product from the list.
- On the Setup menu, point to Products, and then click Product Categories.
- Select the product category you wish to remove and click Delete.
- If this product category is currently assigned to a product, the product category cannot be deleted.
Setup: Create Products
A product represents each individual ingredient used in your operation. The product will be tracked from the time of pre-purchase through harvest transactions.
- On the Setup menu, point to Products, and then click Products.
- Click New.
- In the Abbreviation box, enter up to ten characters of optional information that you can use to easily identify the product by (for example, Pi C XYZ or Be B 1234).
- In the Name box, enter up to 30 characters of required information that describes the product such as Pioneer Corn XYZ or Becks Soybean 1234.
- Select the Product Category from the lookup list. In this example, Corn Seed is the product category for Pioneer Corn XYZ and Soybean Seed is the product category for Becks Soybean 1234.
- Enter the Manufacturer. (optional)
- Enter the Manufacturer Product #. (optional)
- The product number and manufacturer lot number provide traceability details. As the consumer industry is wanting more traceability on products consumed, agriculture needs a way to track specific identifiers used to raise the product.
- Enter the Manufacturer Lot #. (optional) (see note above)
- Selecting the product category displays the Product Properties at the bottom of the screen. The product properties are the custom product fields previously assigned to the product category.
- Enter any information you have at this time. Details can be updated at any time.
- Click Additional Notes in the lower right to store optional other product information.
- Click Save to save the product category and return to the List tab, or click Close to save the product property and close the product screen.
- If the product becomes outdated, the Active box at the top can be unchecked. The history will remain on posted data.
Click the Copy button to create a new product by copying an existing one. Select the product you wish to copy.
Click Copy. All fields will be auto-filled with the information from the original product, but can be modified.
Edit/Change a Product
All information on an existing custom product field can be modified. Posted activity will stay with the product.
- On the Setup menu, point to Products, and then click Products.
- Select the product you wish to change and click Edit (or double click on the product).
- Edit the details as needed.
- Click Save to save the product and return to the List tab.
Delete a Product
The delete button completely removes a product from the list.
- On the Setup menu, point to Products, and then click Products.
- Select the product you wish to remove and click Delete.
- If this product is currently assigned to an account category, the product cannot be deleted.
Outdated Products
Next year if the grower no longer used the same variety of seed, a new product is created and then begin the process using the new product. No new accounts. Outdated products can be combined or inactivated while the accounts remain the same.
- Combine would lose the product details for the product combined.
- Inactivate maintains the history while still cleaning up current lookup lists.
Setup: Assign Product Type to Accounts
The property Product Type was added to raw material accounts and work in process accounts. The product type identifies the type of account and manages the list of products available for a selected account.
- On the Setup menu, point to Accounts, and then click Accounts.
- Select an account such as Corn Seed RM. Click Edit. Select the Detail tab.
- Select the Product Type from the lookup list. In this example, select Crop Seed.Click Save.
- Repeat the steps for each raw material and work in process account used for crop inputs.
- Accounts no longer used can be inactivated from the list of accounts.
Setup: Assign Product to Account Categories
The account categories used to purchase and manage crop inputs will be assigned products. To assign products, the account categories used for crop inputs will require adding balance details.The following account categories are typically used to represent the flow of your products from pre-buy through harvest.
|
Assets > Prepaid Product Purchase |
Prepaid purchases to be delivered at a later time to farm. Using Prepaid Product Purchases provides an accounting at all times of what you have purchased but not yet in your possession. |
|
Assets > Fertilizer RM |
Fertilizer Raw Material are delivered products but not applied. |
| Assets > Chemical RM | Chemical Raw Material are delivered products but not applied. |
| Assets > Seed/Plants RM | Seed and Plants Raw Material are delivered products but not applied. |
| Assets > Fertilizer WIP | Fertilizer Work in Process are products applied to a field. |
| Assets > Chemical WIP | Chemical Work in Process are products applied to a field. |
| Assets > Seed/Plants WIP | Seed and Plants Work in Process are products applied to a field. |
| Cost of Goods > Fertilizer Cost | Fertilizer costs of the harvested crop by product and field. |
| Cost of Goods > Chemical Cost | Chemical costs of the harvested crop by product and field. |
| Cost of Goods > Seed/Plants Cost | Seed and plants costs of the harvested crop by product and field. |
Setup: Assign Product to Prepaid Product Purchase and Raw Material Account Categories
- On the Setup menu, point to Accounts, and then click Account Categories.
- Select an account category used for your crop inputs such as Seed/Plant RM. Click Edit.
- Select the Balance Detail tab.
- Select Product in the left column and double-click or use the right arrow to move to the right column.
Separate account balances will be maintained on accounts in Seed/Plant RM by the product purchased. - There may be other details you wish to maintain account balances such as Inventory Location.
If you wish to track the location of the deliveries, such as Pole Shed or Applicator Tank 1, use Inventory Location. The order of the items on the right defines the order of detail used on the account balance. If using Inventory Location, order beneath Products. Order the items on the right using the green up and down arrows.
The account category Prepaid Product Purchase has a balance detail by name. Order Product under Name. - Repeat the steps for each account category of Prepaid Product Purchase, Seed/Plant RM, Fertilizer RM, and Chemical RM.
- Click Save.
Setup: Assign Product and Production Center Details to Work in Process Account Categories
These are Seed/Plant WIP, Fertilizer WIP, and Chemical WIP. When the product is applied to the field, the quantity and dollars are transferred out of the raw material account’s product account balance to a work in process account with product and production center detail account balance. The work in process account is maintaining the balance of the product applied on each field.
- On the Setup menu, point to Accounts, and then click Account Categories.
- Select an account category representing crop inputs applied to the field such as Seed/Plant WIP. Click Edit.
- Select the Balance Detail tab.
- Select Product and Production Center Detail in the left column.
- Use the green single right arrow to move the items to the right column. Separate account balances will be maintained on accounts in Seed/Plant WIP by the product applied AND the field.
- Use the green up and down arrow to order the details. If you want the account balances to be first stored by Product with each field’s subledger balance under product, the order is Product and then Production Center Detail. Other details could be maintained if needed.
- Click Save.
Adding Product column in Transaction Entries
Selecting a prepaid product purchases account, a raw material account or a work in process account in a payable or payment screen selects the template “DT – Increase Product Inventory”.
- The product can be selected from the front screen by adding Product as a column.
- Right-click on the blue row in the entry grid and select Add/Remove Columns.
- Select Product as a column. Position product column as needed. Click OK.
- The product can also be selected by clicking the green Detail button and select from the Product field.
Transaction: Pre-buy or Purchase Products
- As you pre-buy or purchase crop inputs, assign the product in the transaction entry.

- Using the example in the beginning of this document, we will pre-buy 90 bags of corn seed at Pioneer.
- Select the Prepaid Seed account in the Account column. This is a prepaid product purchases account.
- Select the product in the Product column.
- Enter the Quantity and Amount in dollars purchased.
- In the next row select the same account but a different product for this variety.
- The Prepaid Seed will maintain subledger balances for Pioneer Corn Seed ABC and Pioneer Corn Seed XYZ.
If the payment is performed at or after the product is delivered, select the raw material account in the purchase transaction.
If you do not wish to track products not delivered from products delivered, you can use the raw material account at the time of purchase.
Purchase Products where the Field Location is Known
The purchase of crop inputs when you know where it will be applied can be entered directly to the work in process account. Assign the product and the production center detail in the transaction entry which avoids keeping track of the detail somewhere else. The entry might be an accounts payable, credit card, line of credit, or cash transaction.
However, if you are tracking products not delivered from those delivered, you may still want to use a prepaid product purchase account and then transfer to Corn Seed RM (in this example) at the time of delivery.
Transaction: Deliver Product to Farm
When products are delivered to the farm, a general journal transfers the prepaid purchase to a raw material. In our example the Pioneer corn seed was delivered in February 2019. Product is assigned to both the prepaid account and the raw material account.
- On the Processes menu, point to General Journal.
- Select the Company.
- In Name, select the vendor for this product. Name is required for Prepaid Product Purchase accounts because the account category also has balance detail of Name.
- In the Transaction Type, select General Journal (Accrual).
- In the Date, select the delivery date.
- In the grid under Account, select the Prepaid account.
- Enter the Quantity delivered.
- In the Credits column, enter the dollar value of the product delivered.
- Product column will need to be added.
- Right-click in the blue row and select Add/Remove Columns.
- Select Product.
- Use the green up and down arrows to position the column.
- In the Product column, select the product delivered.
- In the next journal row under Account, select the raw material account.
- Enter the same Quantity.
- In the Debits column, enter the same dollars.
- In the Product column, select the same product.
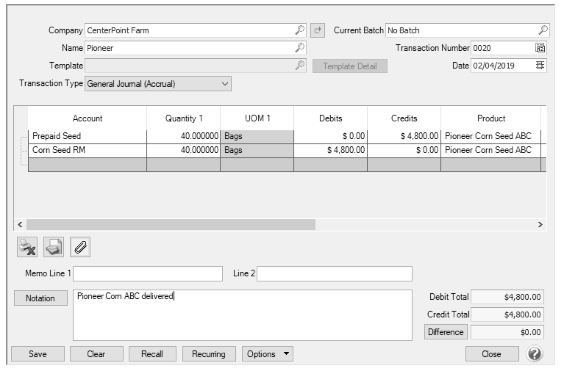
- Click Save.
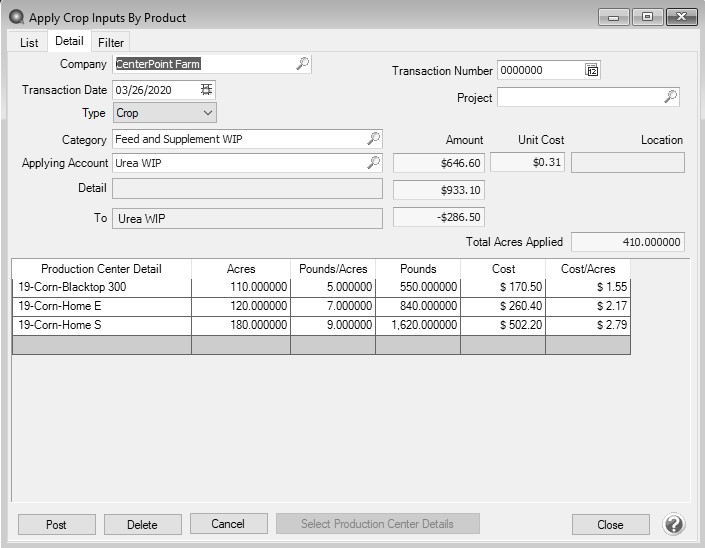
Transaction: Apply Crop Inputs by Product
When the product is applied to the field, Apply Crop Inputs by Product moves the product from a raw materials account to a WIP account. The WIP account is assigned the production center detail and the product.
- On the Processes menu, point to Production, and next click on Apply Crop Inputs by Product.
- Click Create New to add a new transaction.
- Select the Company.
- Select the Date.
- The Transaction Number is optional. A Numbering Sequence can be created.
- Project is optional. Project allows tracking other types of information such as the various field activities.
- In the Category, select the raw material or work in process account category for the crop input you are assigning production details.
- Applying Account lookup will list products with balances in the selected account category. Select the product. Applying Account displays the account.
- Options manages the display. If Applying Account is displaying product or <blank value> because product is not assigned, right click and select Options.
- In the Return Text column, select Name.
- Exit the entry screen and open again. Name will display in Applying Account.
- Detail displays the product. If no product is assigned to the account, Detail will remain blank.
- To displays the WIP account the product is transferring to. The WIP account is retrieved from the raw material account detail information..
- In the grid under Production Center Detail, select the field the product was applied.
- The Select Product Center Details button at the bottom of the screen can be used to generate the list of production center details.
- Set the filters on the left to display only the details you wish to use on the right. For example, the production year and the profit center.
- In Selected Production Detail Records, use the check boxes to indicate which fields you wish to apply at this time. Check All will select all detail records.
- Click OK to generate the list.
- Enter the units per acre applied in this field OR enter the total quantity applied.
- Entering units per acre calculates the total quantity.
- Entering the total quantity calculates the units per acre.
- The total Cost and Cost/Acres are calculated.
- The Used quantity and dollars are updated at the top of the screen.
- The Total Acres Applied box sums the Acres column displayed in the grid. The number of decimal places to display is set in File > Preferences > General Quantity Settings and will be the same as the Acres column in the grid.
- If the product was applied to multiple fields, continue entering the information to each production center detail in the grid.
- Click Post.
- The quantity and dollars are credited (decreased) from the raw material account with product.
- The quantity and dollars are debited (increased) to the WIP account with product AND production center detail.
- Clear removes detail from the screen.
- Close closes the screen.
Transaction: Apply Crop Inputs by Field
Apply Crop Inputs by Field moves the product from delivered raw materials to a WIP account with the field it was applied to. The WIP account assigns the production center detail and the product.
- On the Processes menu, point to Production, and next click on Apply Crop Inputs by Field.
- In the Production Center Detail, select the field you wish to apply crop inputs.
- Applied products for this field display in the grid at the top of the screen.
- Product displays the account for the product.
- Details displays the crop input name (product).
- Selecting an applied product in the far-left column displays its application details at the bottom of the screen.
- The applied Total Cost and Total Cost per Acres display below the grid.
- Click New to add a new application.
- At the bottom of the screen in Category, select the raw material or work in process account category for the crop input you are assigning production details.
- On the right in Application Date, assign the date.
- In Applying Account, click the lookup to view product balances not yet applied. Select a product.
- Applying Account displays the account for the product.
- Details displays the product. If product was not assigned, the field is blank.
- Location is optional and will be filled in if inventory location was assigned in balance detail.
- To displays the WIP account the product is transferring to.The WIP account is retrieved from the raw material account detail information.
- Project is optional. Project allows tracking other types of information such as the various field activities.
- On the right, Applied Acres displays the production center detail acres. The number of acres applied can be changed if needed.
- Enter the units per acre applied in this field OR enter the total quantity applied.
- Entering units per acre calculates the total quantity.
- Entering the total quantity calculates the units per acre.
- The total Cost is calculated based on quantity applied times the product cost/unit.
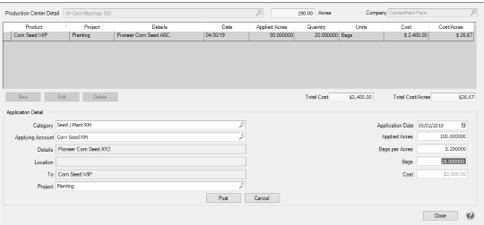
- Click Post.
- The quantity and dollars are credited (decreased) from the raw material account with product.
- The quantity and dollars are debited (increased) to the WIP account with product AND production center detail.
- The applied input displays in the top grid.
- The Total Cost and Total Cost per Acres is updated.
- Edit allows modifying a selected application detail.
- Delete allows removing a selected application detail.
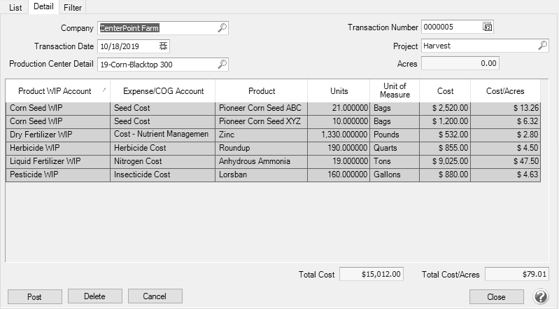
Transaction: Expense Applied Work in Process
After harvest, the applied crop inputs are transferred to cost of goods accounts representing the cost of raising the crop. The expensing transaction is entered in the same date range used to enter the new crop production transaction or the accounts receivable or receipt transaction to sell the grain from the field.
- On the Processes menu, point to Production, and next click on Expense Applied Work in Process Products.
- Existing expense transactions display in the grid.
- Select a transaction and click Review to display the detail. Modify or review the transaction.
- Select a transaction and click Delete to remove the expense transaction.
- Select Create New to add an expense transaction.
- In Company, select the company.
- In Transaction Date, select the harvest date.
- In Production Center Detail, select the field you wish to expense crop inputs.
- The Acres for this detail display on the right.
- Applied products for this field display in the grid for review.
- Each product lists the expense/cost of goods account assigned to the WIP account details.
- Applied products cannot be modified from this screen.
- The Total Cost and Total Cost per Acres display below the grid.
- Transaction Number is optional. A numbering sequence can be created.
- Project is optional. Project allows tracking other types of information such as the various field activities.
- Click Post.
- The quantity and dollars are credited (decreased) from the WIP account with product and production center detail.
- The quantity and dollars are debited (increased) to the expense/cost of goods account with product and production center detail.
- Cancel returns to the List tab.
- Close closes the screen.
Reports: Reports by Production Center Detail and Product
Transaction Search and many of the reports in CenterPoint have added Product as an available column. The reports that added Product column are: Transaction Journal, General Ledger Account Activity, General Ledger, Cash Basis General Ledger, Work-in-Process Account Activity, Inventory Account Activity, Payments Journal, Receipts Journal, Purchases by Vendor, Purchases by Vendor and Account, Inventory Account Balances, and Work in Process Account Balances.
The following steps would provide a traceability report by field.
- On the Reports menu, select Reports.
- Expand Transaction Reports, and next General Ledger.
- Select General Ledger Account Activity.
- In the Report Selections, set the Transaction Date to All.
- Add a filter for Product Center Detail to select a field or fields.
- Click More Items.
- Select Production Center Detail.
- Click OK.
- In the filter Production Center Detail, move the fields you wish to view from the Available column to the Selected column. Click OK.
- Click Preview.
- All account activity assigned to the selected production center details display. We now need to group by Production Center Detail and add the Product columns.
- Select the Columns tab.
- In the Available tab, add Product and Product Type.
- In The Selected tab, order the columns as desired.
- Select the Group/Sort tab.
- In the Available tab, select Production Center Detail.
- In the Selected tab, click the Group on Production Center Detail row. Next use the green up arrow to position the Production Center Detail row at the top.
- Click Refresh.
- The report groups all activity assigned to each selected production center detail which includes the transfer to WIP accounts.
- This report can be used prior to expensing the work in process products to see the products applied to your fields.
- If you have completed expensing work in process products and wish to view only the costs, filter the report by account type cost of goods.
- Select the Filters tab.
- Click More Items.
- Select Account Type. Click OK.
- In the Reports Selections select Account Type.
- Move Cost of Goods from the Available column to the Selected column.
- Click Refresh.
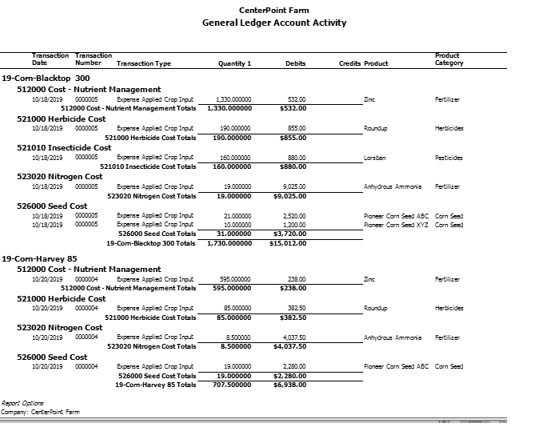
- The report includes all costs associated to the selected production center details with the list of products applied to the field.
- Click Favorites (star) icon on the preview toolbar to save to Add to Favorites. Enter a report name such as Production Center Details with Product.
|
Document: 3352 |
|---|