CenterPoint® Accounting for Agriculture
- Maps
Related Help
_24.jpg) Create Production Center Maps Video - Duration: 9 min 40 sec
Create Production Center Maps Video - Duration: 9 min 40 sec
Create Production Center Detail Maps Video - Duration: 5 min 34 sec
Working with Production Analysis Maps Video - Duration: 8 min 45 sec
Printing Production Analysis Maps Video - Duration: 3 min 0 sec
MyJohnDeere Authorization Video - Duration: 2 min 42 sec

| Document #: | 3368 | Product: | CenterPoint® Accounting for Agriculture |
|---|
Maps provide a visual tool of your production centers and production center details. Maps are stored in the setup of a production center or production center detail.
Typically maps of your fields will be imported from a source such as Shape Files or John Deere. However, fields can also be drawn within CenterPoint with your mouse.
The maps become an analysis tool in Production Analysis where you can visually compare the activity or results acquired in the different areas of your operation. Using maps in Production Analysis can help you see unknown conditions and insights to guide your management strategies.
This document includes the following topics:
Creating Maps
- Maps can be added from Setup > Profit/Production Centers > Production Centers or Setup > Profit/Production Centers > Crop Production Center Details.
- Map menus and techniques are identical at both the production center or the production center detail. The exception is production center detail maps include a few additional options.
- Maps added at production centers will be available as a background in new production center details that select a production center with an existing map.
- Select a production center or production center detail and Edit.
- Select the Map tab.
- Under the Production Center tab or the Production Center Detail tab, there are several display options:
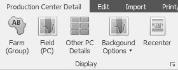
- Farm (Group)
- Provides a way to combine production centers using Production Center Groups. For example, you might have production groups for each farm. Selecting the Farm (Group) icon toggles between:
- Displaying all production centers (or details) assigned to its production center group OR
- Displaying just the selected production center (or detail).
- This option requires that a map exists at the production center setup.
- Field (PC)
 - This option is only available when working with maps in Crop Production Center Details. The Field (PC) icon displays the production center map selected in this production center detail. The map displays as a background and cannot be edited from production center details.
- Select Field (PC) to display the map from the production center.
- Field (PC) is a tool to trace a new production center detail using the production center map as a background. The icon toggles between displaying the production center map and not displaying the map.
- This option requires that a map exists at Setup > Profit/Production Centers > Production Centers > Map.
- Other PC Details
 - This option is only available when working with maps in Crop Production Center Details. The Other PC Details icon displays all production center details assigned to its production center.
- If one production center includes multiple crop production center details that are active, the Other PC Details icon toggles between displaying all production center details with each shape title and tooltip information OR
- Displaying just the selected production center detail.
- Background Options
 - There are three options available - Aerial, Roads, or Hybrid. Select an option from the drop-down.
 - Aerial - an aerial view with no road definitions.
- Roads - include labeled roads and locations without an aerial view.
- Hybrid - combines both the aerial view and road names.
- Recenter
 - Returns the zoom to center the selected production centers. Recenter is helpful when working with maps and you want to return the map view back to the selected area.
 - Other functions available when working with maps are:
- The mouse wheel is used to zoom in and out on the map.
- The arrows
 at the bottom of the screen moves from one production center or production center detail map to the next.
 - Save accepts changes to the production center or production center detail.
- Cancel rejects changes to the production center or production center detail.
Importing a Map
- Select Setup > Profit/Production Centers > Production Centers OR Setup > Profit/Production Centers > Crop Production Center Details.
- Select a production center or production center detail and Edit.
- Select the Map tab.
- Select the Import tab or click
 .
. - From the Source
 drop-down menu, select the source you are importing from. The options are:
- Shape Files
- My John Deere
- The Import From Shape File screen displays. In the Shape File box, click
 to browse to the folder you are importing from.Selecting a folder displays the files for the indicated source.
- Select the file you wish to import for the production center.
- Select Open.
- The map displays.
- Select Accept
 to save the map or select Cancel
  to reject.
 - Select Save to save the map to the production center or production center detail.
- Imported maps can be modified using the Add/Edit
 functions. See the Editing an Existing Map section in this document for more information.
Drawing a Map
- Select Setup > Profit/Production Centers > Production Centers OR Setup > Profit/Production Centers > Crop Production Center Details.
- Maps added at production centers will be available to view as a background in new production center details that select a production center with an existing map. Use the Field (PC) icon to view the map from the production center.
- Maps added at production centers will be available to view as a background in new production center details that select a production center with an existing map. Use the Field (PC) icon
- Select a production center or production center detail and Edit.
- Select the Map tab.
- When drawing a map manually, you will first need to zoom into your location. Use the wheel on your mouse to zoom to the field location. Drag the map in the direction needed until you are viewing a detailed aerial of the field. From the drop-down menu, using the Hybrid background option will help find the right area.
- Once you are zoomed into your field location, select Edit (or Map > Production Center Detail tab > Add/Edit ).
- Select Insert New Shape
 .
.- You will be drawing the shape of the field with points. Each time you click the mouse a new point is inserted to change direction. A continuous line connects point to point.
- The field can have as many points as needed to complete the contours of your field. When you return to the first point, double-click to end the shape or press Enter.
- The shape can be modified before accepting changes. Select a point and drag to a new position. You cannot insert a new point once the shape is closed, but you can accept changes and then edit the shape to add additional points.
- Select Accept Changes
 to accept the shape.
 - Select Reject Changes
 to reject the shape.
 - Undo Last Edit
 removes the last change. Undo Last Edit keeps removing one more change backwards.
- If you are creating a production center detail map AND a map exists for the production center, that map can be used as a background to trace the new production center detail map.
- Select the Production Center Detail tab > Field (PC) . That displays the production center map for this production center detail. If you do not see the map, save the new production center detail to establish the production center assigned. Edit the new production center detail and return to the Map > Production Center Detail tab and select Field (PC).
- Select Add/Edit .
- Select Insert New Shape . The background map displays as a guide to trace the new production center detail map.
- Click Accept Changes to accept the shape.
- Select the Production Center Detail tab > Field (PC)
- Multiple shapes in one field: If your field has unfarmed areas such as a waterway, a creek, trees, etc., the field can be represented with multiple shapes.
- A shape can be drawn inside the field boundaries to represent unfarmed area. Any shape that is not connected to the outside boundary is considered an exclusion to the calculated area and will be deducted from the total acres for this field.
- Your field can be multiple shapes that adjoin. If two shapes adjoin, the total of both shapes are used in the calculated area.
- Your field can be multiple shapes that do not join. If your field is separated by unfarmed areas, the field can be represented with multiple shapes that do not join. All shapes are totaled into the calculated area.
- To add additional shapes to one field:
- For the first shape, select Accept Changes .
- Then select Add/Edit again.
- To add the next shape, select Insert New Shape
- Continue until all shapes for this field are completed.
- Select Save to save the map to the production center or production center detail.
- For the first shape, select Accept Changes
Editing an Existing Map
An existing imported map or a manually drawn map can be edited.
- Select Setup > Profit/Production Centers > Production Centers OR Setup > Profit/Production Centers > Crop Production Center Details.
- Select a production center or production center detail and Edit
- Select the Map tab.
- Select Edit (or Map > Production Center Detail tab > Add/Edit ).
- Select the field by clicking the mouse anywhere inside the map.
- Select Edit Selected Shape
 from the menu. The points display in the map.
- To move a point, select a point and drag to a new position.
- To add a point, click on the line between points. A new point is added. Drag the point and position as needed. Each click inserts a new point to change direction.
- When finished, click outside of the map.
- Select Accept Changes to accept, Reject Changes to reject, or Undo Last Edit to go back one change at a time.
- A field can be moved or rotated to match its real location if needed.
- Select Edit (or Map > Production Center Detail tab > Add/Edit ).
- Select the field by clicking the mouse anywhere inside the map.
- Select Move/Rotate Selected Shape

- Hovering your mouse over the Rotate symbol allows you to rotate the field.

- To move the field, select the field and drag to the desired location and drop. When you select the field and drag with the mouse, this symbol displays
 .
. - When you finish moving the field, click outside of the map.
- Select Accept Changes to accept, Reject Changes to reject, or Undo Last Edit to go back one change at a time.
- Select Accept Changes
- Select Edit (or Map > Production Center Detail tab > Add/Edit
- If you begin drawing a shape you wish to reject, double-click to end the shape. Then click Reject Changes.
- To remove a field and start over, select Remove
 from the Production Center Detail menu.
 - Click Save at the bottom of the screen to save the map changes to the production center or production center detail.
Printing / Exporting Maps
The Map > Print/Export menu allows you to preview the map to make print or export modifications, print the map, or export the map.
- Select Print/PreviewTo add headers or footers to the printout, scale the size of maps, change margin settings, change page orientation, as well as other features.
- A map preview displays.
- The preview screen toolbar includes functions to modify your printed map.
- provides an input of a header title or footer note.
- allows enlarging or diminishing the size of the map by a percent of normal.
- adjusts the page borders.
- allows you to switch the page orientation to portrait or landscape.
- allows you to select a paper size.
- Maps can be printed or exported from the Preview screen and will include preview modifications.
- Click the Print
icon to print to the selected printer.
- Selecting the Export To
drop-down arrow displays a list of format options; .PDF, HTML, MHT, RTF, DOCX, XLS, XLSX, or Image File (BMP, GIF, JPEG, PNG, TIFF, EMF, WMF). Select the appropriate format. The next screen allows optional modifications for the selected format. Click OK to select where you wish to save the file.
Selecting to Email As
displays optional modifications for the selected format. Click OK to display a Send Email screen with the file attached. Fill in the email address you wish to send the map to and enter a message.
- Select Print Options
to make printer, number of copies, paper source, and duplex printing selections.
- A Print screen displays.
- Select the Printer name.
- Select Number of copies or Page range.
- Click the Print button.
- Select Print Default
to print the current map to the windows default printer.
- Select Export PDF
to display a File Explorer screen to select where you wish to save the PDF file. Select a folder location. The file name can be changed if needed. Click OK.
Settings
The Map > Settings menu allows display options and default settings.
- Select the Settings
 icon.
icon. - From the left side of the screen, under Display Options, select Shape Titles to select the attribute used to label your production center or production center detail.
- Select the Title Attribute you wish to display - Name, Calculated Area, or Reported Area
- More attributes are available at the production center detail than at the production center. The additional attributes are: Yield, Yield (Bdgt), Year, and Crop.
- Select Shape Tooltips to select which attributes you wish to include in the production center or the production center detail tooltip. Tooltips display when you hover over a field with your mouse.
- Under Import Sources, select the source you use to import maps. Each source includes options such as default file locations or authorization information. The source options are:
- Shape Files - allows selecting the folder location of your shape files.
- My JohnDeere - authorizes access to your MyJohnDeere account.
- Click Authorize.
- The MyJohnDeere login page will display in your default web browser.
- Enter your MyJohnDeere user and password. The first time you perform this process, you will be prompted by MyJohnDeere to allow CenterPoint to access your MyJohnDeere account. When the process is complete, an Authorization Complete screen will display. If the screen does not automatically close, click the Close icon in the upper-right corner of the screen to return to CenterPoint.
- CenterPoint can now access your MyJohnDeere account for a limited period of time (12 hours).
- Under Print Options, select Export Folder to set a default location you wish to export map files to.
Production Analysis (WIP) Maps
Production Analysis (WIP) provides a way to visually analyze your production data.
- From the Production Analysis screen, select the Map tab at the top.
- To view maps you will first need to import or create your maps from Setup > Profit/Production Centers > Production Centers or Setup > Profit/Prodicution Centers > Crop Production Center Details. If the maps are created at the Production Center, the maps will be available at the Production Center Detail when selecting that production center in the detail.
Adding Maps to Production Center Details
Maps can be imported from other sources such as Shape Files or My John Deere. Maps also includes drawing tools to add maps to your production details.
- Select Setup > Profit/Production Centers > Crop Production Center Details.
- Select a crop production center detail and Edit.
- Select the Maps tab.
- From the Production Center Detail tab are the following Display menu options:
- Farm (Group)
 - displays your fields by Production Center Groups.
 - Field (PC) - displays a selected crop production center detail.
- Other PC Details - includes other production details that are a part of the same production center.
- Background Options - allows you to display your maps with an Aerial view that has no roads; Roads includes road names with no aerial; and Hybrid includes both roads and aerial.
- Recenter - Returns the zoom to center the selected production centers. Recenter is helpful when working with maps and you want to return the map view back to the selected area.
- Farm (Group)
- From the Production Center Detail tab option are the following Modify options:
- A map displays. Use your mouse wheel to zoom into your location.
- Add/Edit - displays the Edit options to add a new shape or edit an existing shape.
- Undo Last Edit - goes back to shape previous to last change.
- Edit Selected Shape - allows selecting the shape. The points display to drag an make changes to the shape.
- Insert New Shape - begins the process of adding a new shape. Click the mouse to begin the first point. Drag your mouse to the next point of change in shape and click. Keep drawing points until you return to first point. Double click ends the shape or press Enter. Click Accept Changes.
- Move/Rotate Selected Shape - provides a rotating tool to rotate using the backward arrow. A shape can be moved by grabbing with your mouse, move the shape, and drop.
- Click Accept Changes to accept the new shape or modifications to the shape.
- Reject Changes returns the shape to previous details.
- Select Save when you have completed the new shape or modifications.
|
Document: 3368 |
|---|