CenterPoint® Accounting for Agriculture
- Make a Bank Deposit
Related Help
_24.jpg) Make a Bank Deposit Video - Duration: 7 min 02 sec
Make a Bank Deposit Video - Duration: 7 min 02 sec
 View or Print as PDF
| Document #: | 3035 | Product: | CenterPoint® |
|---|
Bank deposits allow you to specify which receipts were deposited into the bank at one time. Receipts with the same bank deposit number will be assigned to the same bank deposit. If you create a deposit and then add the transactions to that deposit, they will all be consolidated to a single line in checkbook reconciliation. Bank deposits will appear in the Bank Reconciliation screen on the Reconcile tab under Deposits and Other Credits. If you do not include your receipts in a deposit, all of our receipts will be listed separately when you go to reconcile your checkbook. This will make reconciling your bank statement difficult because your bank statement will sum all of the amounts that are deposited at the same time into one amount on your bank statement. A sequence number can be set up for use with bank deposit numbers. The sequence number can be set to include an identifier for the deposit (for example DEP), set to increment, include the date, and reset on each day. To create an incrementing sequence number with the date that will reset daily, select Setup > General > Numbering Sequences. select the Bank Deposits transaction screen, determine if the sequence number should be unique by company and bank account, in the Format box enter DEPddmmyy#, select the Reset on New Date check box, and then click Save.
There are 3 steps to making a bank deposit:
Step A: Assign receipts to a bank deposit (two options)
Step A: Assign Receipts to a Bank Deposit
Option 1: Assign receipts after entering the receipt transactions
- Enter all receipt transactions in Processes > Sales > Receipts.
- Select Processes > Banking > Bank Deposit. Click New.
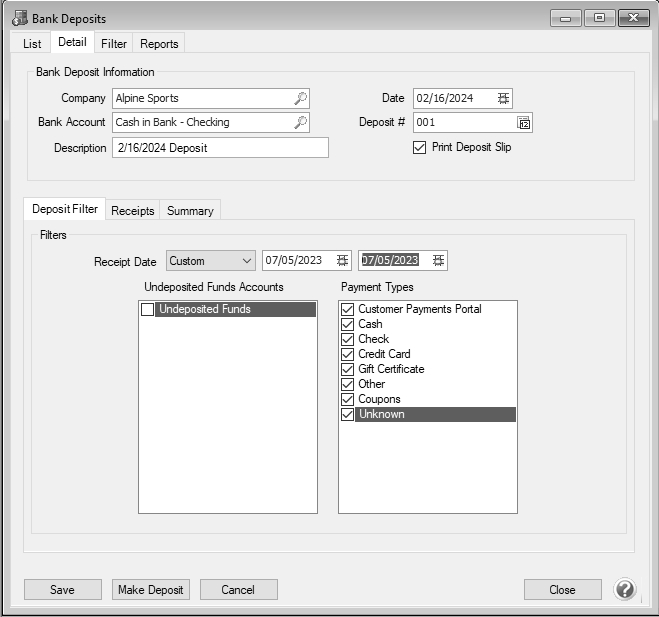
- In the Company/Fund box, select the company/fund this bank deposit is for. If you are creating a bank deposit from the Receipts screen, the company/fund id will display from the Receipts screen.
- In the Bank Account box, select the bank account this bank deposit is for. Only accounts in the Bank and Line of Credit account categories will display. If you are creating a bank deposit from the Receipts screen, the bank account id will display from the Receipts screen.
- In the Description, enter a description for the bank deposit slip. The default value for the description will be "<Bank Deposit Date> Deposit". If you prefer to set the Description box to something other than the default, enter the information or leave the box blank, right-click and select Set As Default.
- Enter or select the Date of the bank deposit.
- The Deposit # box retrieves the default sequence number. This can be changed if needed. (See Optional Setup at the end of this document for more information on Deposit #.)
- Select if you wish to Print Deposit Slip.
Note: The deposit slip will print the form type, number of copies, and to the printer specified in File > Preferences > Printing > Bank Deposit Slips . To set a default selection for the Print Deposit Slip check box, determine if you want the deposit slip to print, right-click, and then select Set As Default. To clear the default , right-click and select Clear Default.
- On the Deposit Filter tab, select the date range of receipt transactions to display.. The date defaults to Today's date.
- Select the Undeposited Funds check box to display the receipts entered to an Undeposited Funds account on the Receipts tab.
- Select the Payment Types used in the receipt transactions you wish to include. If you did not use the Payment Type in the receipt transaction, select Unknown.
Note: All payment types will display for selection except for payment types with the Type of Payment set to Other that have not been assigned a cash account.
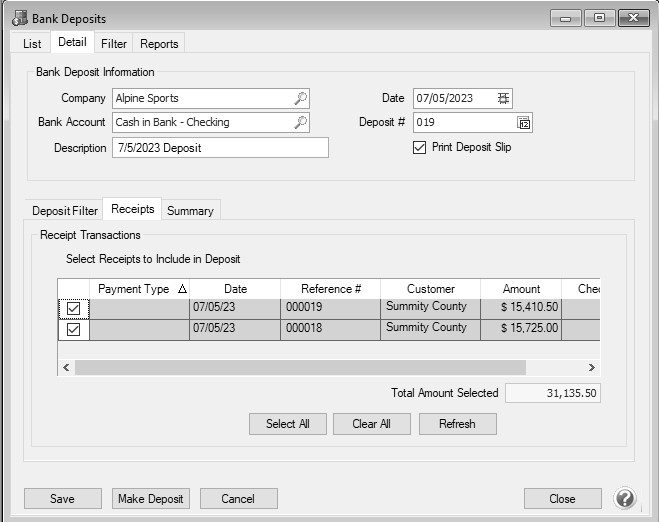
- Select the receipts to be deposited with this bank deposit.
Note: Use Select All if all receipts displayed should be included in this bank deposit. You can view the total of all receipts selected for deposit in the Total Amount Selected box. Click Refresh if a change was made in Transaction Search or through a report to a receipt to display the change on the Receipts tab.
- Click Save to complete the deposit.
Option 2: Assign receipts while entering the receipt transactions.
- Select Processes > Sales > Receipts to begin entering a receipt transaction.
- In the Bank Deposit field, select an existing deposit or right mouse click and choose New to add a new bank deposit.
- Continue entering the receipt as normal. Click Save when the transaction is entered completely.
- As each additional receipt transaction is entered, specify the appropriate Bank Deposit.
Note: if you have multiple receipts to put in the same deposit, right click on the selected bank deposit and choose Set Default.
Step B: Review the Deposit Summary
- Select Processes > Banking > Bank Deposit.
- Select the appropriate deposit and click on Edit.
- Click on the Summary tab. The Deposit Summary will display total receipts for each payment type.
- If you are getting cash back in this deposit, enter the amount in the Cash Back Amount box.
- Enter the Expense Account to use for the cash back. An optional memo can also be entered.
Step C: Make the Deposit and Print the Deposit Slip
- When you are ready to complete the deposit, click Make Deposit (Processes > Banking > Bank Deposits > Edit). If the Print Deposit Slip check box was selected on the deposit, the deposit slip will print. If the Form Type selected in File > Preferences > Printing > Bank Deposit Slips is the default Pre-printed form, when the number of non-cash receipts on the deposit is greater or equal to 39 lines, you will receive a message prompting you to load your preprinted bank deposit form followed by blank paper before clicking OK to continue.
- Deposit slips can be reprinted by selecting the closed deposit on the List tab. Click Print Deposit Slip.
|
Document: 3035 |
|---|