CenterPoint® Accounting for Agriculture
- Entering Beginning Balances for Inventory Items
Related Help
_24.jpg) Enter Beginning Balances of Inventory Items Video - Duration 7 min 06 sec
Enter Beginning Balances of Inventory Items Video - Duration 7 min 06 sec

| Document #: | 3138 | Product: | CenterPoint® Accounting with Inventory Module |
|---|
When a new database is created that includes inventory items, or the inventory module is added to an existing CenterPoint database, the beginning balance quantities and amounts for the inventory items need to be entered. This is done using the Inventory Adjustments screen.
Prerequisite
You must have the Inventory module purchased and registered in the module configuration manager (File > Administration > Module Configuration Manager) prior to entering beginning balances for inventory items.
Entering Beginning Balances for Inventory Items
- Select Processes > Inventory > Inventory Adjustments.
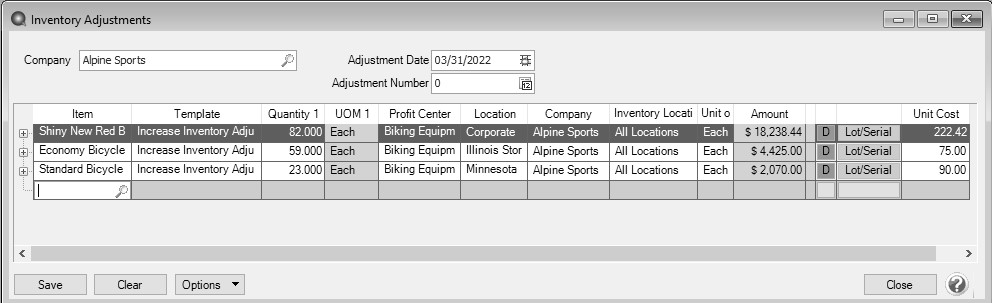
- Select the Company the inventory adjustment is for.
- Select the Adjustment Date.
- In the Adjustment Number box, a sequence number will be assigned automatically. You can also select a sequence number. This is optional information for Inventory Adjustments.
- In the Item box, select the sales item that needs to be adjusted. Only inventory types of Inventory, Lotted, or Serialized will display in the selection list.
- If the sales item you entered in step 5 is a Lotted or Serialized item, click the Lot/Serial button in the data entry grid (if it is not displayed, right-click and from the Add/Remove Columns screen, select Lot/Serial Number) the Lotted/Serialized Items screen will display. If you need to adjust existing lot/serial item quantities, the Display All Lot/Serial Numbers checkbox is selected. New items can be added by typing into a blank row. Enter a positive quantity to increase and decrease inventory.
Note: the Amount and Unit Cost for a lotted/serialized item will be blank. When adjusting existing lots or serial items, it is important to enter the quantities and amount to accurately update the inventory adjustment. Click OK. .
- In the Template box, select the appropriate template:
- For an Inventory Item: Decrease Inventory Adjustment or Increase Inventory Adjustment.
- For a Lotted/Serialized Item: Decrease Lot/Serial Numbers or Increase Lot/Serial Numbers.
- Enter the Quantity to be adjusted. All quantities are entered as positive numbers, as the Template selected in the previous step controls how the quantity will affect the on hand quantity.
- The Unit Cost is a calculated field (Amount / Quantity) and is for display purposes only. The unit cost is found in this order:
If the inventory quantity on hand > 0.00, the unit cost is based on the valuation method.
If the inventory quantity on hand = 0.00 or less, the last purchase cost is used.
If no last purchase cost is found, then the unit cost found on the Setup > Sales > Items > General tab or Setup > Inventory > Items > General tab is used.
If the unit cost on the General tab = 0.00, .01 is used.
If you selected the Add Inventory (Enter Qty & Unit Cost) template, enter the Unit Cost. The Amount is calculated by multiplying the Unit Cost by the Quantity.
- Select the Company the inventory adjustment is for.
- Select the Inventory Location the inventory adjustment is for.
- Select the Unit of Measure for the adjustment. If an item has multiple units of measure they will be displayed in the lookup. If a unit of measure other than stocking is selected and the conversion factor from stocking is different, the program converts quantities to the selected UOM. So, adjustments are made using the Unit of Measure selected. For example, if the unit of measure selected is dozen and the stocking unit of measure is each, a quantity of 1 entered into the Quantity field is equal to 12 stocking units (quantity). Also if the unit cost for the stocking quantity is $1.00, the unit cost displayed in the Unit Cost field will be $12.00 as long as the quantity is not equal to zero.
- The Notation can be used to enter information about the inventory adjustment.
- The Amount is automatically calculated.
- A Comment can be entered to specify the reason for the adjustment. Notations are optional.
- Click the + button to display a preview of the journal entry that will to be posted. If the company uses the FIFO or LIFO inventory valuation method, there will be more than one journal displayed.
- Click Save.
|
Document: 3138 |
|---|