CenterPoint® Accounting for Agriculture
- Apply Crop/Livestock Inputs using Products
Related Help
_24.jpg) Apply Crop Inputs by Products Video - Duration: 6 min 42 sec
Apply Crop Inputs by Products Video - Duration: 6 min 42 sec

| Document #: | 3376 | Product: | CenterPoint® Accounting for Agriculture |
|---|
This document can be used to either:
Apply Crop Inputs by Product or Field
Apply Livestock Inputs by Product or Group
Apply Crop Inputs by Products or Field
Processes > Production > Apply Crop/Livestock Inputs by Product and Apply Crop/Livestock Inputs by Field/Group are tools to move your crop inputs from the raw material asset to a work in process asset production center detail or from WIP to a specific production center detail.
- Apply Crop Inputs by Product begins with selecting a product and assigning the product to multiple field locations in one screen.
- Apply Crop Inputs by Field begins with selecting a field and assigning multiple products to the selected field in one screen.
- The results of both Apply Crop Inputs by Product and Apply Crop Inputs by Field are identical.
- Raw material assets represent products not applied and on hand.
- Work in process assets represent products applied to a field location (crop production center detail).
- Products allow you to manage the specific ingredients you use without a long list of accounts. The product detail is maintained as the ingredient moves from the raw material asset to the work in process asset.
- Refer to the document “Using and Understanding Products” for help on creating your list of products.
Apply Crop Inputs by Product
Apply Crop Inputs by Product begins with selecting a product and assigning one or more field locations the product was applied.
- Select Processes > Production > Apply Crop/Livestock Inputs by Product.
- Select Create New to add a new transaction.
- In the Company, select your company.
- In Transaction Date, select the date. (Changing a date will clear the grid.)
- Transaction Number is optional. A Numbering Sequence can be created.
- Project is optional. Projects allow tracking other types of information such as the various production activities.
- In the Type box, select Crop.
- In Category, select the WIP or Raw Material category for the crop input you are assigning details.
- Only accounts with NO production center details will be available.
- In Applying Account, select the crop input from the lookup list.
- The list includes accounts in the selected account category with a balance.
- Each product is individually listed.
- The list includes only accounts with NO production center detail.
- The Detail box is populated with the selected Product.
- Selecting the Applying account populates the details on the right of On Hand quantity, dollars, Unit Cost, and Location.
- Location is displayed if the Raw Material has Inventory Location as a balance detail.
- The To account is retrieved from the raw material account representing the WIP account associated to this Raw Material.
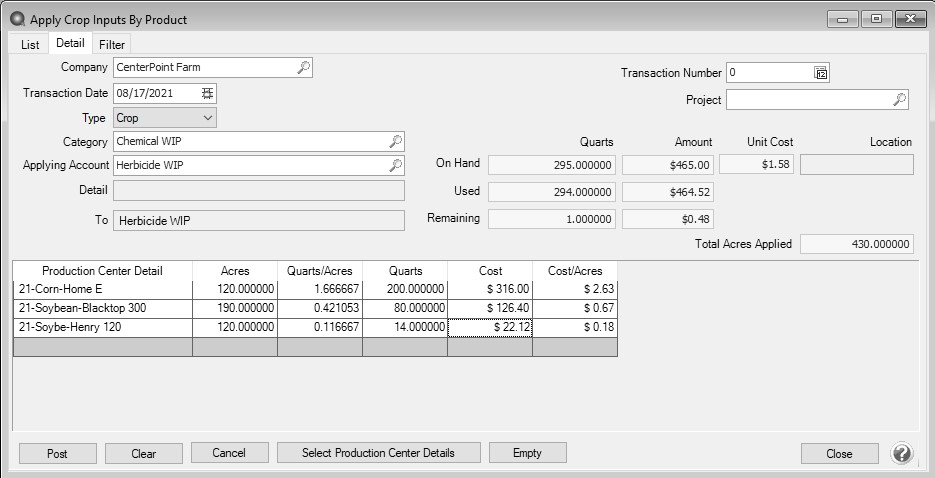
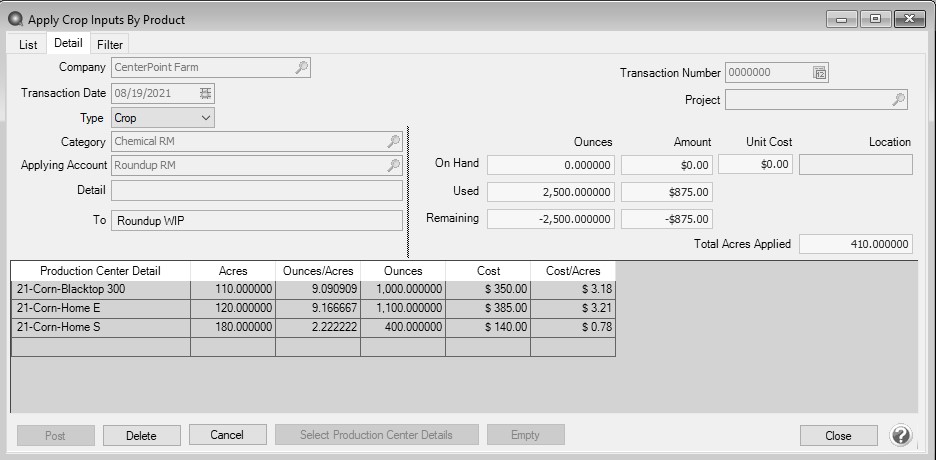
- Select a Production Center Detail. This represents where the ingredient is planned to be applied or was applied.
- The Acres display for the Production Center Detail.
- The number of acres can be changed if all acres were not applied at this time.
- The Quantity title is retrieved from the Applying account.
- Select the Production Center Details button at the bottom will generate the production center detail list for you. If the same item is being applied with the same production center detail, the Amount/Acres will automatically display with the value entered on the previous row of the grid..
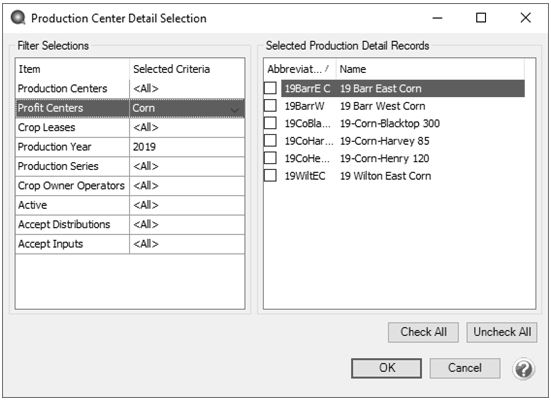
- Set the filters on the left to display only the details you wish to use on the right.
- This example filtered production year 2019 and profit center Corn.
- Check the boxes at the left of each detail allow you to assign the selected product. Check All selects all fields on the right..
- Click OK to generate the list.
- Enter the units per acre applied in each field OR enter the total quantity applied.
- Entering units per acre calculates the total quantity.
- Entering total quantity calculates the units per acre.
- The total Cost and Cost/Acres are calculated.
- The Used quantity and dollars are updated at the top of the screen.
- The stocking units Quantity On Hand, Used, and Remaining are updated at the top of the screen. The On Hand, Used and Remaining stocking units use the number of decimals set in Preferences > General > Quantity Decimal Settings.
- All quantity does not need to be assigned at one time.
- The Total Acres Applied box sums the Acres column displayed in the grid. The number of decimal places to display is set in File > Preferences > General Quantity Settings and will be the same as the Acres column in the grid.
- Click Post if all details are entered for this ingredient at this time.
- The quantity and dollars are credited (decreased) from the Raw Material account.
- The quantity and dollars are debited (increased) to the WIP account with production center detail.
- Clear removes details from the screen.
- Close closes the screen.
- Cancel takes you back to the list. The List displays posted Apply Crop Input by Product transactions.
- Click the Select Production Center Details button to generate a production center detail list.
- Click the Empty button to distribute remaining quantity and amounts to a selected production center detail.
- From the List tab, Review displays the selected transaction detail screen.
- From the List tab, Delete removes the selected transaction in the list.
Apply Crop Inputs by Field
Apply Crop Inputs by Field selects a Production Center Detail and assigns one or more products applied to the selected field.
- Crop Inputs can be assigned to the selected Crop Production Center Detail.
- This is a convenient screen to view all crop inputs currently assigned to the production center detail.
- Applied inputs can be edited from this screen.
- Select Processes > Production > Apply Crop/Livestock Inputs by Field/Group.
- In the Production Center Detail, select a detail.
- The Acres are populated from the Production Center Detail.
- The Company from the detail is displayed.
- The crop inputs already applied to the Production Center Detail are displayed in the grid.
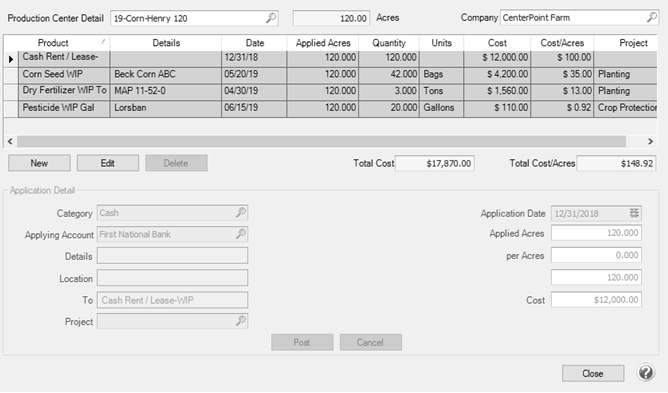
- To Edit a crop input, select a row at the far left.
- The details of the application display in Application Details at the bottom.
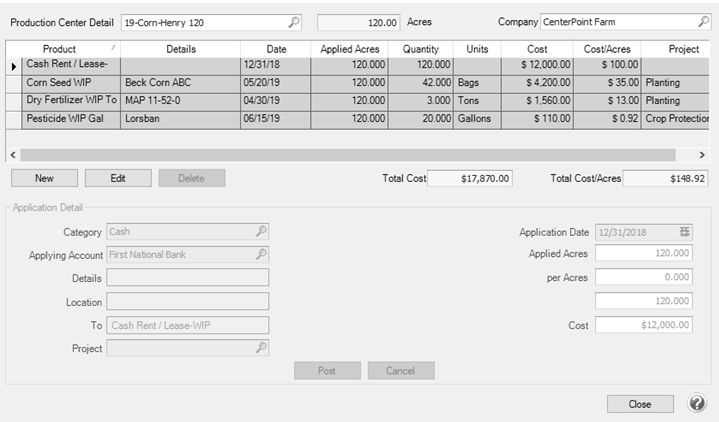
- Notice the grid also includes a cash payment to Cash Rent / Lease WIP assigned to the Production Center Detail. Any transactions that updated balances with the selected Production Center Detail are included in the grid even though it may not have a product.
- Click Edit to make changes.
- Editing a row created from a payment screen displays the payment entry screen to make changes.
- Editing a row representing a crop input applied from Apply Crop Inputs by Production or by Field displays the original screen.
- If the product you are modifying is now a zero balance, delete the row. Calculations require an amount remaining in the product.
- If the Apply Crop Input was entered from this screen, the Delete button is active.
- If the Apply Crop Input originated from a different screen, click Edit to remove the product form the original entry. Click Post or Save.
- Click New to apply the product to this field again and complete your changes.
- After changes are made, click Save or Post. The balances are adjusted.
- Click New to add a new crop input to this detail. The Application Details become active.
- In Category, select the Raw Material category for the crop input you are assigning details.
- WIP account categories can be selected here also.
- Only accounts with NO production center details will be available.
- In Applying Account, select the crop input account.
- The list includes accounts in the selected account category with a balance.
- Each product with balance detail is individually listed.
- The list includes only accounts in the account category with NO production center detail
- The Details box populates with the selected product.
- If Inventory Location is maintained on the account category, the Location is listed.
- Project is optional. Projects allow tracking other types of information such as the various production activities.
- Select the Application Date.
- Applied Acres is populated from the Production Center Detail.
- The number of acres can be changed if needed.
- The Quantity title is retrieved from the Applying account.
- Enter the units per acre applied in this field OR enter the total quantity applied.
- Entering units per acre calculates the total quantity.
- Entering total quantity calculates the units per acre.
- The total Cost and Cost/Acres are calculated.

- Click Post to apply this ingredient to the Production Center Detail.
- The quantity and dollars are credited (decreased) from the Raw Material account.
- The quantity and dollars are debited (increased) to the WIP account with production center detail and product.
- Cancel clears the screen.
- Close closes the screen.
- The Delete button under the grid allows removing a transaction entered from this screen.
Apply Livestock Inputs by Products or Group
Processes > Production > Apply Crop/Livestock Inputs by Product and Apply Crop/Livestock Inputs by Field/Group are tools to move your livestock inputs from the raw material asset to a work in process asset production center detail or from WIP to a specific production center detail.
- Apply Livestock Inputs by Product begins with selecting a product and assigning the product to multiple groups in one screen.
- Apply Livestock Inputs by Group begins with selecting a group and assigning multiple products to the selected group in one screen.
- The results of both Apply Livestock Inputs by Product and Apply Livestock Inputs by Group are identical.
- Raw material assets represent products not applied and on hand.
- Work in process assets represent products applied to a group (livestock production center detail).
- Products allow you to manage the specific item (feed/supplement, etc.) you use without a long list of accounts. The product detail is maintained as the specific item (feed/supplement, etc.) moves from the raw material asset to the work in process asset.
- Refer to the document “Using and Understanding Products” for help on creating your list of products.
Apply Livestock Inputs by Product
Apply Livestock Inputs by Product begins with selecting a product and assigning one or more groups the product was applied.
- Select Processes > Production > Apply Crop/Livestock Inputs by Product.
- Select Create New to add a new transaction.
- In the Company, select your company.
- In Transaction Date, select the date. (Changing a date will clear the grid.)
- Transaction Number is optional. A Numbering Sequence can be created.
- Project is optional. Projects allow tracking other types of information such as the various production activities.
- In the Type box, select Livestock.
- In Category, select the WIP or Raw Material category for the livestock input you are assigning details.
- Only accounts with NO production center details will be available.
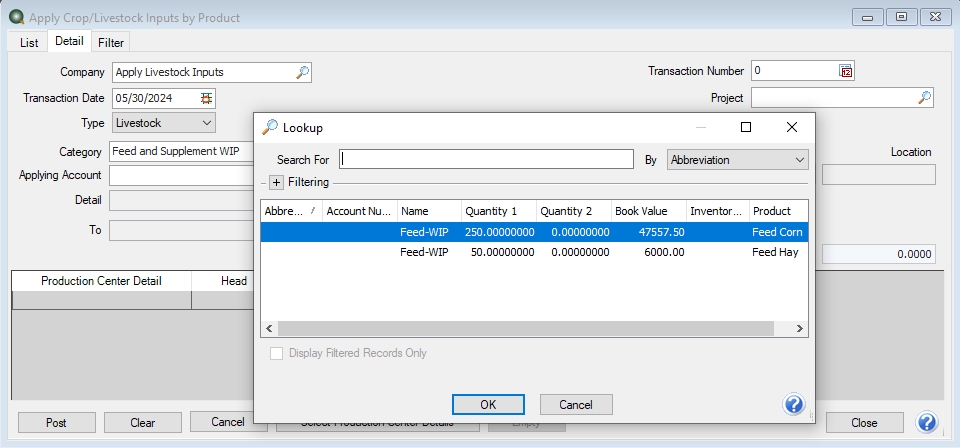
- In Applying Account, select the livestock input from the lookup list.
- Click the Lookup icon, the list includes accounts in the selected account category with a balance.
- The list includes accounts in the selected account category with a balance.
- Each product is individually listed.
- The list includes only accounts with NO production center detail.
- Right-click, select Add/Remove Column, and then select the Product column to display/select the appropriate product
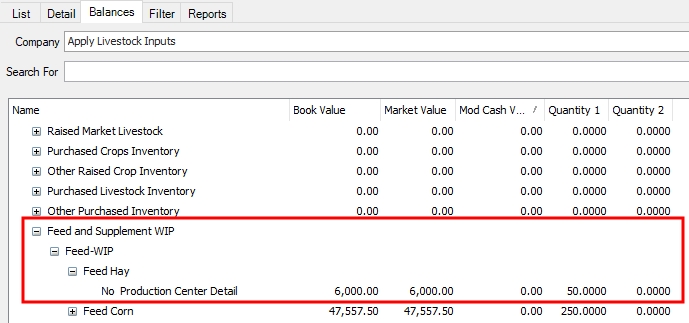
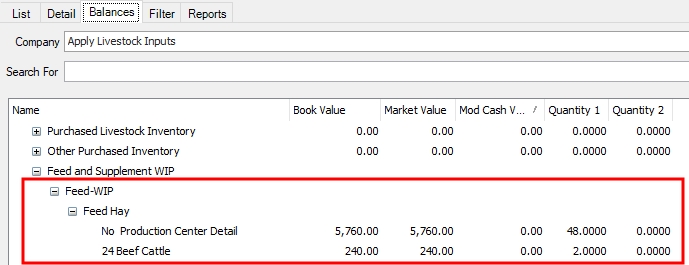
Display the account balance for the Feed-WIP before production center details are entered by selecting Accounts > Accounts > Balances tab and selecting the account cateogory/account. For example, the Feed-WIP account displays the following:
- The Detail box is populated with the selected Product.
- Selecting the Applying account populates the details on the right of On Hand quantity, dollars, Unit Cost, and Location.
- Location is displayed if the Raw Material has Inventory Location as a balance detail.
- The To account is retrieved from the raw material account representing the WIP account associated to this Raw Material.
- Select a Production Center Detail. This represents where the item (feed/supplement, etc.) is planned to be applied or was applied.
- The Head displayed is from the Production Center Detail setup screen.
- The number of head can be changed if all head were not applied at this time.
- The Quantity title is retrieved from the Applying account.
- Select the Production Center Details button at the bottom will generate the production center detail list for you. If the same item is being applied with the same production center detail, the Amount/Head will automatically display with the value entered on the previous row of the grid..
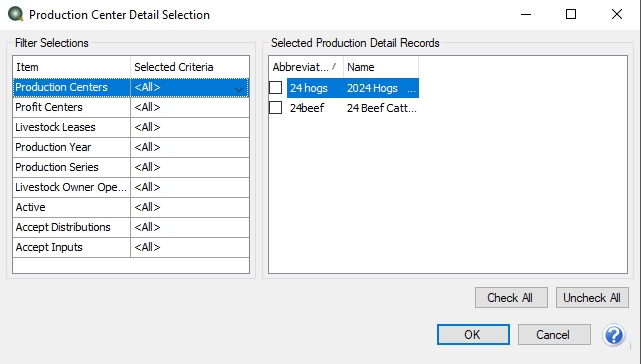
- Set the filters on the left to display only the details you wish to use on the right.
- Check the boxes at the left of each detail allow you to assign the selected product. Check All selects all groups on the right..
- Click OK to generate the list.
- Enter the units per head applied in each group OR enter the total quantity applied.
- Entering units per head calculates the total quantity.
- Entering total quantity calculates the units per head.
- The total Cost and Cost/Head are calculated.
- The Used quantity and dollars are updated at the top of the screen.
- The stocking units Quantity On Hand, Used, and Remaining are updated at the top of the screen. The On Hand, Used and Remaining stocking units use the number of decimals set in Preferences > General > Quantity Decimal Settings.
- All quantity does not need to be assigned at one time.
- The Total Head Applied box sums the Head column displayed in the grid. The number of decimal places to display is set in File > Preferences > General Quantity Settings and will be the same as the Head column in the grid.
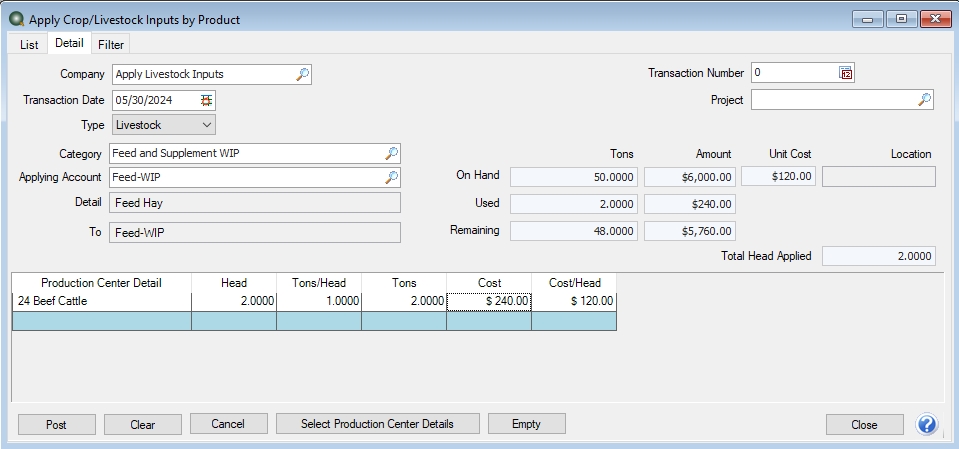
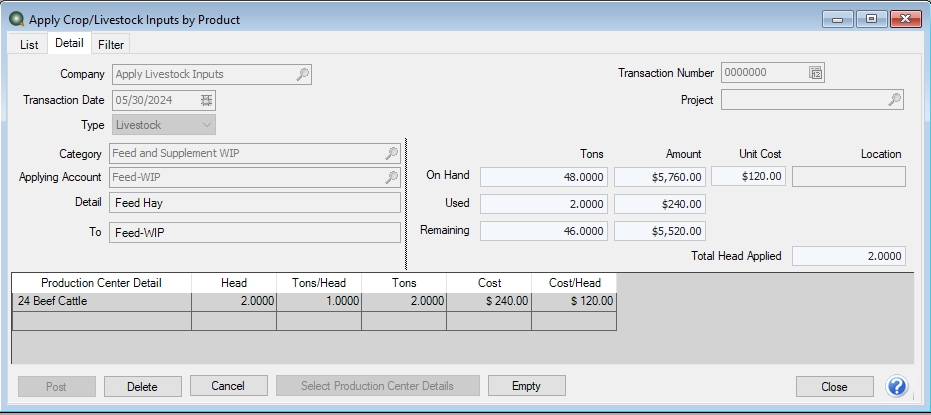
- Click Post if all details are entered for this item at this time.
-
After posting, CenterPoint will move the cost and tons from no production center detail in the Accounts > Accounts > Balances tab to the production center detail selected (24 Beef Cattle).
- The quantity and dollars are credited (decreased) from the Raw Material account.
- The quantity and dollars are debited (increased) to the WIP account with production center detail.
- Clear removes details from the screen.
- Close closes the screen.
- Cancel takes you back to the list. The List displays posted Apply Crop Input by Product transactions.
- Click the Select Production Center Details button to generate a production center detail list.
- Click the Empty button to distribute remaining quantity and amounts to a selected production center detail.
- From the List tab, Review displays the selected transaction detail screen.
- From the List tab, Delete removes the selected transaction in the list.
Apply Livestock Inputs by Group
Apply Livestock Inputs by Group selects a Production Center Detail and assigns one or more products applied to the selected group.
- Livestock Inputs can be assigned to the selected Livestock Production Center Detail.
- This is a convenient screen to view all livestock inputs currently assigned to the production center detail.
- Applied inputs can be edited from this screen.
- Select Processes > Production > Apply Livestock Inputs by Group.
- In the Production Center Detail, select a detail.
- The Head are populated from the Production Center Detail.
- The Company from the detail is displayed.
- The livestock inputs already applied to the Production Center Detail are displayed in the grid.
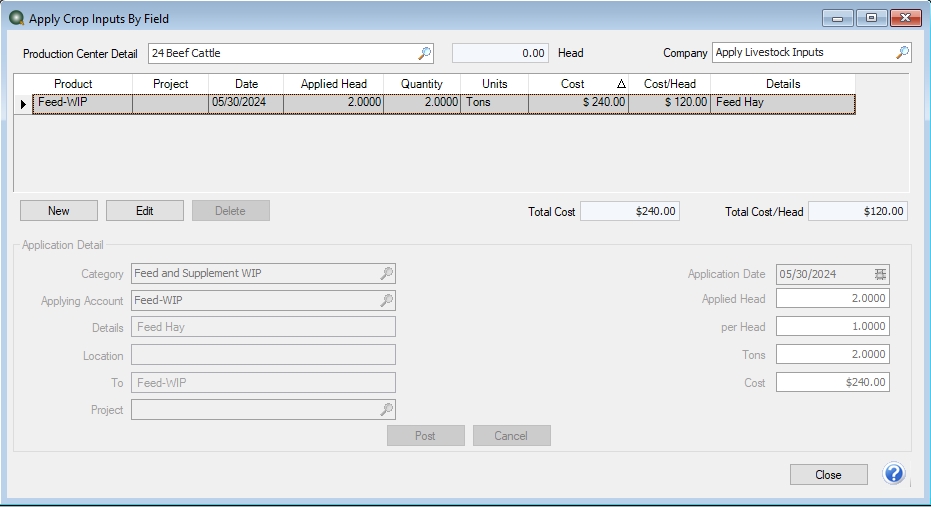
- To Edit a livestock input, select a row at the far left. The details of the application display in Application Details at the bottom.
- Any transactions that updated balances with the selected Production Center Detail are included in the grid even though it may not have a product.
- Click Edit to make changes.
- Editing a row created from a payment screen displays the payment entry screen to make changes.
- Editing a row representing a livestock input applied from Apply Livestock Inputs by Product or by Group displays the original screen.
- If the product you are modifying is now a zero balance, delete the row. Calculations require an amount remaining in the product.
- If the Apply Livestock Input was entered from this screen, the Delete button is active.
- If the Apply Livestock Input originated from a different screen, click Edit to remove the product form the original entry. Click Post or Save.
- Click New to apply the product to this group again and complete your changes.
- After changes are made, click Save or Post. The balances are adjusted.
- Click New to add a new livestock input to this detail. The Application Details become active.
- In Category, select the Raw Material category for the livestock input you are assigning details.
- WIP account categories can be selected here also.
- Only accounts with NO production center details will be available.
- In Applying Account, select the livestock input account.
- The list includes accounts in the selected account category with a balance.
- Each product with balance detail is individually listed.
- The list includes only accounts in the account category with NO production center detail
- The Details box populates with the selected product.
- If Inventory Location is maintained on the account category, the Location is listed.
- Project is optional. Projects allow tracking other types of information such as the various production activities.
- Select the Application Date.
- Applied Head is populated from the Production Center Detail.
- The number of head can be changed if needed.
- The Quantity title is retrieved from the Applying account.
- Enter the units per head applied in this group OR enter the total quantity applied.
- Entering units per head calculates the total quantity.
- Entering total quantity calculates the units per head.
- The total Cost and Cost/Head are calculated.
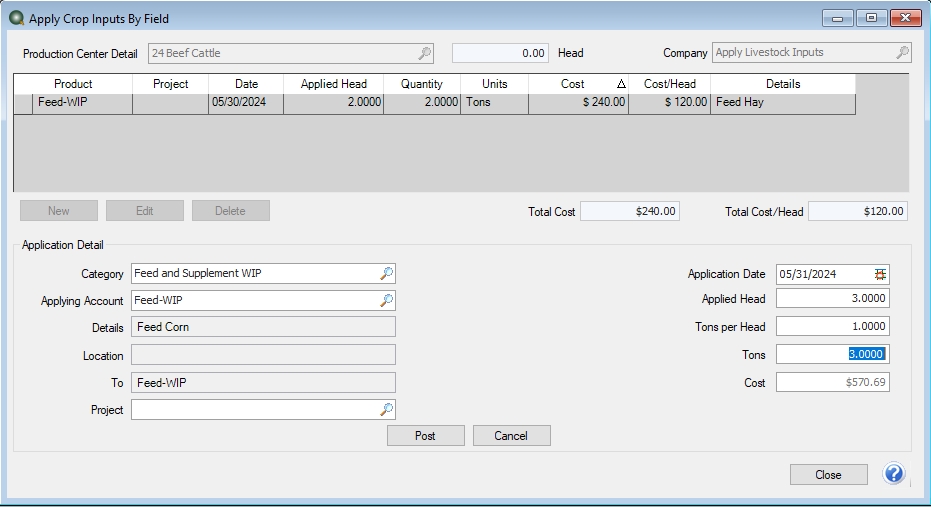
- Click Post to apply this item (feed/supplement, etc.) to the Production Center Detail.
- The quantity and dollars are credited (decreased) from the Raw Material account.
- The quantity and dollars are debited (increased) to the WIP account with production center detail and product.
- Cancel clears the screen.
- Close closes the screen.
- The Delete button under the grid allows removing a transaction entered from this screen.
|
Document: 3376 |
|---|