CenterPoint® Accounting for Agriculture
- Adjusting Crop Inventory
Related Help
_24.jpg) Crop Inventory Adjustment Transaction Video - Duration: 7 min 41 sec
Crop Inventory Adjustment Transaction Video - Duration: 7 min 41 sec

| Document #: | 3016 | Product: | CenterPoint® Accounting for Agriculture |
|---|
Crop inventory adjustments allow you to modify your raised inventory balances. It is recommended that you review your inventory balances and make adjustments where needed before entering new harvest transactions. The balances displayed and the balances used in any crop inventory adjustment are the ending balances from the period selected for the transaction date. There are four options for adjusting inventory levels:
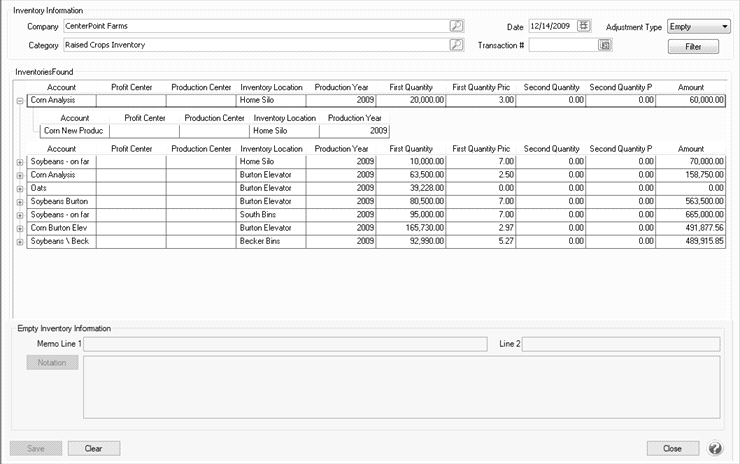
Option A: Empty Inventory
The Empty Inventory adjustment can be used to zero inventories that are gone.
- Select Processes > Production Transactions > Crop Inventory Adjustments.
- In the Company box, select the company the adjustment is for.
- In the Date box, select the date for the adjustment.
- In the Adjustment Type box, select Empty.
- In the Category box, select the appropriate account category.
- The inventory accounts that meet the selection criteria specified will display in the Inventories Found box.
- Select the inventory balances you wish to zero. To select multiple rows, hold down the CTRL key while selecting the inventories. The balances displayed and the balances used in the transaction are the ending balances from the period selected in the Date box.
- If you need to record production details to the offset account other than what is displayed on the Inventories Found screen, click the + and enter the production details that differ from the inventory balance detail.
- Click Save. The system will automatically create a transaction for the difference between zero and the previous amount. The inventory and offset accounts will be affected.
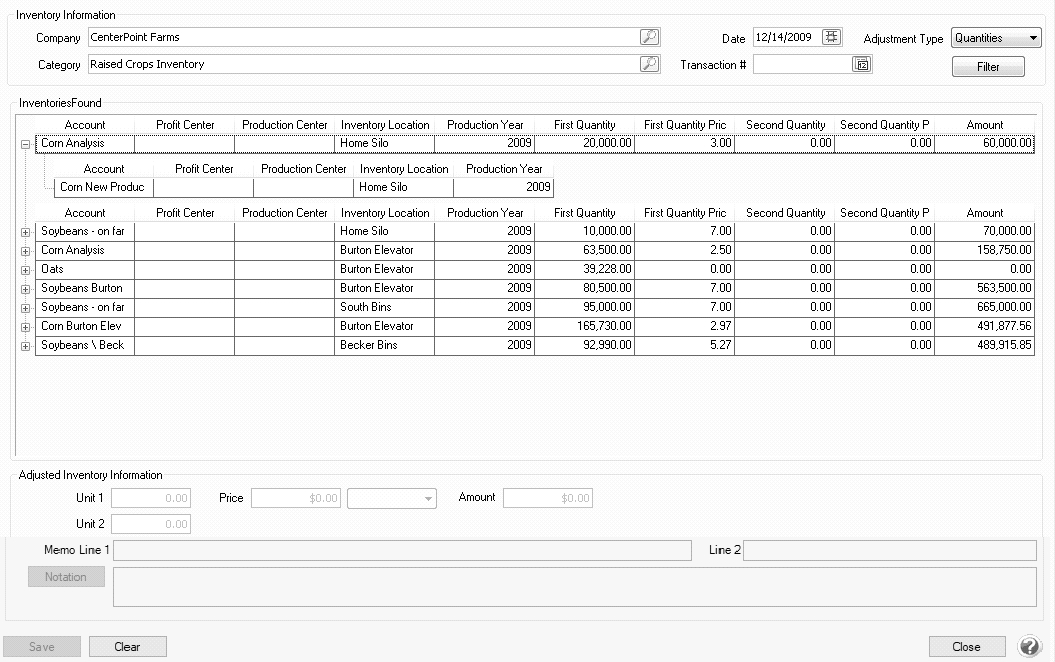
Option B: Adjust Quantities
Quantity adjustments allow you to modify current quantity levels.
- Select Processes > Production Transactions > Crop Inventory Adjustments.
- In the Company box, select the company the adjustment is for.
- In the Date box, select the date for the adjustment. The balances displayed and the balances used in the transaction are the ending balances from the period selected in this box.
- In the Adjustment Type box, select Quantities.
- In the Category box, select the appropriate account category.
- The inventory accounts that meet the selection criteria specified will display in the Inventories Found box.
- Select an inventory that requires a quantity adjustment. Only one line can be selected per adjustment. The balances displayed and the balances used in the transaction are the ending balances from the period selected in the Date box.
- In the Adjusted Inventory Information box, enter the new quantity (not the change in quantity). If the price of the inventory changed, enter the new price in the Price field. The Amount will automatically be calculated by multiplying the new quantity times the price.
- If you need to record production details to the offset account other than what is displayed on the Inventories Found screen, click the + and enter the production details that differ from the inventory balance detail.
- Click Save. Click Yes on the confirmation message and OK on the adjustments completed successfully message.. The system will automatically create a transaction for the difference between the new quantity & value and the original value.
- Repeat steps 7-9 for each inventory that needs a quantity adjustment.
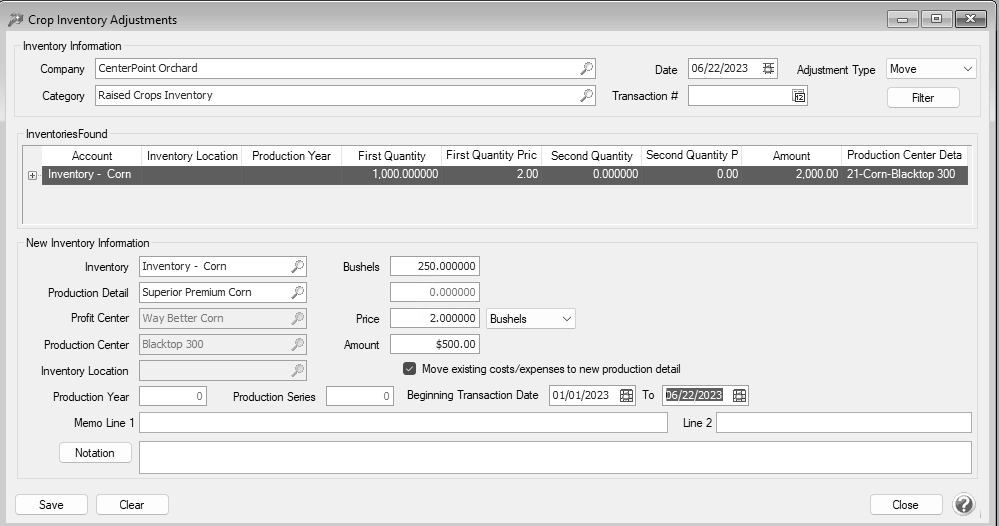
Option C: Move Inventory
Move allows you to move inventory from one inventory account to another inventory account or from one inventory (storage) location within the same inventory account. The account category must have balance detail turned on to see inventory balances broken down by production details.
- Select Processes > Production Transactions > Crop Inventory Adjustments.
- In the Company box, select the company the adjustment is for.
- In the Date box, select the date for the adjustment. The balances displayed and the balances used in the transaction are the ending balances from the period selected in this box.
- In the Adjustment Type box, select Move.
- In the Category box, select the appropriate account category.
- The inventory accounts that meet the selection criteria specified will display in the Inventories Found box.
- Select the inventory you wish to move. Only one line can be selected per adjustment. The balances displayed and the balances used in the transaction are the ending balances from the period selected in the Date box.
- The fields available In the New Inventory Information box represent the balance detail options selected to maintain in this account category.
- Select the Inventory account to move the inventory to.
- If applicable, enter the Production Detail, Profit Center, Production Center, Inventory Location, Production Year and Production Series.
- Enter the Quantity you wish to move. If it is the entire amount, enter the same values displayed in the Inventories Found box above. If the price of the inventory changed, enter the new price in the Price field. The new Amount will automatically be calculated and displayed.
- If you need to record production details to the offset account other than what is displayed on the Inventories Found screen, click the + and enter the production details that differ from the inventory balance detail.
-
If you want to move related costs/expenses from the original production detail for a specified time period, select the Move existing costs/expenses to new production detail check box and enter the Beginning Transaction Date and To date.
- Click Save. Click Yes on the confirmation message and OK on the adjustments completed successfully message.. The system will automatically create a transaction for the difference between the new & original quantity & value.
- Repeat steps 7-10 for each inventory that needs to be moved.
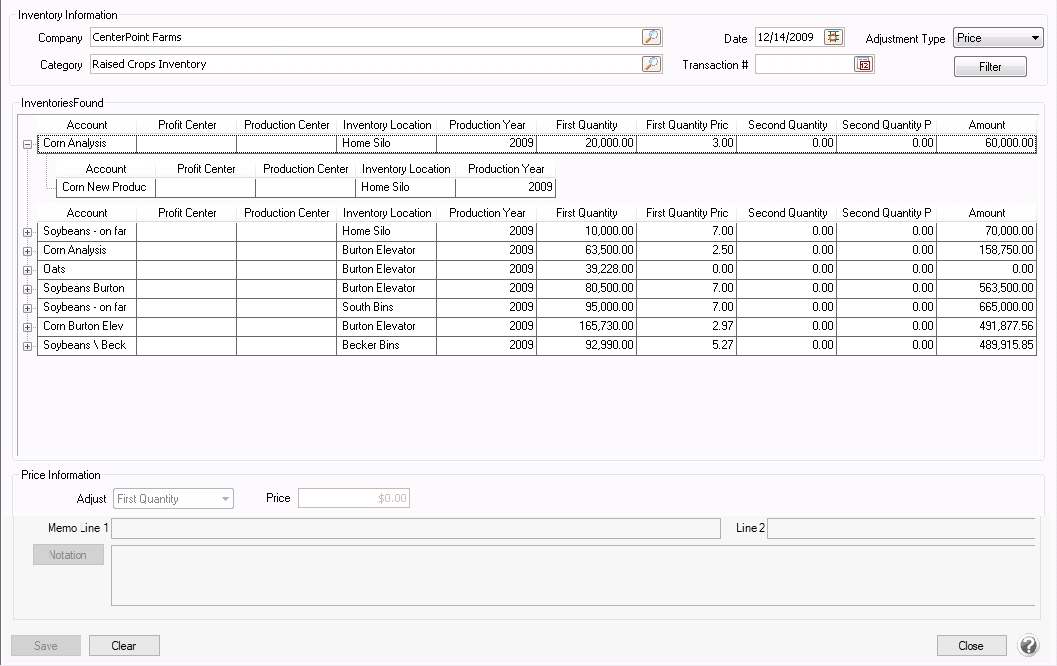
Option D: Price Adjustments
Price adjustments allow you to modify the price per unit of the inventory and calculates a new total dollar value. Price can be used to reflect changes in market prices.
- Select Processes > Production Transactions > Crop Inventory Adjustments.
- In the Company box, select the company the adjustment is for.
- In the Date box, select the date for the adjustment. The balances displayed and the balances used in the transaction are the ending balances from the period selected in this box.
- In the Adjustment Type box, select Price.
- In the Category box, select the appropriate account category.
- The inventory accounts that meet the selection criteria specified will display in the Inventories Found box.
- Select the inventory which needs a price adjustment. The balances displayed and the balances used in the transaction are the ending balances from the period selected in the Date box.To select multiple rows, hold down the CTRL key while selecting the inventories. Blue lines indicate selected inventories.
- In the Price Information box, select if you are adjusting the price by First Quantity or Second Quantity in the Adjust box. Then enter the new price in the Price field.
- If you need to record production details to the offset account other than what is displayed on the Inventories Found screen, click the + and enter the production details that differ from the inventory balance detail
- Click Save. Click Yes on the confirmation message and OK on the adjustments completed successfully message. The quantity is multiplied by the new price to display a new total for each line. The difference between the new and the old amount are recorded to the Inventory account and its offsetting account along with the production information associated with the Inventory account balance.
Frequently Asked Questions
Q: While in the Crop Inventory Adjustments screens, some of the accounts are displayed in red. What does that mean?
A: While using any of the Crop Inventory Adjustments options, if any accounts (inventories) are displayed in red this indicates that the offsetting account was not assigned in the inventory account details. To resolve this issue:
- Select Setup > Accounts > Accounts.
- Select the inventory account in the Asset section, click on Edit and the Detail tab.
- Assign the Offset Account (such as Change in Raised Crop Inventory revenue account).
- Click Save.
Q: How can I Review Current Raised Inventory Balances?
- Select Reports > Reports > Financial Statements > Account Balances > Inventory Balances.
- Select the current month in the Date field.
- Preview or print the report to examine the quantities and dollars for each remaining raised inventory.
|
Document: 3016 |
|---|