- AgCHEK to CenterPoint Data Transfer
Related Help

This document will guide you through transferring and verifying your AgCHEK database to a CenterPoint Accounting for Agriculture database. Each company needs to be transferred individually.
We recommend following these five steps to accurately transfer your data from AgCHEK to CenterPoint.:
Step A: Transfer Data from AgCHEK to CenterPoint
Step B: Print Reports to Verify Data Transferred Accurately
Step C: Define the basic CenterPoint Preferences
Prerequisite
AgCHEK and CenterPoint must be installed on the same computer prior to starting the data transfer.
Step A: Transfer Data from AgCHEK to CenterPoint
- Close the AgCHEK program and open CenterPoint Accounting for Agriculture
- Close all databases before beginning the data transfer by selecting File > Close.
- Select File > New > Data Transfers > AgCHEK.
- The default path for the AgCHEK data transfer looks for the system file (Acsys.mdb) in the default folder C:\AGCHEKW\. The path should not need to be modified unless you have installed AgCHEK to a different path. Use Browse if you need to change the path.
![]()
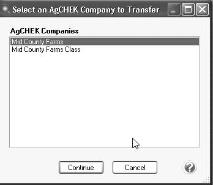
- Select the AgCHEK company you wish to transfer. Click Continue.
- Select whether you wish to Transfer AgCHEK Account Codes into the Abbreviations or Account Numbers field in CenterPoint. If you used abbreviations in the Code field on your accounts in AgCHEK, select Abbreviations. If you used numbers in the Code field on your accounts in AgCHEK, select Account Numbers.
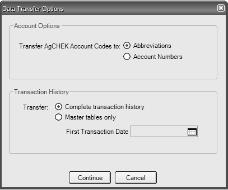
- Select whether you wish to transfer Complete Transaction History (Open Periods, account balances, and transaction history) or Master tables only (accounts, customers, vendors, etc.).
- If you selected to transfer Master tables only, select the First Transaction Date. This date will be used to create an initial period one month prior to the period when transactions will first be created and an open period for the month including the first transaction date.
- Click Continue.
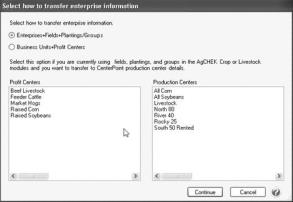
- If you used the AgCHEK Crop and Livestock modules, the following screen will display. Select the Enterprise + Fields + Plantings/Groups option if you are current using fields, plantings, and groups in AgCHEK Crop or Livestock modules and you want to transfer to CenterPoint production center details. Select the Business Units+Profit Centers option if you are not using the AgCHEK Crop or Livestock modules and you want to transfer the Business Unit and Profit Center data from AgCHEK to CenterPoint production center and profit center. Click Continue.
- The Company Being Transferred box displays the AgCHEK database file location, this information automatically displays and cannot be changed.
![]()
- The Transferred Database Name box displays the CenterPoint database name. The name will be filled in automatically but can be changed.
- The Server box displays the SQL server connection started on your machine to run CenterPoint, this information automatically displays. You should not have to make any changes to this information.
- Click Transfer Data.
- The Create Database screen displays the progression of the migration. This process may take a little time. You will not need to make any additional selections during the process. Some data transfers can take a while due to the number of years and size of your database. Please be patient and let the migration proceed. An error message will warn you of any data transfer problems.
- Please note the current table in the status screen if an error occurs during the data transfer process and then contact the Red Wing Software Technical support department.
- A message displays when the data transfer is complete. Click OK.
Step B: Print Reports to Verify Data Transferred Accurately
When your AgCHEK to CenterPoint data transfer is complete, reports from your CenterPoint program need to be compared to the corresponding reports in the AgCHEK program to verify the accuracy of your transferred information. Print the following reports for comparison. Use current dates for all reports. If you find that any reports are not matching, please call Red Wing Technical Support (do not begin using CenterPoint for new transactions until you have spoken with a technician).
| Balance to Check | AgCHEK Report | CenterPoint Report |
|---|---|---|
|
Account Balances |
Management Reports > Balance Sheet AND Management Reports > Income Statement OR Management Reports > Trial Balance |
Reports > Reports > Financial Statements > Balance Sheet AND Reports > Reports > Financial Statements > Income Statement OR Reports > Reports > Financial Statements > Trial Balance > Trial Balance |
| A/P Vendor Balances | Transactions > Open Invoice Report > Acct Payable Invoice |
Reports > Reports > Transaction Reports > Purchases & Accounts Payable > Open Invoices
|
| A/R Customer Balances | Transactions > Open Invoice Report > Acct Receivable Invoice | Reports > Reports > Transaction Reports > Sales & Accounts Receivable > Open Invoices |
Step C: Define the Basic CenterPoint Preferences
Preferences define how you would like different areas of the program to behave. Although we have many preferences available, we do recommend you set the following preferences prior to entering any transactions. If you do not use a certain process (for example, Printing A/R Invoices) that preference can be skipped.
- Select the Printer and form type used to print checks: File > Preferences > Printing > Checks
- Select the printer and invoice type used to print invoices: File > Preferences > Printing > Customer Invoices
- Identify the default Accounts Payable account for AP Invoices: File > Preferences > Vendor Invoices > Default Accounts
- Identify the default Accounts Receivable account for AR Invoices: File > Preferences > Customer Invoices > Defaults
- Password Protect CenterPoint Databases (if applicable): File > Preferences > Security > Database Security
Step D: Update CenterPoint Account Lookups
Follow the steps below to update CenterPoint account lookups to be similar to AgCHEK account lookups.
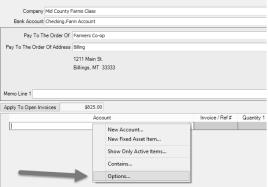
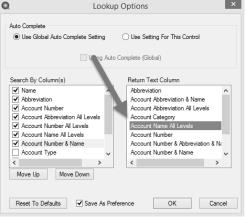
- In one of the following Transaction screens: Processes > Purchases > Payments or Vendor Invoices A/P, Processes > Sales > Receipts or Customer Invoices, or Processes > General Journal Entries, right-click in the Account box and choose Options.
-
In the Lookup Options screen in the Return Text Column, choose Account Name All Levels, and then click OK.
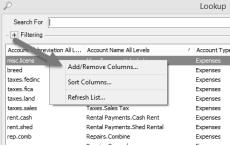
-
Back on the Transaction screen, in the Account box, click on the magnifying glass icon to bring up the account list, right-click on one of the accounts, and then choose Add Remove Columns.
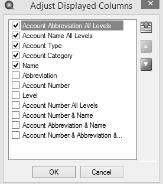
-
On the Adjust Displayed Columns screen, select the check boxes listed below. If the columns are not in the same order, highlight the columns one at a time and click on the green arrow buttons on the right to move the columns up or down, and then click OK when you've completed your selections.
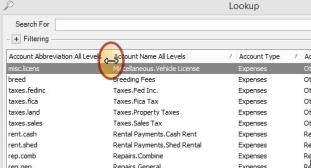
-
If the columns are not wide enough to show the full account abbreviation or name, place your mouse over the line that separates the columns until your mouse changes to a double arrow, and then drag the separation line until the entire column displays to your liking.
Step F: FAQ Section
Q: Will transferring my data to CenterPoint remove it from AgCHEK?
A: No. The data transfer moves a copy of your data into CenterPoint so the original AgCHEK data is untouched.
Q: Are there terms that were used in AgCHEK that have changed in CenterPoint?
A: Yes. The following is a table of terms that have changed.
| Terminology in AgCHEK | Terminology in CenterPoint |
| Account Type | Account Type |
| Account Category | Account Category |
| Summary Account | Account Category |
| Main Account | Level 1 Account |
| Subaccount | Level 2 Account (subaccount of main account) |
| Management Account | Level 3 Account (subaccount of subaccount) |
| Account Code | Abbreviation or Account Number |
| Profit Center | Profit Center |
| Business Unit | Production Center |
| Key Accounts | Not Needed or Used in CenterPoint |
| Transaction Entry | Processes > separate menu for each type of transaction |
Q: Where in CenterPoint will I find the menus I use most often in AgCHEK?
A:The following table includes many of the common tasks and where they can be found in CenterPoint:
| AgCHEK Menu Location | CenterPoint Menu Location |
| Setup > Accounts > Depreciable Asset Accounts | Setup > Fixed Assets are items under depreciable asset account categories. Item details are stored in Setup > Fixed Assets. |
| Setup > Vendors, Customers, Employees | Setup > Names - all vendors, customers, and employees will be transferred to CenterPoint. |
| Distribution for Vendors and Customers | Recurring Transactions can be assigned to vendors and customers in Transaction entry using the Recurring button at the bottom of the screen. |
| Units of Measure | Setup > General > Units of Measure. |
| Transaction > Check | Processes > Purchases > Payments |
| Transaction > Deposit | Processes > Sales > Receipts |
| Transaction > AP Invoice | Processes > Purchases > Vendor Invoices (A/P) |
| Transaction > AR Invoice | Processes > Sales > Customer Invoices (Basic) |
| Transaction > GJ Entry | Processes > General Journal Entries |
| Checking Account
Reconciliation |
Processes > Banking > Bank Reconciliation |
| Process AR Deposits | Processes > Sales > Receipts |
| Process AP Checks
AP Payments Due Today |
Processes > Purchases > Pay Invoices Due |
| Check Register | Reports > Reports > Transaction Reports > Banking > Bank Register |
| Journals | Reports > Reports > Transaction Reports |
| Management Reports | Reports > Reports |
| Setup > Budget |
Setup > Budget |
| Management Reports > Report Sets | Reports > Batch Reports. AgCHEK Report Sets do not transfer to CenterPoint. They will need to setup in Batch Reports. |
| Management Reports > Amortization Schedule | Schedule of Payments is run from Reporting Tools > Amortization Schedule. |
Q: Are there any new terms & features in CenterPoint that I should become familiar with?
A: Yes. The following table outlines many of the new terms & features that you will use in CenterPoint.
| CenterPoint Term | Description |
| Quick List (menu) |
The Quick List is the user customizable menu that is on the left-hand side of the screen. Red Wing Software has set up a default Quick list for you. You can change the Quick List to meet your needs. |
| Setup Menu | |
| General > Numbering Sequences | Sequences are used to maintain check numbers, invoice numbers, etc. Sequences maintain alternate numbering for needs such as manual checks and printer checks for the same bank account. |
| Profit/Production Centers > Profit Center Groups | Profit Center Groups is optional and a way to sort and organize the profit centers for reporting purposes. |
| Profit/Production Centers > Production Center Groups | Production Centers can be assigned to more than one group. An example is making groups for owned, leased, or shared crop fields AND then another set of groups for different farms. Groups are optional. |
| General > Inventory Locations |
Maintains a list of storage facilities where inventory is stored. Examples are a bin or an elevator.
|
| Processes Menu | |
| Periodic > Accrued Interest Transactions | Creates journal entries between accrued interest expense and the accrued interest liability where the liability detail screen includes accrued interest setup. |
| Periodic > Adjust Current Portion Long Term Debt | Creates journal entries between the long term loan and a current liability to adjust for the current portion of the long term account on liabilities that include the current portion long term debt setup. |
| Production > Expense Work in Process Inventories | Creates journal entries between a work in process asset and a cost of goods or expense account. This provides an easy way to expense your crop or livestock purchases. The inputs are purchased into a work in process account and expensed at a later time with production details. |
| Batch Transactions | A batch can be created and assigned to multiple transactions. Batch transactions are posted at a later time and so can be modified if needed before posted. Checks and invoices in a batch print at one time at the time of posting. |
| Recurring Batch | Batch transactions that represent routine entries can be saved as a Recurring Batch to recall in the future. |
| Banking > Bank Deposits | Generates deposit slips for receipts with the same deposit number. |
| Features | |
| Setup > Reminders | Reminders help you keep current with financial tasks. Reminders can alert you when Accounts Payable or Accounts Receivable invoices are due, schedule routine backups, alert you when account balances go below a specified amount, and schedule alerts to run recurring batches. Reminders are optional and can be added any time. |
| Recurring
Transactions |
Saved transactions can be assigned to individual customers and vendors. Recurring transactions can be set to automatically load when the name is selected in data entry. |
| Distributions | Distributions allow you to assign transaction activity to various profit center, production center, production year, production series combinations on a percentage or Acre/Head basis. Distributions can be assigned at the time of the transaction or at a later time. |
|
Apply Distribution
|
Processes > Periodic > Apply Distributions assigns a distribution to a group of entries that were marked with the distribution “later” timing. Distributions recorded “later” create fewer journal entries than distributions recorded for each transaction using “at transaction” timing. IMPORTANT Distributions MUST be setup prior to entering transactions to use the distribute “later” option. |
| Drill-Down in Reports | Reports in CenterPoint have drill-down capabilities. Double click on a dollar amount on a previewed report to display the transaction or transactions that created the amount or totals on the report . |
| Reports > Reports > Preview > Fly-out tabs | Allows the user to customize any of the CenterPoint default reports. A customized report can then be saved as a Favorite for recurring use. |
Q: I seem to have some duplicates in Names, is there anything I can do with them?
A: Yes, you can combine them. All history and balances will be combined together for the 2 names.
- Select Setup > Names. Highlight a duplicate name you wish to remove from the list.
- Click the Combine button at the bottom of the screen. The next screen will allow you to choose a name to combine to.
- Click OK. Repeat the steps for each duplicate name you wish to remove.
Q: Is there anything I can do with the Names that I no longer use?
A: Yes, you can mark them inactive. Inactive names will continue to show on reports if there is activity but they will not display in transaction screens.
- Select Setup > Names. Highlight a name on the list that you are no longer using. If you have multiple names that should be marked inactive, hold the CTRL key on the keyboard while highlighting their names.
- Right-click and select Activate/Deactivate. Deselect the company or companies you are deactivating names for. If it should be deactivated for all companies, select the Deactivate All button.
- Click OK.
Q: Where can I find the General Summary Report?
A: The general summary report can be found by selecting Reports > Reports > Financial Statements > Sources and Uses > General Summary. To print this report correctly, you will need to edit the account categories for the following accounts. To edit the account category, click on Setup > Accounts > Accounts. Find the appropriate account in the list and click Edit. Change the Account Category field.
- Capital Draw Account - Change the Account Category to Capital Draws
- Contributed Capital Account - Change the Account Category to Contributed Capital
- Accumulated Depreciation Contra-Asset Accounts - Change the Account Category to Accumulated Depreciation.
- Depreciation Expense Accounts - Change the Account Category to Depreciation Expense.
Q: Are there any changes in the way Depreciation is processed in CenterPoint?
A: Yes, in CenterPoint depreciation transaction journal entries can be created with an automated periodic process. Select Processes > Periodic > Depreciation Transactions. If you would like to use this process in CenterPoint, the following must first be done:
- Select File > Preferences > Accounts > Depreciation Setting to select the depreciation option you wish to use. Depreciation expense transactions adjust depreciation expense and an asset. CenterPoint allows the following options:
- Adjust Accumulated Depreciation: This option leaves the depreciable asset at its original cost. Depreciation expense is offset by the accumulated depreciation asset which will be a negative value.
- Reduce Item Book Value: This option reduces each depreciable asset. The book value represents the undepreciated amount.
- In the same preference, select your preference for Adjust Market Values. Not adjusting (No) fair market value is typical for depreciation transactions.
- Identify the depreciation offset account on each Fixed Asset.
- Select Setup > Fixed Assets > Fixed Assets
- Right-click on Assets, and then select Expand All to view all Fixed Assets.
- Select a fixed asset and click the General tab.
- Select your Depreciation Expense account.
- If you set your preference to Adjust Accumulated Depreciation, select the Accumulated Depreciation asset account.
Q: In AgCHEK I was using Calculate Extended Amount (account prices) in transaction entry. Will CenterPoint allow me to calculate the extended prices also?
A: Yes. This type of transaction is handled in CenterPoint through a price template. Each account has a default template assigned, but other templates are available for various uses, such as price templates. There are two ways you can use a price template:
Option A: Choose the price template during transaction entry.
- After entering an account on a transaction, click on the Detail button.
- Select a price template in the Current Template field.
- Enter an Amount and a Quantity. Click OK.
Option B: If an account should use the price template each time (or the majority of the time), then the price template can be assigned to the account.
- Select Setup > Accounts > Accounts
- Highlight the appropriate account and click Edit.
- Select the Templates tab.
- Select the process on the left. In the Change To field on the right, click the Lookup icon to display the available templates and select a price template.
- The individual account can also store the price per unit. For example, you might have a mileage expense you pay to employees. Click on the Prices tab to assign the price per unit.
Document: 3031