CenterPoint® Accounting for Agriculture
- ACH: Setup & Processing
Related Help
_24.jpg) ACH Overview and Vendor Bank Information- Duration: 7 min 08 sec
ACH Overview and Vendor Bank Information- Duration: 7 min 08 sec
ACH Bank Account Setup Video - Duration: 13 min 51 sec
ACH Processing - Payment Transactions Video - Duration: 4 min 04 sec
ACH Processing - Create Files Video - Duration: 5 min 07 sec
 View or Print as PDF
| Document #: | 3337 | Product: | CenterPoint® |
|---|
This document outlines how to setup and use ACH within CenterPoint. ACH processing allows you to deposit electronic payments directly into your vendor's bank account from CenterPoint. Some of the information in the setup will need to be supplied by your bank. Follow the steps below to complete the setup and process an ACH electronic payment.
Setup Bank Account Information
Add Pay Invoices Due Payments to an ACH File
Create an ACH Pre-note File (optional)
Email Vendor Checks (Pay Advices)
Setup Bank Account Information
- Select Setup > Accounts > Accounts. Select the account that the ACH funds will be withdrawn from (accounts in the Cash or Line of Credit account categories) and click Edit.
- Click on the Detail tab.
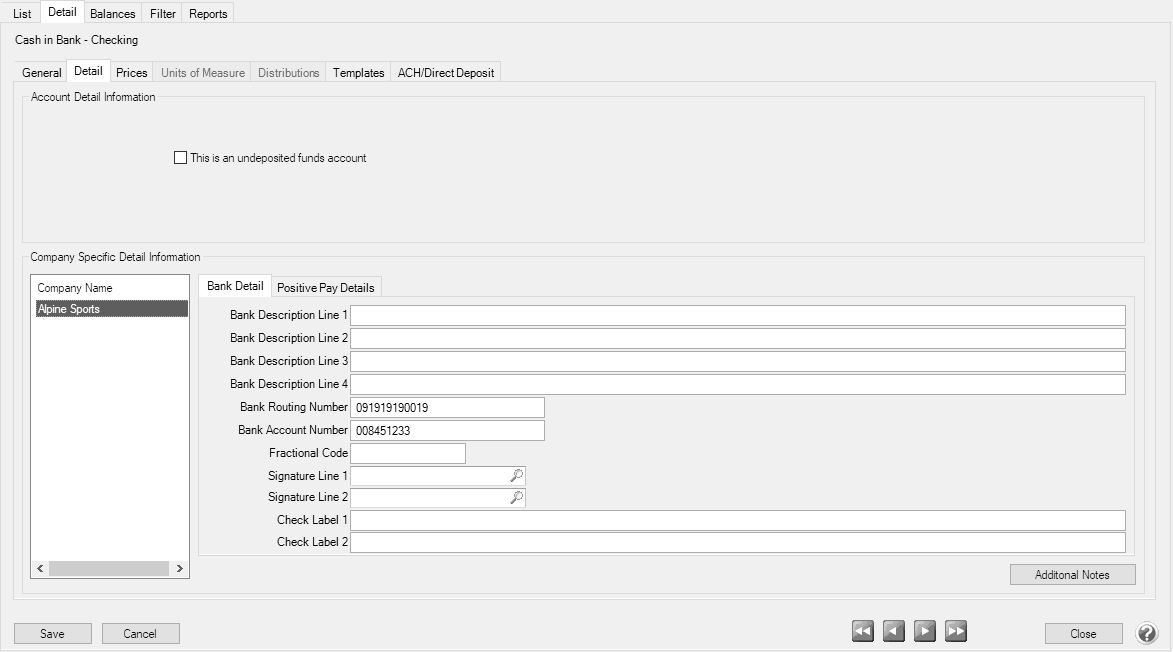
- Select your Company/Fund Name on the left.
- On the right, enter the Bank Routing Number and Bank Account Number for your bank account.
- Click on the ACH/Direct Deposit tab.
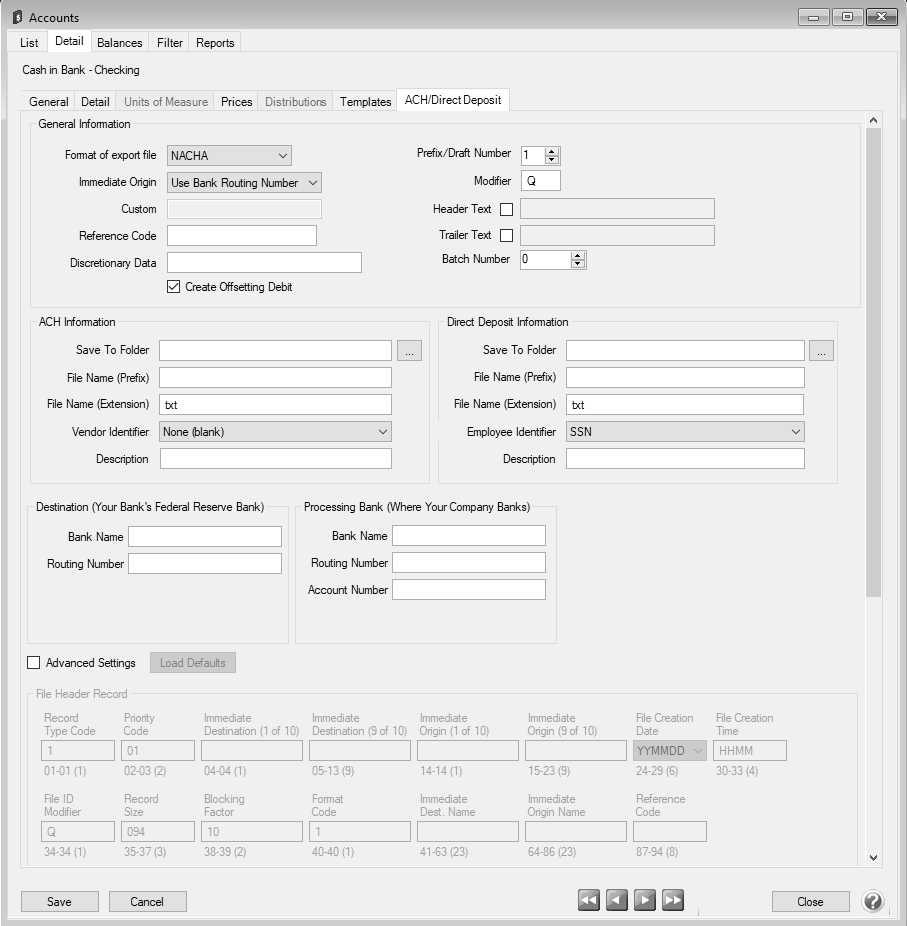
- In the Format of Export File box, specify the file type required by your banking institution. The formats available are:
- NACHA - The file format specified by NACHA (National Automated Clearing House Association) using FEDLINE from the federal reserve for personal computers. These records are 94 characters long with 10 records per 940 character block.
- ASCII - The file format required by many main-frame computer systems. These records are 94 characters long with an additional carriage of return/line feed (CR/LF) at the end of each record.
- NACHA Modified - This is a modified version of the NACHA file as required by some institutions. It is the same as the NACHA format, but includes carriage returns.
- Select the value that should be used to fill the Immediate Origin field in the ACH file:
- Use Bank Routing Number - The Immediate Origin field will be filled with the account's routing number from the Detail tab prefixed with a space, i.e. “ 999999999”.
Use Federal EIN Number - The Immediate Origin field will be filled with the company’s/fund's Federal Tax ID prefixed with a “1”, i.e. “1999999999”.
- Use Custom Number - The Immediate Origin field is filled with the user-defined alphanumeric value entered into the Custom field. The value is prefixed with Zeros to a maximum of 10 characters, i.e. “09999999999”.
- If you select Use Custom Number in Step 7, enter the Custom alphanumeric value to fill the Immediate Origin field with.
- The Reference Code is optional (up to 8 characters). It will appear on the file control record of the transaction file and is only required if the bank indicates it. For example, RWACH tells you this is the Red Wing ACH.
- The Discretionary Data is also optional. It will appear in the batch header of the ACH file. For example, enter ENDOFMONTH or 10TH OF MONTH.
- Select the Create Offsetting Debit check box to have CenterPoint automatically create the dollar amount that will be deducted from your company’s/fund's checking account. Do NOT remove this check mark unless your lender has instructed you to do so.
- Enter the Prefix/Draft Number (1-9) used with the Federal Id (EIN) to create the Company/Fund Identifier in the ACH file. The default is 1, however sometimes banks require a different value when sending multiple direct deposit files.
- In the Modifier box, enter a modifier as indicated by your bank. Modifiers can be numeric (0-9) or alphabetic (A-Z). The modifier "A" and "0" should be used if you need to differentiate between multiple files transmitted on the same day (CenterPoint will increment these modifiers).
- Select the Header Text check box only if your bank indicates that header text is required on the ACH file that is sent for payment. If the Header Text check box is selected, the Header Text box will be enabled. Enter the header text for the ACH file as provided by your bank.
- Select the Trailer Text check box if your bank requires you to include trailing (footer) text. The Trailer Text box will be enabled if it is indicated to include trailer text. Enter in the text for this record as indicated by your bank.
- In the Batch Number box, enter a number that you want to start batch numbers at in generated ACH files. The default batch number is 0 (zero), and can be set to any number between 0 and 9,999,999. This number will be padded on the left with zeros to 7 digits, for example 0000001.
- Under ACH Information, in the Save To Folder box, enter the name of the folder or click the ellipse button to browse to the location where the output file specified in the File Name (Prefix) box will be sent to. To create a new folder, click the ellipse button, click Make New Folder, and then click OK.
- In the File Name (Prefix), enter the prefix of the file name you want saved to the Save To Folder. The file name will be Prefix-YYYYMMDD-x.ext (where x is the number of file created that day and ext is the value entered in the File Name (Extension) box).
- In the File Name (Extension) box, the default value of .txt will display, but can be changed to any 10-character value or a blank value.
- In the Description box, enter a description for the ACH transaction (up to 20 characters) that will appear on your bank statement.
- Determine how you want the Vendor Identifier to display in the ACH file PPD/CTX Detail records in position 40-54 by selecting an option from the drop down list:
- TIN - Use the Vendor's TIN as entered (including formatting characters) when the ACH file is created.
- TIN (Suppress First 5 Digits) - The first five digits of the Vendor's TIN are excluded and replaced with "X" characters, ex. "XX-XXX1234" when the ACH file is created.
- None(Blank) - The Vendor Identifier will be left blank when the ACH file is created.
- TIN (No Formatting) - Formatting characters are excluded from the Vendor's TIN when the ACH file is created.
- Vendor Abbreviation - The Abbreviation field from Setup > Vendors or Setup > Names > Names will be included when the ACH file is created.
- Enter your bank's Bank Name and Routing Number.
- If an alternate bank name should be used in your ACH file instead of the name of the account from the Detail tab, enter the Processing Bank Name, Bank Routing Number and Bank Account Number used in the ACH file for the offsetting debit record.
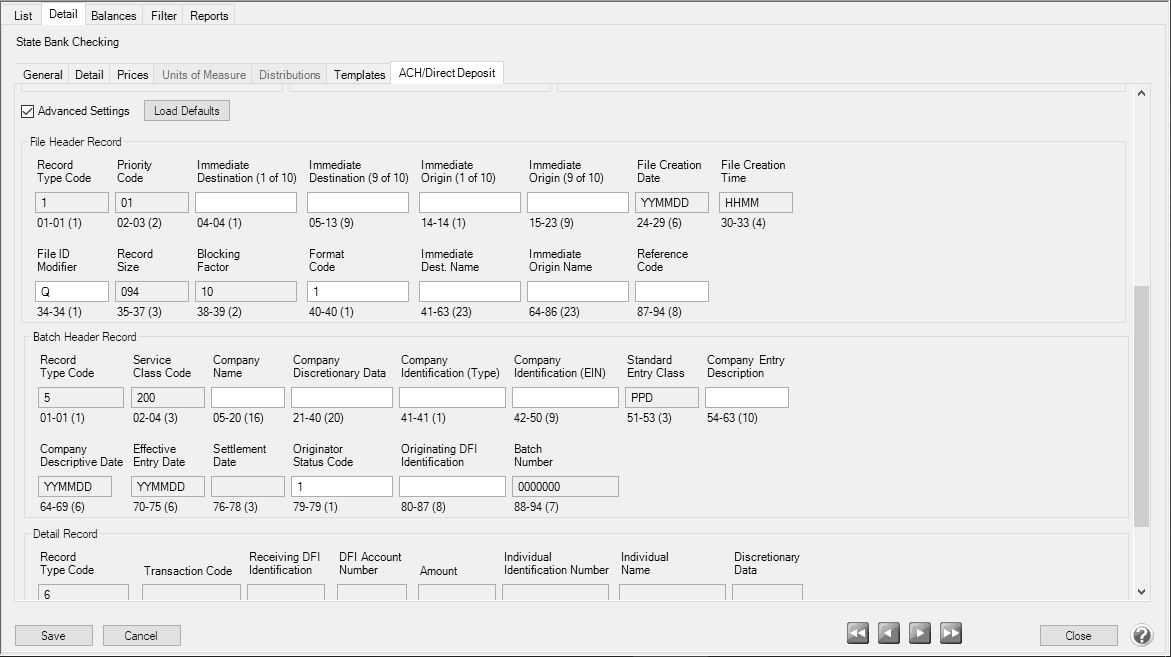
Optional Advanced Settings
Important Note:
The majority of the time no changes are needed in the Advanced Settings. We recommend you only make changes in this area if a Red Wing Software technician has recommended it.
- Select the optional Advanced Settings check box to activate the Advanced configuration section of the screen where you can see a representation of the File Header and Batch Header records included in an ACH file and customize the values. Click the Load Defaults button to set the file configuration based on your current selections in the upper portion of this screen. Use the vertical scroll bar to display all of the Advanced Settings. Fields that are read-only display values from CenterPoint when the file is generated. The editable fields can be modified to customize values and will be used when the ACH file is generated. Each field has a label identifying its purpose, position in the file, and field length, (in parenthesis), all per the NACHA file format definition, for example the Immediate Destination field is at character position 4 through 13 and is 10 characters long.
Note: If you choose to customize the ACH file, ALL editable fields must be populated with an appropriate value; blank fields will not be populated with any other values by CenterPoint and will appear in the file as blank space.
Setup Vendor or Name
- Select Setup > Vendors or Setup > Names > Names, select the vendor/name you want to add/change ACH information for, and then click Edit.
- Click the ACH Payments tab.
- To activate ACH electronic payments for this vendor/name, select the Activate ACH Transactions check box.
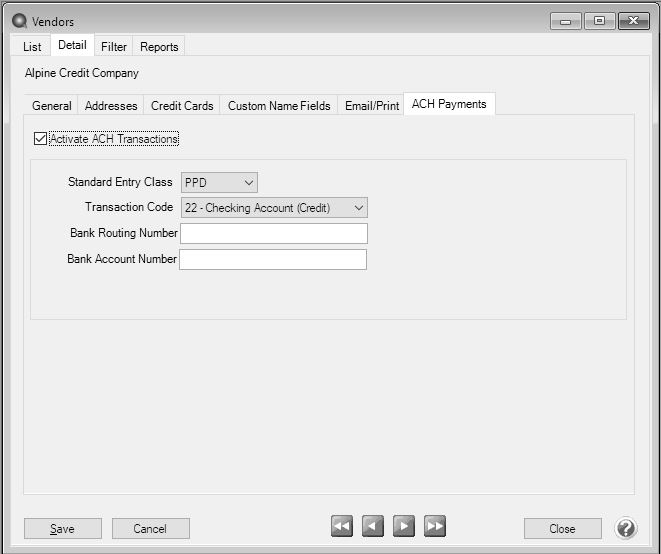
- NACHA requires that when a transaction is submitted for processing, the transaction must include an ACH Standard Entry Class (SEC) code to designate how the transaction was authorized by the originator. Select one of the options below as required by your bank:
- PPD (Preauthorized Pay/Deposit) - for credits and debits that process against consumer accounts for entries such as payments to vendors and direct deposit.
- CCD (Corporate Credit or Debit) - for credit and debit entries processed against non-consumer accounts for transactions such as payments to vendors and collections from customers.
- CTX (Corporate Trade Exchange) - use CTX, like CCD, to facilitate business-to-business transfer of funds as either debits or credits.
- Select one of the Transaction Codes below to identify the type of entry that should be included in the ACH file for the vendor/name. A pre-note is the commonly used term for an Automated Clearing House (ACH) pre-notification. It is a zero dollar ACH entry that should be sent at least six banking days prior to the first live ACH credit being sent. Under NACHA Operating Rules (also known as ACH rules), a pre-note’s purpose is to “validate” the routing number and account number of the receiving bank or credit union.
- 22 - Checking Account (Credit)
- 23 - Prenote Checking (Credit)
- 32 - Saving Account (Credit)
- 33 - Prenote Savings (Credit)
- 52 - Loan Account (Credit)
- 53 - Loan Prenote (Credit)
- In the Bank Routing Number box, enter the bank transit/routing number for this vendor/name (assigned by the American Banking Association) for where the ACH deposit is to be made. This number is eight digits plus a ninth "check" digit. CenterPoint will verify that the routing number is a valid ABA number and display a warning if it is not. You can choose to continue with your entry if the number is invalid.
- In the Bank Account Number, enter the bank account number
- Click Save.
- Click Close.
Add Payments to an ACH File
- Select Processes > Purchases > Payments.
- Select the appropriate Company/Fund and Bank Account.
- Enter a vendor/name in the Pay To The Order Of box that has the Activate ACH Transaction check box selected and ACH information defined on the ACH Payments tab in Setup > Vendors or Setup > Names > Names.
- Complete the necessary information for this payment in the data entry grid. For more information about entering payments, see the Enter a Payment topic.
- When a vendor/name that has the Activate ACH Transactions check box selected is entered, the ACH icon will replace the Printer icon. Click the ACH icon
 to display the Print Settings screen.
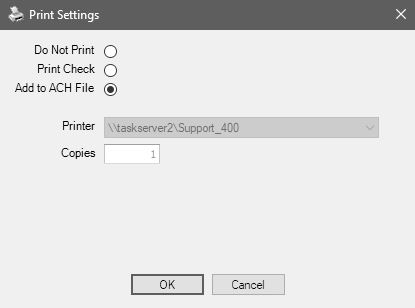
- Select Add to ACH File to make an electronic payment.
- Click OK.
- Click Save.
Add Pay Invoices Due Payments to an ACH File
- Select Processes >Payroll, Purchases, or Expenditures > Pay Invoices Due.
- The criteria fields at the top of the Pay Invoices Due screen control which invoices will be displayed below and available to be selected for payment.
- In the Company/Fund box, enter the company/fund name that you want to view open invoices for.
- In the Bank Account box, enter the bank account that will be decreased by this payment transaction.
- In the Filter box, select
- In the next filter box, select which vendor invoices should display, select Include ACH vendors only
- There are three options available for the Find By field (Find by Due Date, Find by Invoice Date, Find by Discount Due Date). Choose the appropriate option by clicking on the Options button at the bottom of the screen (the option that was selected the last time you paid invoices due will display). Once an option is selected, enter the appropriate date in the field.
- In the Payment Date field, enter the date to use on the advices.
- Verify the first Check Number (Advice Number).
- All open invoices that meet the criteria selected in step 1-2 will display for all vendors in the Pay Invoices Due grid (outstanding invoices that are on hold will not display).
- Select the invoices you want to pay.
-
When the filter is used to Include ACH vendors only , the ACH icon will replace the Printer icon. Click the ACH icon to display the Print Settings screen.
- Select Add to ACH File to make an electronic payment.
- Click OK.
- Click Post.
Create an ACH Pre-note File (optional)
If you would like to create a pre-note ACH file for any vendor/name with a Transaction Code set to 23 - Prenote Checking (Credit), 33 - Prenote Savings (Credit), or 53 - Loan Prenote (Credit) without submitting an actual ACH file:
- Select Processes > ACH Files > Create Prenote.
- In the Company/Fund box, select the company/fund you want to create an ACH pre-note for.
- Select the Bank Account number the pre-note should be created for.
- Vendors marked with a transaction code of 23, 33, or 53 will display on the right side of the screen. Vendors marked with other transactions codes for ACH will display under ACH Vendors, select a vendor/name or multiple vendors/names and use the right-arrow(s) to move the vendor/name to the right side of the screen.
Note: It may be necessary to create individual ACH files by standard entry class; PPD, CCD, or CTX (you will be notified by your bank if this is the case). Only the vendors assigned the same standard entry class in Setup > Vendors > ACH Payments would be selected and then steps 1-13 of the Create ACH File process would be repeated for the other standard entry classes.
- Click Create.
- Select or enter a Transmission Date.
- The Transmission Time will display the current system time. This time can be changed.
- Select or enter an Effective Entry Date.
- In the Save To Folder & File Name box, the file path and name (filepath/Prefix-YYYYMMDD-x.ext (defined in steps 21-22 in the Setup Bank Account Information section above) where the x increments for each file created that day) will display from the Setup > Accounts > Accounts > ACH/Direct Deposit tab ACH Information section.
- Select the value that should be used to fill the Immediate Origin field in the ACH file:
- Use Bank Routing Number - The Immediate Origin field will be filled with the account's routing number from the Detail tab prefixed with a space, i.e. “ 999999999”.
- Use Federal EIN Number - The Immediate Origin field will be filled with the company’s/fund's Federal Tax ID prefixed with a “1”, i.e. “1999999999”.
- Use Custom Number - The Immediate Origin field is filled with the user-defined alphanumeric value entered into the Custom field. The value is prefixed with Zeros to a maximum of 10 characters, i.e. “09999999999”.
- If you select Use Custom Number in Step 8, enter the Custom alphanumeric value to fill the Immediate Origin field with.
- Click Create.
- At the file has been created successfully message, click OK.
Create an ACH File
- Select Processes > ACH Files > Create ACH File.
- In the Company/Fund box, select the company/fund you want to create an ACH file for.
- Select the Bank Account number the ACH file should be created for.
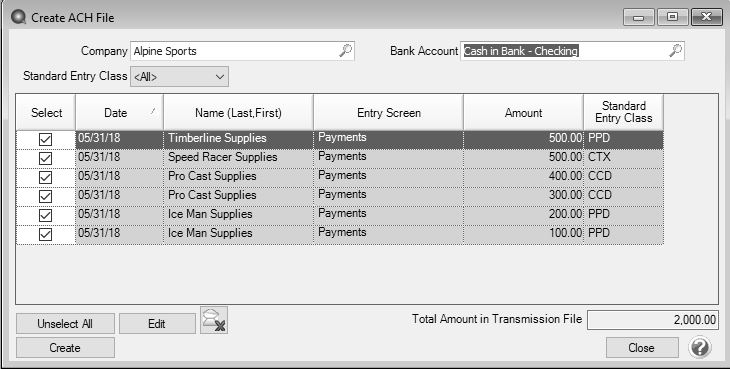
- In the Standard Entry Class box, select a standard entry class (SEC) filter, or select All to display all ACH transactions.
- PPD (Preauthorized Pay/Deposit) - for credits and debits that process against consumer accounts for entries such as payments to vendors and direct deposit.
- CCD (Corporate Credit or Debit) - for credit and debit entries processed against non-consumer accounts for transactions such as payments to vendors and collections from customers.
- CTX (Corporate Trade Exchange) - use CTX, like CCD, to facilitate business-to-business transfer of funds as either debits or credits.
- All invoices marked to be included in the ACH file will display. To unselect an invoice, click the Select check box or click Unselect All to remove the selection from all invoices.
Note: Invoices listed in this screen can be edited by clicking the Edit button from the Create ACH Files screen.
- Click Create.
- Select or enter a Transmission Date.
- The Transmission Time will display the current system time. This time can be changed.
- Select or enter an Effective Entry Date.
- In the Save To Folder & File Name box, the file path and name (filepath/Prefix-YYYYMMDD-x.ext (defined in steps 21-22 in the Setup Bank Account Information section above) where the x increments for each file created that day) will display from the Setup > Accounts > Accounts > ACH/Direct Deposit tab ACH Information section.
- Select the value that should be used to fill the Immediate Origin field in the direct deposit file:
- Use Bank Routing Number - The Immediate Origin field will be filled with the account's routing number from the Detail tab prefixed with a space, i.e. “ 999999999”.
- Use Federal EIN Number - The Immediate Origin field will be filled with the company’s/fund's Federal Tax ID prefixed with a “1”, i.e. “1999999999”.
- Use Custom Number - The Immediate Origin field is filled with the user-defined alphanumeric value entered into the Custom field. The value is prefixed with Zeros to a maximum of 10 characters, i.e. “09999999999”.
- If you select Use Custom Number in Step 8, enter the Custom alphanumeric value to fill the Immediate Origin field with.
- Click Create Files.
- At the file has been created successfully message, click OK.
Manage ACH Files
Recreate an ACH File
If an ACH file is damaged, there were transmission errors, or it is accidentally deleted, the file can be recreated by following these steps:
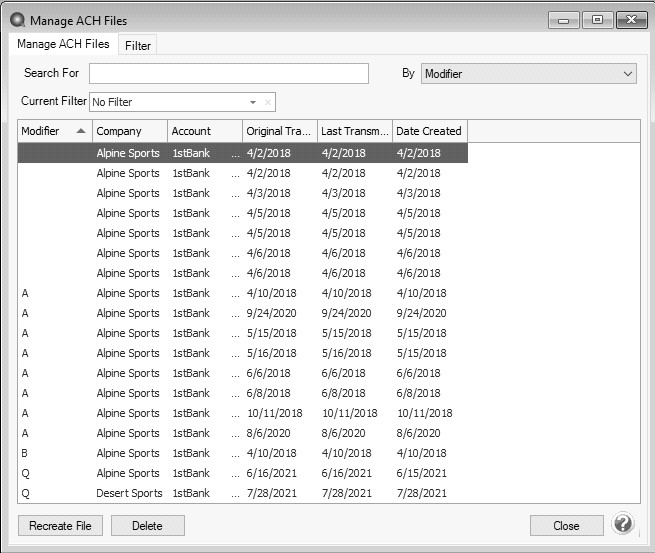
- Select Processes > ACH Files > Manage ACH Files.
- On the Manage ACH Files tab, select the vendor/name and file you want to recreate the ACH file for.
- Click Recreate File.
- The Original Transmission Date, Last Transmission Time, and Date Created columns will default from the original ACH file.
- In the Save To Folder & File Name box, the file path and name will display from the Setup > Accounts > Accounts ACH/Direct Deposit tab formatted with filepath/Prefix-YYYMMDD-x.txt.
- Select the value that should be used to fill the Immediate Origin field in the ACH file:
Use Bank Routing Number - The Immediate Origin field will be filled with the account's routing number from the Detail tab prefixed with a space, i.e. “ 999999999”.
- Use Custom Number - The Immediate Origin field is filled with the user-defined alphanumeric value entered into the Custom field. The value is prefixed with Zeros to a maximum of 10 characters, i.e. “09999999999”.
- Use Federal EIN Number - The Immediate Origin field will be filled with the company’s/fund's Federal Tax ID prefixed with a “1”, i.e. “1999999999”.
- If you select Use Custom Number in Step 8, enter the Custom alphanumeric value to fill the Immediate Origin field with.
- Click Recreate File.
- At the file created successfully message, click OK.
Delete an ACH File
- Select Processes > ACH Files > Manage ACH/Direct Deposit Files.
- On the Manage ACH Files tab, select the vendor/name and file you want to delete the ACH file for.
- Click Delete.
ACH Reports
To view or print reports that will provide information about the ACH transactions, select Reports > Reports > ACH Transactions.
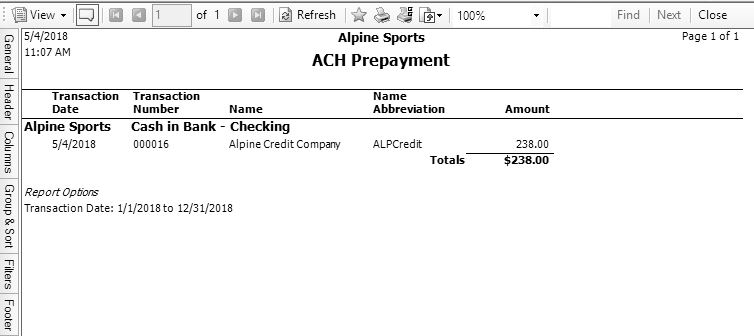
- ACH Prepayment - This report includes payment transactions that have been added to an ACH File during the payment entry or pay invoices due process.
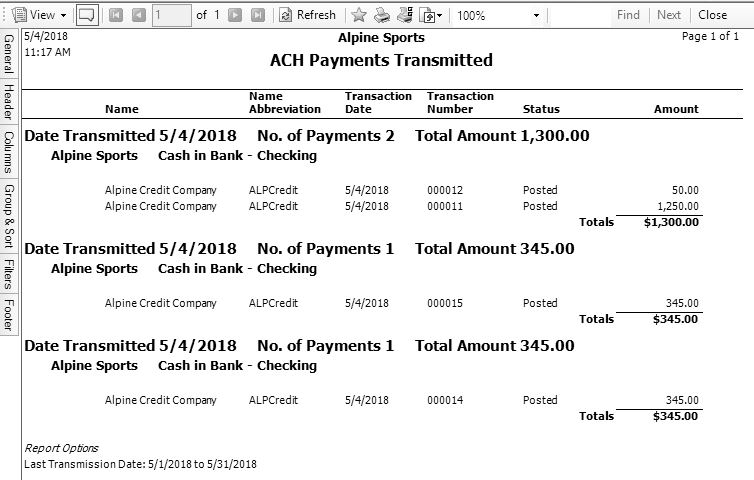
- ACH Payments Transmitted - Provides a listing of the ACH payments included in a transmission file. The Total Amount should equal the posted status Totals. The number of payments should match the number of rows where the status is Posted. If any transaction that was included in a transmission file was edited after the file was created, then the report will indicate that in the "Transactions were edited after transmission file was created." section.
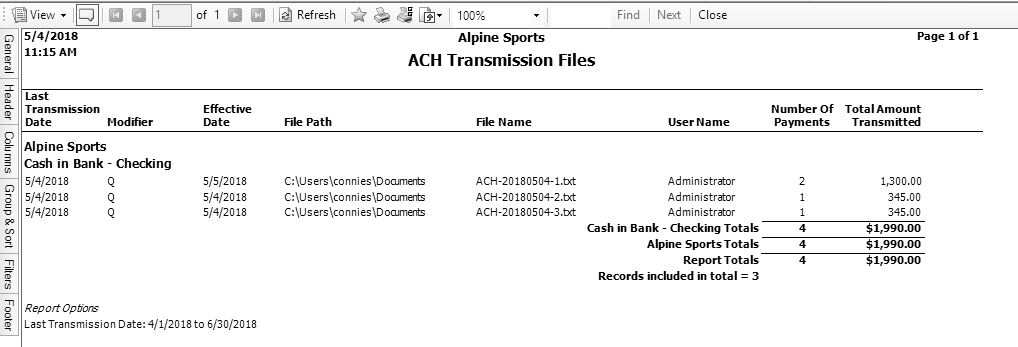
- Transmission Files - Lists the ACH transmission files created.
Email Vendor Checks (Pay Advices)
Setup
Prerequisite
The Email Setup preference (File > Preferences > Email Setup > Email Setup > Database tab) is a required part of the configuration needed to send emails from CenterPoint. See the Email Setup topic for additional information.
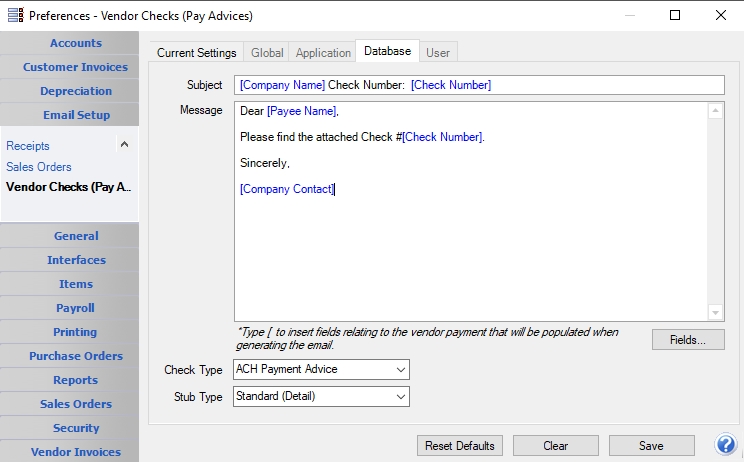
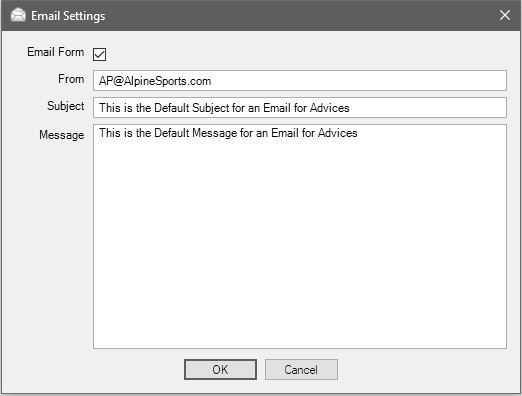
Optional Setup - Define a Default Subject and Message for Emailed Checks (Advices)
If you'd like to use the same e-mail Subject, Message, and Form each time you email a check (advice), it can be added to this preference. This preference also allows you to add Form Fields from the check (advice) data to the default Subject line or Message text.
- Select File > Preferences > Email Setup > Vendor Checks (Pay (Advices).
- Select the Database tab.
- Enter a default Subject and Message.
- If you want to insert Form Fields into the Subject or Message of the email, click the Fields button at the location the form field should be inserted. The available Form Fields for sales orders are:
| Company Abbreviation |
Company Name |
Company Address 1-3 |
Company Phone |
Company Contact |
| Payee Abbreviation |
Payee Name |
Payee Contact |
Check Date |
Check Number |
| Check Amount |
Memo 1 | Memo 2 |
-
For example, you can customize the default Subject and Message for emailed checks (advices) to include data fields from the checks (advices)data along with default text:
-
In the Subject box, click Fields, select Company Name, type Check Number:, click Fields or type [, and then select Check Number.
- In the Message box, type Dear,click Fields or type [, select Payee Name, and then type a comma.
- In the Message box, type Please find the attached Check #,click Fields or type [, select Check Number, and then type a period.
- In the Message box, type Sincerely,.
- In the Message box, click Fields or type [, select Company Contact.
-
Note: To create paragraphs, press your Ctrl and Enter keys at the same time.
- Select a default Check Type and Stub Type for emailing advices. The default form for vendor advices is the non-negotiable ACH Payment Advice form. This form will be used to format the PDF file that will be attached to the email.
- Click Save.
Set Vendor Email/Print Defaults
Prior to emailing an advice to a vendor, the vendor file must include an email address and email form options on the Email/Print tab.
- Select Setup > Names > Names or Setup > Vendors.
- Find the appropriate vendor and click Edit.
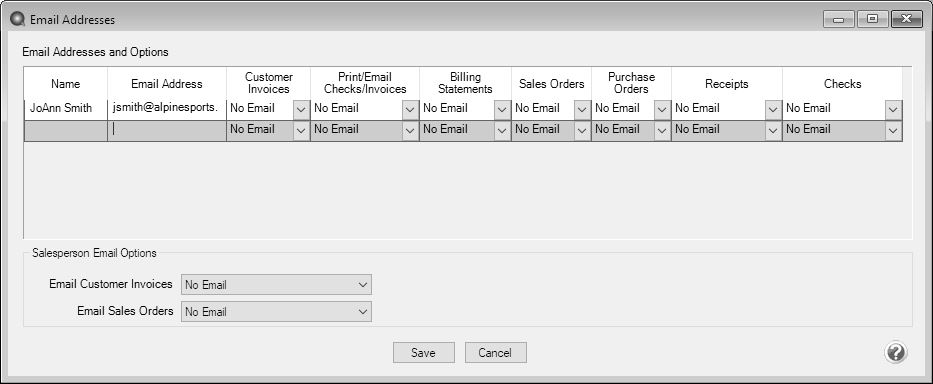
- Click on the Email/Print tab. Use the Email Addresses and Options section on this tab to set up multiple email addresses where advices can be sent for this vendor. You can also select how each email is to be sent, No Email, Send "To..." (directly to the recipient), Send "CC..." (as a carbon copy), or Send "BCC..." (as a blind carbon copy, for example, the person sending the email may want to enter their own email address so they have an audit trail of emails sent ). The Email Addresses and Options settings will be used to set the default image on the Email button on the Payment entry screen. An envelope image with a check mark on it will mean the form will be emailed and an Envelope image with a cross-through on it will mean the form will not be emailed.

- Click Save.
Set Sent From and Optional Email Addresses
The Setup > General > Email Addresses menu selection is used to set the name and email address checks (advices) are sent from. This menu allows you to select other Sent From email address for the different forms that you send via email.
You can optionally add email addresses where messages and attached documents can be sent to; including internal staff, outside accountants, or other addresses that are not related to the name/customer the transaction is entered for. You can also select how each email is to be sent, directly to the recipient, as a carbon copy, or as a blind carbon copy or set a default "From" email address for each document.
- Select Setup > General > Email Addresses.
- Enter the Name, the Email Address, and select how checks (advices) should be sent, No Email, Send "From..." (the default e-mail address the check (advice) is sent from), Send "CC..." (as a carbon copy), or Send "BCC..." (blind carbon copy).
Option 1: Email Advices During Creation of an ACH File
- Follow steps prior to clicking Create Create an ACH FIlesection in this document.
- Select the Envelope icon
 .
.
- Select the Email Form check box to email advices for vendors/names with the Checks (Advices) column in the Setup Vendors > Email/Print tab or Setup > Names > Names > Email/Print tab set to Send "To".
- The From box will display the Email Address from Setup > General > Email Addresses if the Checks (Advices) column is set to Sent "From", and can be changed.
- The Subject and Message will display the default subject and message from File > Preferences > Email Setup > Vendor Checks (Advices) and can be changed.
- Click OK. When the Email Form check box is selected on the Email Settings screen, the Envelope icon on the Create ACH File screen will display with a green check mark on it
 .
. - Follow steps 5-13 from the Create an ACH File section in this document.
- A progress bar will display during the email advices process.
- You will receive a Process Completed Successfully message when completed.
- Click OK.
Option 2: Mass Email Advices from Print/Email Checks
- Select Processes > Purchases > Print/Email Checks.
- If this is the first time entering this screen, the screen will not list any advices. After using the screen for the first time, the previous filter selection will automatically display.
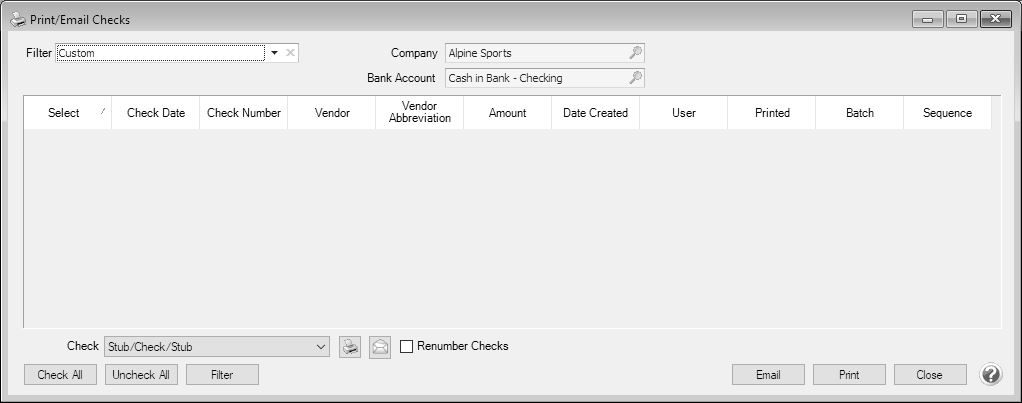
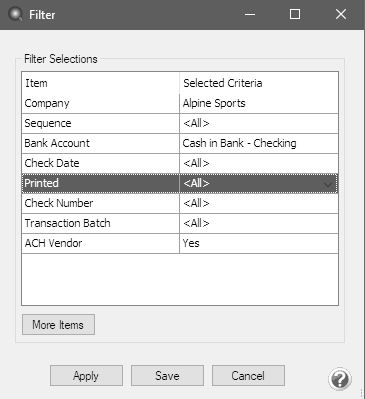
- If you would like to filter the list of advices that display, click the Filter button, select your filter criteria, and either Apply the filter to the list (you will see Custom in the Filter box) or Save the filter so you can select the named filter in the Filter box in the future. In the example below, the filter is set to display advices for Alpine Sports, for the Cash in Bank - Checking bank account, and for ACH Vendors and the filter was saved with the name ACH Advices to Email

- To select all advices for emailing, click Check All or select each advice you want to email. To unselect all advices from the printing selection, click Uncheck All.
- Select the Check form type. If you are emailing advices, the suggested format is the non-negotiable ACH Payment Advice.
- Click the Envelope icon to change the defaults set in File > Preferences > Email Setup > Vendor Checks (Pay Advices) for the Subject, Message, and Form.
- Click Email to email the selected advices. Advices will be emailed and according to the email settings on the vendor.
- You will receive a Process Completed Successfully message when completed.
- Click Close.
Frequently Asked Questions
Q: When I’m setting up ACH in CenterPoint, should I be making modifications in the Advanced Settings?
A: No, the majority of the time no changes are needed in the Advanced Settings. We recommend you only make changes in this area if a Red Wing technician has recommended it.
Q: What is a pre-note?
A: A pre-note is the commonly used term for an Automated Clearing House (ACH) prenotification. It is a zero dollar ACH entry that should be sent at least six banking days prior to the first live ACH file being sent. Under NACHA Operating Rules (also known as ACH rules), a pre-note’s purpose is to “validate” the routing number and account number of the receiving bank or credit union.
Q: How does the program know what format to use when emailing ACH advices?
A: When advices are emailed, they will use the formats for the Check and Stub Type and options selected in File > Preferences > Email Setup > Vendor Checks (Pay Advices).
Q: Is there a way to view the contents of an ACH file generated by CenterPoint ?
A: Yes, the contents of a NACHA, NACHA (Modified), or an ASCII direct deposit file can be viewed (no edit is allowed) by following these steps:
- Select Processes > ACH FIles > ACH/Direct Deposit File Viewer.
- Select a File or drag-and-drop a file onto any part of the viewer window to select that file.
- Under Contents, on the left side of the screen, an overview of the file displays the different type of records, for example File Header, Batch Header, PPD Detail Entry, Batch Control File Control.
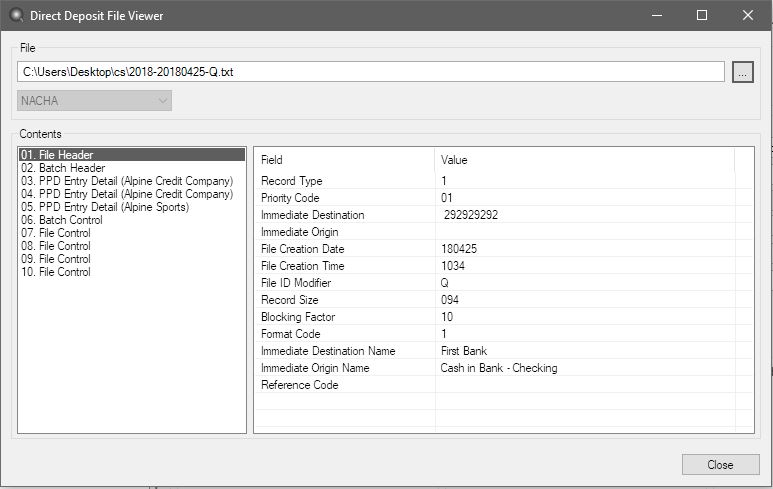
- Select one of the record types to display that record's information on the right. The PPD Detail Entry record will display for each vendor/name in the ACH file followed by the vendor/name, for example PPD Detail Entry (Alpine Credit Company).
- Click Close.
|
Document: 3337 |
|---|