CenterPoint Accounting
- Move CenterPoint® Data to the Default Version of Microsoft® SQL Server® (2019)
Related Help
 View or Print as PDF
Microsoft SQL Server is the database technology used by CenterPoint to store data. CenterPoint version 17 and later distributes SQL Server Express 2019 by default. Prior versions of CenterPoint distribute SQL Server Express 2014.
At this point, updating your CenterPoint data to SQL Server Express 2019 is not required, but you may decide to update to take advantage of the newer technology. If you share data with another entity, such as an accounting office that has updated to SQL Server 2019, you may be required to update to SQL Server Express 2019 to restore your data.
When is SQL Server 2019 Express installed by CenterPoint?
When is SQL Server 2019 Express not installed by CenterPoint?
Verify if SQL Server Express 2019 (Server)\RWS64 is Installed on my Computer or Network
When is SQL Server 2019 Express installed by CenterPoint?
Starting with CenterPoint version 17, SQL Server Express 2019 will be installed in the following situations.
- A manual upgrade installation of CenterPoint version 17 or later from an installation CD or by downloading and installing CenterPoint from the Red Wing Software website.
- A new installation on a computer that has never had CenterPoint installed.
When is SQL Server 2019 Express not installed by CenterPoint?
- SQL Server Express 2019 is not installed when updating through CenterPoint Online Updates.
- SQL Server 2019 Express will not be installed unless the computer meets the minimum system requirements (Windows® 10 or Windows Server 2016 or newer). You can continue to use CenterPoint with an older version of SQL Server, such as 2014. New installations of CenterPoint cannot install SQL Server on Windows 8 or older operating systems. See the Installing SQL Server 2014 Express Manually topic for additional information.
- If a prior installation did not install SQL Server.
Verify if SQL Server Express 2019 (Server)\RWS64 is Installed on my Computer or Network
- In CenterPoint, select File > Administration > Data Maintenance.
- Click Servers.
- Click the Add button.
- If (Server)\RWS64 is selected or listed as an available server, SQL Server 2019 is already installed.
Note: If you are on a network, you may not have SQL Server installed on your computer. In this case, check the server computer for the SQL Server 2019 instance.
- If SQL Server Express 2019 is not installed on your computer or network, continue with the Install SQL Server Express 2019 through CenterPoint section of this document.
- If SQL Server Express 2019 is installed on your computer or network, continue with the Move CenterPoint Data to SQL Server Express 2019 section of this document.
Install SQL Server Express 2019 through CenterPoint
- Download and install CenterPoint. Go to www.redwingsoftware.com and log into the website. From the Welcome menu, select My Account Home and select the Downloads tab. Locate your products and click Download Now.
- Start the installation by clicking the centerpoint##setup##.exe file.
- Click Next through the installation to the Setup Type screen.
Note: If you receive an option to "Modify Available Options", click Next to the Custom Setup screen and continue with step 5.
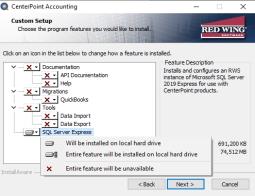
- Select Custom.
- Select the down-arrow next to SQL Server Express, select Entire feature will be installed on local hard drive, and then click Next until the installation begins. Continue clicking Next until the installation completes.
Move CenterPoint Data to SQL Server Express 2019
Note: If you are on a network, this step would typically happen on the computer where the CenterPoint databases are located. Typically this is the server computer.
-
To display the databases and the servers they are on, open CenterPoint and select File > Administration > Data Maintenance.
Look at the list of databases and take note of the Server name in the Server column for each database.
- If the databases are already on the (Server)\RWS64 instance, the data is available and does not need to be moved.
- If the server shows (Server)\RWS, this indicates that your data is on a SQL version earlier than 2019, follow steps 1 - 7 below to move data to the(Server)\RWS instance of SQL Server.
- If a different server displays, the instance of SQL Server distributed with CenterPoint is not being used. Consult Red Wing Software Technical Support, your IT department or network administrator before moving any data.
- Add the SQL Server 2019 (Server)\RWS64 instance to CenterPoint and make it the default server.
- Click the Servers button.
- If the (Server)\RWS64 instance is on your list, right-click and select Set As Default.
- If the (Server)\RWS64 instance is not on your list, click the Add button.
- Move the (Server)\RWS64 instance to the Selected Servers and click OK on the Server Settings screen.
- At the Do you want to make (Server)\RWS64 your default Server? message, click Yes.
- Click OK.
- Click to highlight the server where your data is currently located (RWS).
- Click Move Databases.
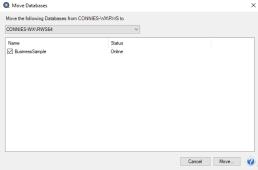
- In the Move the following databases from ###\RWS to drop down box, select (Server)\RWS64.
- Select the check box next to the databases you want to move.
- Click Move. This will backup your databases from the old RWS SQL Server instance and restore the databases to the new (Server)\RWS64 SQL Server 2019 instance.
- At the Databases moved successfully message, click OK. The databases are now using SQL Server Express 2019.
- I am on a network, what about the other computers?
- Option 1 Manually add server and databases on other computers.
- On Each Computer
- From within CenterPoint, select File > Administration > Data Maintenance.
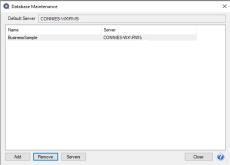
- Select your database. Click Remove.
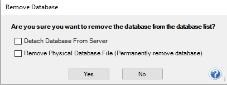
Note: You are not deleting data in this step. You are only removing a link to data.
- Leave both check boxes unchecked. At the Do you want to remove the database from the database list message, click Yes.
- Repeat for any other databases.
- Click Add.
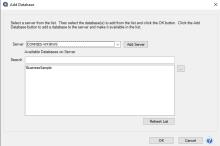
- Click Add Server.
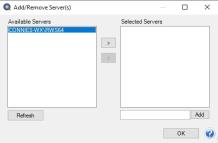
- Move the (Server)\RWS64 instance from the Available Servers list to the Selected Servers list on the right side of the screen. Click OK.
- At the Do you want to make (Server)\RWS64 your default server message, click Yes. Click OK.
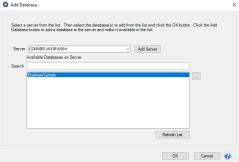
- Select the (Server)\RWS64 instance from the drop down list.
- Select the databases you wish to add. (to select multiple databases, hold the CTRL key while selecting the databases).
- Click OK. Click Close.
- Repeat at each computer using CenterPoint.
- Option 2 Export configuration settings and Import on other computers.
- On the Server Computer or Computer where the Data is Located:
- Select File > Administration > Data Maintenance.
- Right-click and select Export Configuration. This will export a "database.xml" file with all your database configurations in it.
- Chose a location to save the file. This should be a shared drive on the network you can access from each computer. Click Save.
- On Each Workstation:
- Select File > Administration > Data Maintenance.
- Right-click and select Import Configuration.
- Select the file (database.xml) that you exported above.
- Click Open. Click Close.
- Repeat on each workstation computer.
|
Document: 3438 |
|---|