CenterPoint® Accounting
- Create Invoices for Filled/Shipped Sales Orders
Related Help
_24.jpg) Enter a Sales Order or Quote Video - Duration: 22 min 12 sec
Enter a Sales Order or Quote Video - Duration: 22 min 12 sec
Sales Order Quick Entry Video - Duration: 15 min 14 sec
Convert a Quote to a Sales Order Video- Duration: 9 min 52 sec
Fill and Unfill Sales Orders Video - Duration: 13 min 12 sec
Invoice Filled Sales Orders Video - Duration: 15 min 18 sec
Print or Email Sales Orders Video - Duration: 11 min 55 sec

Creating an invoice from a sales order is the final step in the sales order process. An invoice can be created only for filled or partially filled sales orders (lines with a zero quantity shipped will be copied to the invoice when the sales order status is open). Once invoiced, an order will have a status of Invoiced and can no longer be edited or removed; but it can be copied to a new order or quote.
If an order has a deposit applied, the deposit will be applied to the invoice; thus lowering the net due. Any amount of the original deposit not used, will continue to be a deposit available to apply to other orders and invoices.
Invoicing deducts the quantity shipped from the inventory On Hand quantities and from Assigned Quantities. Any backorder quantities will continue to affect Assigned Quantities.
Commissions are calculated and copied to customer invoices on a prorata basis shipped vs ordered during the invoicing process.
Both invoices and packing slips can be printed from the Create Invoices Post & Print screen. If you always want the system to print one or the other during this process, select the box; then right click and select “Set As Default”. You can also select which printer each form should print to.
Orders can be invoiced a number of ways:
Option A: Invoice a Single Order
Option B: Manually Select Multiple Orders to be Invoiced at the Same Time
Option C: Use Filters to Select Multiple Orders to be Invoiced at the Same Time
Option A: Invoice a Single Order
- Select Processes > Sales > Sales Orders (Edit/Fill/Invoice).
- Select and open the order to be invoiced and click Create Invoice.
Note: An invoice can be created only for filled or partially filled sales orders.
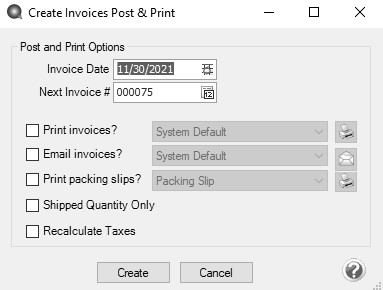
- The Invoice Date defaults to today’s date, but can be changed.
- Next Invoice # - If the File > Preferences >>Sales Orders> General Use Order Number as Invoice Numberpreference is set to Yes, the invoice number will be assigned the same number as the sales order number. If the preference is set to No, the Next Invoice # defaults to the next sequence number for invoices, but the number can be changed. When assigning back order numbers, if the File > Preferences > Sales Orders > General > Add version no. to back orders (Ex -1, -2, -3) is set to Yes, a version number will be added to the end of the order number. If the option is set to No, the same number will be assigned to the back order and subsequent invoices.
-
Selections on the Create Invoices Post & Print Screen:
- Print Invoices ? and Print Packing Slips ? - Both invoices and packing slips can be printed by selecting the appropriate check box. If you always want the system to print one or the other during this process, select the box; then right-click and select Set As Default. You can also select which form type to print the form on and printer each form should print to. The Create Invoices from Sales Order form type and printer defaults display from File > Preferences > Sales Orders > Printing, but can be changed.
- Email Invoices ? - Invoices can be emailed after the customer invoice is posted and printed by selecting the Email Invoices? check box. If you always want the system to email the invoice during this process, select the check box, then right-click and select Set As Default. You can also select which form type to email the form on. Click the Envelope icon to display the Email Settings which will display the To, CC, and BCC defaults from Setup > General > Email Addresses and the From default from Setup > General > Email Addresses (if blank the From default displays from File > Preferences > Email Setup > Email Setup > To/From Email Address).
- Shipped Quantity Only - You can select to create invoices that show the shipped (filled) items/quantities only and not show a Back Order if a line on the sales order was partially filled by selecting the Shipped Quantity Only check box. If you always want the system to show Shipped Quantity Only, select the check box, right-click and select Set As Default.
- Recalculate Taxes - When this option is selected, the sales tax will be recalculated on the invoice that is created from the sales order.
- Click Create.
Option B: Manually Select Multiple Orders to be Invoiced at the Same Time
- Select Processes > Sales > Sales Orders (Edit/Fill/Invoice).
- Single-click on the first order to be invoiced. Then while holding down the Ctrl key on the keyboard, click on each additional order to be invoiced.
- Once all orders to be invoiced are highlighted, click on Create Invoices.
- The Invoice Date defaults to today’s date, but can be changed.
- If the File > Preferences >Sales Orders>General>Use Order Number as Invoice Numberpreference is set to Yes, the invoice number will be assigned the same number as the sales order number. If the preference is set to No, the Next Invoice # defaults to the next sequence number for invoices, but the number can be changed. When assigning back order numbers, if the File > Preferences > Sales Orders > General > Add version no. to back orders (Ex -1, -2, -3) is set to Yes, a version number will be added to the end of the order number. If the option is set to No, the same number will be assigned to the back order and subsequent invoices.
- Both invoices and packing slips can be printed from the Create Invoices Post & Print screen. Select the appropriate check box. If you always want the system to print one or the other during this process, select the box; then right click and select “Set As Default”. You can also select which printer each form should print to. The Create Invoices from Sales Order form type and printer defaults display from File > Preferences > Sales Orders > Printing, but can be changed.
- Click Create.
Option C: Use Filters to Select Multiple Orders to be Invoiced at the Same Time
Using Filters allows you to select multiple orders to be invoiced based on criteria that you have provided. For example, select all orders that have been filled or partially filled.
- Select Processes > Sales > Sales Orders (Edit/Fill/Invoice).
- Click on the Filter tab.
- Select the criteria to be used from the left side of the screen, (for example, Status) and then specify the filter criteria information on the right side of the screen, (for example, Status = Filled or Partial).
- Click Add Filter.
- Repeat steps 3 and 4 if additional criteria is needed.
- If this is criteria that you will be using again in the future to fill orders, then click Save to save this as a new filter. Otherwise, click Apply.
- The List tab will now display only those orders that meet the criteria specified on the Filter tab. Single-click on the first order, hold the shift key down (on the keyboard), and then click on the last order to highlight all of the orders.
- Click on Create Invoices.
- The Invoice Date defaults to today’s date, but can be changed.
- If the File > Preferences >Sales Orders >General>Use Order Number as Invoice Numberpreference is set to Yes, the invoice number will be assigned the same number as the sales order number. If the preference is set to No, the Next Invoice # defaults to the next sequence number for invoices, but the number can be changed. When assigning back order numbers, if the File > Preferences > SalesOrders > General > Add version no. to back orders (Ex -1, -2, -3) is set to Yes, a version number will be added to the end of the order number. If the option is set to No, the same number will be assigned to the back order and subsequent invoices.
- Invoices can be emailed from the Create Invoices Post & Print screen by selecting the Email invoices? check box. Invoices will only be emailed to customers who have an email address set up for invoices in Setup > Customers > Email/Print tab. The default form to use subject, and message for emailed invoices will automatically display from File > Preferences > Customer Invoice > Email - Invoices, and can be changed. Both invoices and packing slips can be printed from the Create Invoices Post & Print screen. You can also select which printer each form should print to. The Create Invoices from Sales Order form type and printer defaults display from File > Preferences > Sales Orders > Printing, but can be changed. If you always want the system to print or email invoices or packing slips during this process, select the check box; then right click and select “Set As Default”.
- Click Create.
|
Document: 3226 |
|---|