CenterPoint® Accounting
- Sales Order - Quick Entry
Related Help
_24.jpg) Enter a Sales Order or Quote Video - Duration: 22 min 12 sec
Enter a Sales Order or Quote Video - Duration: 22 min 12 sec
Sales Order Quick Entry Video - Duration: 15 min 14 sec
Convert a Quote to a Sales Order Video- Duration: 9 min 52 sec
Fill and Unfill Sales Orders Video - Duration: 13 min 12 sec
Invoice Filled Sales Orders Video - Duration: 15 min 18 sec
Print or Email Sales Orders Video - Duration: 11 min 55 sec

The Sales Order module is used to prepare quotes and manage orders received from customers. Once the goods and/or services have been provided to the customer, the fill and invoice process will deduct the items from inventory and prepare an invoice to bill the customer.
In this topic, we will identify how to enter customer quotes and/or orders quickly on a single-tab consolidated entry screen. Sales orders can also be entered on a multi-tab entry screen by following the Enter a Sales Order or Quote topic.
Prerequisite
You must have the Sales Order module purchased, installed and registered in the module configuration manager (File > Administration > Module Configuration Manager) prior to entering a sales order.
Quickly Enter a Sales Order or Quote
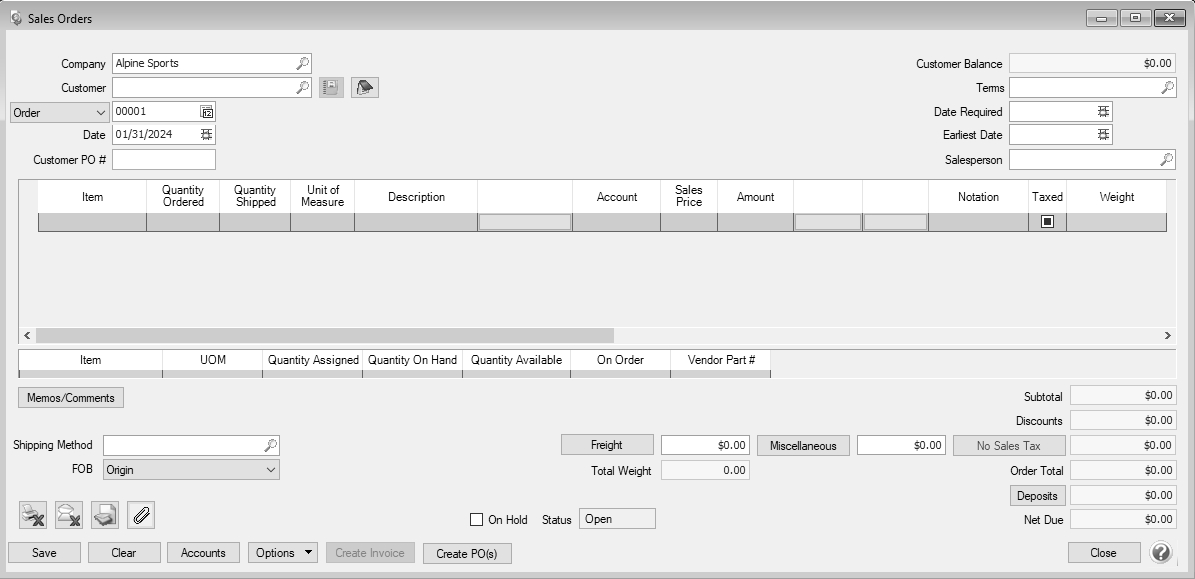
- To begin entering a sales order, select Processes > Sales > Sales Orders - Quick Entry.
- Enter the Customer
- If you enter a name into the Customer box and it does not exist, the Lookup screen automatically displays, from this screen you can either Create a New Customer or Create a One-Time Use Customer:
- Create a New Customer - . Click New . The Add a New Customer screen displays with the name that you entered automatically displaying in the Company box. Complete the additional details to create the customer and then click Save.
- Create a One-Time Use Customer - Click New One Time Use. The New One Time Use Name screen displays with the name that you entered automatically displaying in the Name box. Complete the additional details to create the one time use customer, including the customer Price Level, and then click Save. When creating a new customer through the New One Time Use Name screen, the customer is automatically saved as an inactive customer in all companies so it does not appear in Customer lookups (unless you chose to lookup inactive customers).
- If your File > Preferences > Defaults > Lookup Field Settings are set to Use Auto-Complete, and you change a name after detail is entered on the lines of a transaction, the transaction is cleared and any transaction action (leave the transaction empty, recall the last transaction, or load the default recurring transaction) for the new name will occur.
- If your File > Preferences > Defaults > Lookup Field Settings are set to Allow To Query for Items On Multiple Fields, and If you change a name after detail is entered on the lines of a transaction, you will be asked if you would like to clear the information for the current transaction. If you select Yes, the transaction will be cleared and any transaction action (leave the transaction empty, recall the last transaction, or load the default recurring transaction) for the new name will occur. If you select No, the detail lines from the transaction will remain and if the new name was assigned a transaction action (leave the transaction empty, recall the last transaction, or load the default recurring transaction), the transaction action will not occur.
- If you want tor recall a previous transaction for this name, see the Recall a Transaction procedure.
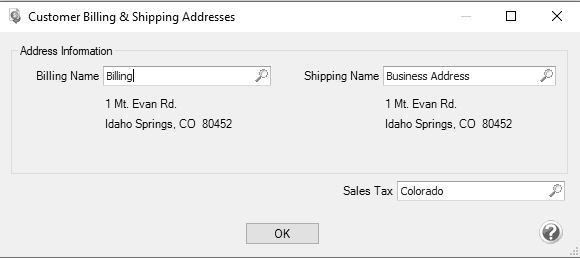
- To view or change the customer's Billing Name/Address, shipping Name/Address, or Sales Tax, click the Address icon
 to display the Customer Billing & Shipping Addresses screen.
- To view or add internal notes for a customer, click the Additional Notes icon
 .
.
- Select the appropriate Type for this transaction. Quotes have no affect on inventory or customer balances and terms and credit limits will be ignored when Quotes are saved. They are used to simply provide pricing information to the customer. The Order option should be used if the customer has confirmed that they would like to purchase the goods/services.
- In the Order or Quote Number box, the next available sequence number will display. Click the Sequence icon
 or press F4 to display the sequences associated with the Sales Order Entry screen. You can use a different sequence for orders vs. quotes.
 - The Date will display the current system date.
-
If desired, enter a Customer PO # or some other information that indicates the source of the sales order
- In the Terms box, verify or enter the terms that should be used when the order is invoiced. Terms are used to calculate Due Dates, Discount Due Dates and Early Payment Discounts.
- Enter the customer-specified delivery date in the Date Required field. This is the latest date the customer must receive the product by. You can use this date in Fill Orders to help select the orders to fill. The default is the current system date.
- Enter the soonest this order can be delivered in the Earliest Date field. Use it to delay filling an order. It is also used in Fill Orders when selecting orders to fill.
- In the Salesperson box, verify or enter the salesperson responsible fore this order or quote.
- There are many fields that can be displayed in the data entry grid. These can be selected by right-clicking anywhere in the grid and selecting Add/Remove Columns. In this topic, we will identify the most commonly used fields.
- Select the first Item ordered by the customer by either typing in a portion of the item abbreviation or the item description or click on the lookup button to display a list of items. Once the Item is selected the system will automatically display the Description, Account , Unit of Measure, and Sales Price. This information will pull from the information that has been setup on the item and can also be modified, if needed.
- Select the Quantity Ordered. If you have already shipped or given the goods/services to the customer you can enter that quantity in Quantity Shipped. If you are entering a quote, the Quantity Shipped is not available.
- If the item entered is a lotted or serialized item, the Lotted/Serialized Items screen will be displayed. If you know at this time which lot/serial numbers will be delivered to the customer, they can be specified by entering a Quantity Ordered of 1 in the corresponding row(s). Otherwise, specify the total Quantity Ordered and correct Price for this item, in the Select Later row. When the Select Later option is used, you will be required to specify the actual lot or serial numbers sold when the order is filled.
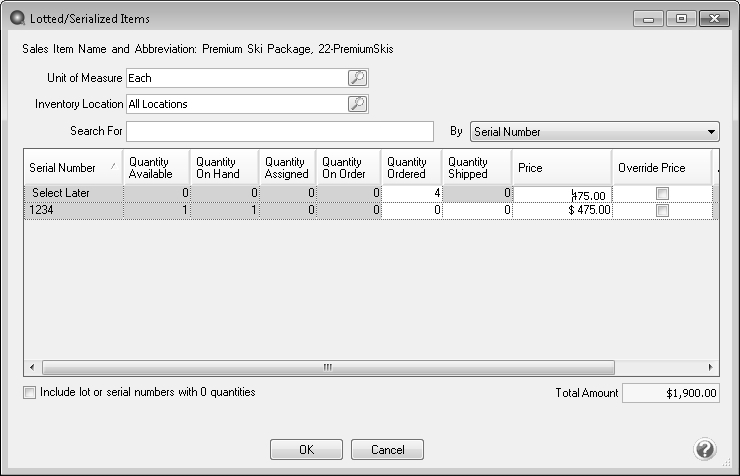
- When all serial/lot information is complete, click OK to return to the Sales Order screen.
- The Taxed check box allows you to indicate if a sales item is taxable or non-taxable on each line of the invoice. If an exemption id is required for this customer, it can be entered in Setup > Customers > Accounting in the Exemption Id box.
- Continue entering additional lines on the invoice for each item that is sold to this customer.
- If you click the Detail button in the data entry grid, you can enter additional details about the transaction, for example for some of the fields you chose not to display on the data entry grid such as associated account, notation, and
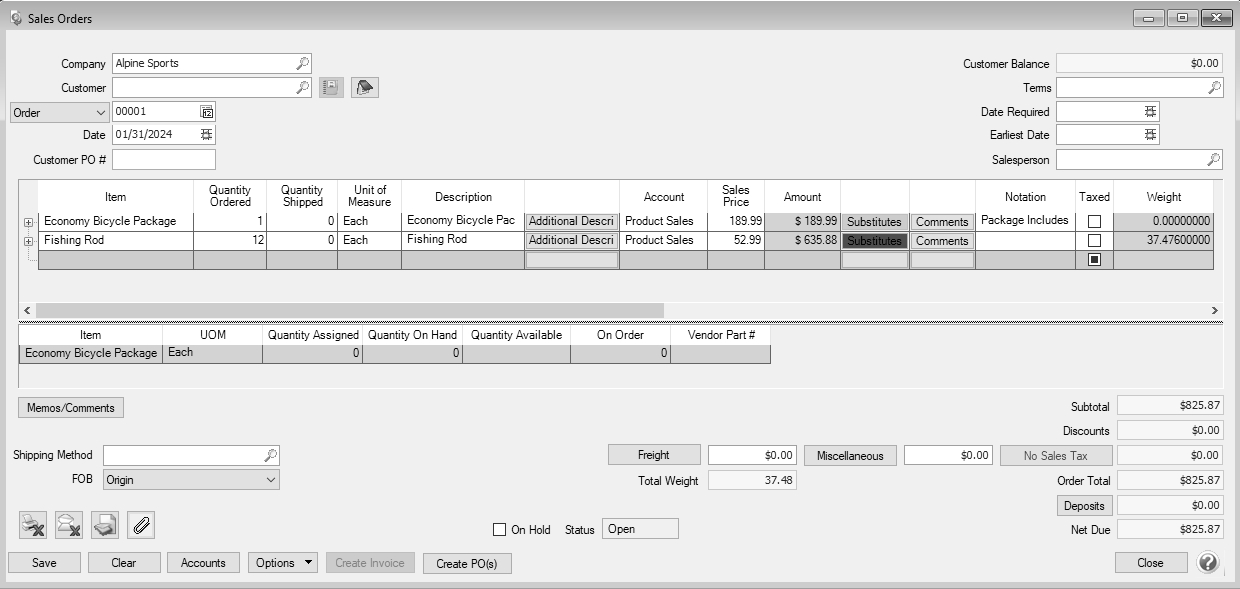
- The Substitutes button will be highlighted in red if there is not enough quantity available from the item/location combination and the item has a substitute. Click the button to display the Substitutes Locations/Items screen. The Inventory Locations tab allows you to view the quantity on hand, assigned, available at the locations available in the system. The Substitutes tab lists any substitute items, inventory locations, quantity on hand, assigned, available, on order, and unit of measure.
- If you click the Additional Description button on the data entry grid, the Sales Item Additional Description screen displays that allows you to type in a 3200 character additional description for each line item in the data entry grid.
- If you click the Comments button on the data entry gird, a Line Comments screen displays that allows you to type in a 3200 character notes for each line in the data entry grid.
- If you click the Price Level button in the data entry grid, the Price Levels screen displays the price levels for the pricing method for the item being entered and allows you to select a different price level for the item.
- A Notation can also be entered if you'd like to specify a description of what was purchased. If the sales item has an additional description, it will display in the Notation column. The Notation field is optional.
- If you click the Detail button in the data entry grid, you can enter additional details about the transaction, for example for some of the fields you chose not to display on the data entry grid such as associated account, notation, and
- Click the Memo/Comments button to add or view Memo 1 or Memo 2 (which print on the sales order/quote), Comments (or a 3200 character comment for the invoice), or up to eight custom fields you can define in File > Preferences > General > Custom Transaction Fields .
- If known or if the customer has identified how the order should be shipped, specify the appropriate Shipping Method.
-
If applicable, choose whether the shipping charges are paid by your company (Destination) or your customer (Origin) in the FOB field.
- Origin - Customer is responsible for the shipping charges because the goods are released at the point of origin ("ship from" location).
- Destination - Vendor (your company) is responsible for the shipping charges because the goods aren’t released until they arrive at the customer’s location.
- If applicable, enter Freight and Miscellaneous charges at the bottom of the screen. The Freight and Miscellaneous dollars can be added when the order is filled also. To specify management details to be posted for the freight or miscellaneous charges, for example profit center, location, project, etc. or a notation specific to these charges, click the Freight or Miscellaneous buttons and enter the information on the Details screen.
- If you entered a weight for your inventory items in Setup > Inventory > Items, the Total Weight will display the sum of each line item's weight multiplied by the Quantity Ordered (converted to Stocking Units). You can add an optional Weight column to the data entry grid to display the weight of each item multiplied by the Quantity Ordered (converted to Stocking Units) by right-clicking and selecting Add/Remove columns.
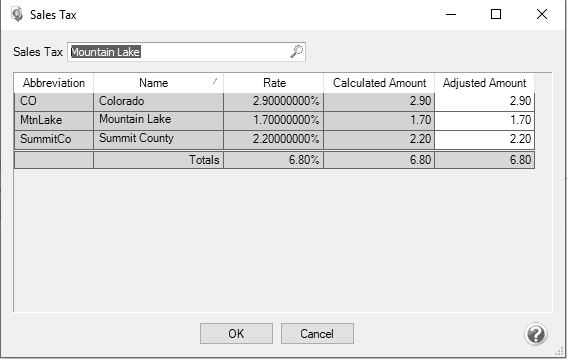
- The Sales Tax will be calculated automatically based on the Sales Tax selected in Setup > Customers. To change or adjust the Sales Tax, click the button labeled with the assigned sales tax (next to the amount).
- If the customer is setup to receive Trade Discounts, the amount calculated will be displayed in the Discounts box.
- The Order Total box displays the calculated amount from the Subtotal + Freight + Misc + Sales Tax - Discounts boxes.
- By default the deposit amounts will automatically be applied to the current order unless you change the deposit application by clicking the Deposits button and change the deposit application. If the applied deposit is less than or equal to the balance due on the current sales order, the entire amount is applied. If the applied deposit is greater than the balance due on the current sales order, only the balance due will be applied. The Balance Due is calculated as the Invoice Total - Amount Received Applied - Sum of Customer Deposit Applied - Discount Amount. Click OK.
- If you are manually applying customer deposits, the amount in the Deposits box will always display as 0.00 even if you have deposits available for application. To display all outstanding deposits and manually apply the deposit, click Deposits. The Apply Customer Deposits screen displays all available deposits that have previously been received with a deposit date that is less than or equal to the current invoice date and not yet applied to a sales invoice. To apply the deposit to the invoice, select the check box next to the Date and then click OK. If the applied deposit is less than or equal to the balance due on the current invoice, the entire amount is applied. If the applied deposit is greater than the balance due on the current invoice, only the balance due will be applied. The Balance Due is calculated as the Invoice Total - Amount Received Applied - Sum of Customer Deposits Applied - Discount Amount.
- Click the Print button. (An image of a printer displays on the button. A green check mark means the order will be printed and a red X means the order will not be printed.) The selections set in File > Preferences > Sales Orders > Printing will display and can be changed. Select whether the order should be printed when it is created. To set your default for the Print button, right-click on the button and select Set As Default. To override the Print button default, click the Print button and change the settings on the Print Settings screen.
- Select the On Hold check box if the sales order or quote is not yet final. For example, if a customer isn't sure how many they want. A sales order cannot be filled until this check box is cleared (changed back to an open status). Selecting this check box indicates additional processing is needed. The inventory quantity is "committed." The sales order cannot be invoiced or filled during the auto-fill process.
- CenterPoint determines the Status based on your input. The status is updated when orders are saved or processed (filled or invoices created).
- Verify the order information for accuracy and click Save to complete the transaction. Saved Quick Entry sales orders will display in Sales Orders Edit/Fill/Invoice like standard sales orders and can be edited on the Processes > Sales > Sales Order screen.
Note: If two or more users are editing a sales order at the same time, the changes will be recorded for the first user to click Save. Subsequent saves of the sales order will not be allowed and the following message displays: "This Sales Order has been edited by another user. Your changes will not be saved. In order to edit this sales order, you will need to click the Close button."
|
Document: 3397 |
|---|