CenterPoint® Accounting
-
Basic Items
Related Help
_24.jpg) Basic Sales Items Video - Duration: 19 min 55 sec
Basic Sales Items Video - Duration: 19 min 55 sec
 View or Print as PDF for CenterPoint Accounting for Agriculture
View or Print as PDF for CenterPoint Accounting
Items are used to maintain a list of products and services your business sells. The sales item setup can include pricing information. Items (without the Inventory module) do not track quantities on hand. They simply provide a convenient list of items that you can include on customer invoices.
Creating an Item
- Select Setup > Sales > Items. Click on the New button.
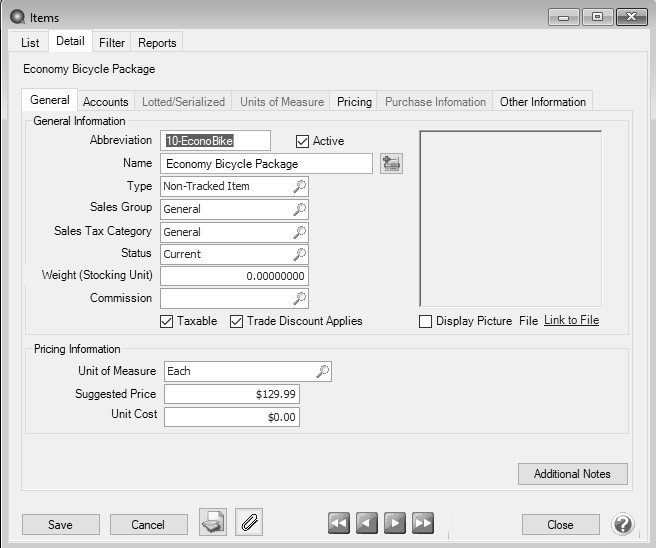
- Assign an Abbreviation and Name for this sales item. The unique Name (up to 50 characters) identifies the item. It can include formatting characters such as hyphens, periods, and slashes. Both the Abbreviation and Name will be included when reviewing sales reports and printing sales invoices.
- If needed, an additional description field can also be used. To enter an additional description; click
 and enter up to 3200 characters The additional detail description can also be printed on sales invoices. Click OK when the additional description is complete. The additional description will only print on reports when the Additional Description column is added one of the sales item reports.
- Service Item - Tasks you perform for customers, such as service warranties and repair services. They do not track quantities.
- Non-tracked Item - Material items you sell but quantities are not tracked.
- Select the Sales Group this item belongs to. The sales group is used for tracking sales on the Sales by Group report.
- Select the Sales Tax Category this item belongs to. Sales tax categories provide a way to group various sales (inventory) items for tax calculations. The sales tax category determines if the sales item is taxable and at what rate.
- Select the Status of the item. This determines whether or not the sales item is still available for use. The options are: Current, Discontinued, or Obsolete. You can change an item's status so that you can filter your lists for all obsolete or discontinued items to determine your action for those types of items. An items status does not affect if the item can be purchased or sold.
- Enter the item's Weight (Stocking Unit). This is optional field and is informational only.
- Select Taxable if the item or service is subject to tax when sold to customers that are not tax exempt.
- Select Trade Discount Applies if the item or service is subject to a trade discount when sold to customers that are assigned a trade discount percentage in Setup > Customers
 . A trade discount can be overridden on the invoice.
 - If you want to link this sales item to a file on your computer, for example a picture of the item, click Link to File, select the file you want to link, and then click Open. The name of the linked file will now display as the text instead of the Link to file text. To open the linked document, click the name of the document. To change or remove a linked file, right-click and select Edit or Remove
- If you linked to an image file (.bmp, .gif, .jpg, .png, or .tif) in the previous step, select the Display Photo check box to display the image in the Sales Items screen.
- Specify the Unit of Measure for this item.
- Enter the Suggested Price recommended by the manufacturer or vendor. This is an information field only and is optional.
- Enter an optional Unit Cost of the sales item. The unit cost must be greater than or equal to 0.00. This is an informational field only.
- Click the Accounts tab and assign the appropriate accounts. If a sales group was selected, some accounts may already be assigned for you, but can be overwritten.
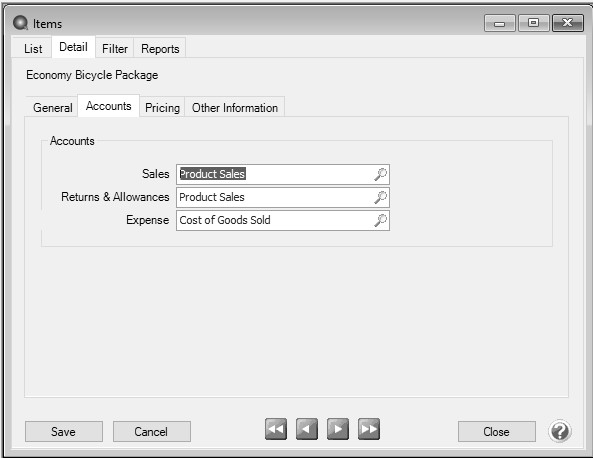
- Sales - This account is credited when this sales item is sold on a customer invoice. This account is also debited when this sales item is returned on a customer invoice (credit memo).
- Returns & Allowances - This account is not used at this time. Although any account can be assigned to the field, we recommend using the same sales account assigned above it. This field will be used for returns when the sales order module is added to CenterPoint.
- Expense - This account is debited when the sales item is sold on a customer invoice and it is required for non-tracked and service items when the Purchase Order and Sales Order modules are installed.
-
Click the Pricing tab to specify the selling prices for the sales item. Depending on the option chosen, one can enter in a specific price or have it calculate from other fields assigned to the item. The options are:
- Fixed Pricing with No Qty Breaks - Enter the selling price for this sales item for each Sales Price Level. The number of price levels is determined by the File > Preferences > Items > Price Levels > Pricing Levels preference setting. The selling price will automatically display in Customer Invoices based on the price level assigned to the customer in Setup > Customers.
- Fixed Pricing with Qty Breaks - This pricing method can be applied to inventory item types. Enter the selling price for this sales item with the quantity break information for each Sales Price Level.
- Quantity More Than/But Not Over- Enter quantities in ascending order. As you enter the But Not Over quantity, the system will automatically fill in the next Quantity More Than quantity, for example if your price breaks are at 20 and 40, enter 20 in the But Not Over box and the next line will automatically display 20 in the Quantity More Than box, enter 40 in the But Not Over box and the next line will automatically display 40 in the Quantity More Than box. The quantity decimal place precision is set in File > Preferences > General > Quantity Decimal Settings.
- If you enter too many quantity break rows and want to remove the rows, enter 999,999,999 in the But Not Over row and click Yes to the prompt that informs you that rows following this row will be removed if you continue.
- Quantity More Than/But Not Over- Enter quantities in ascending order. As you enter the But Not Over quantity, the system will automatically fill in the next Quantity More Than quantity, for example if your price breaks are at 20 and 40, enter 20 in the But Not Over box and the next line will automatically display 20 in the Quantity More Than box, enter 40 in the But Not Over box and the next line will automatically display 40 in the Quantity More Than box. The quantity decimal place precision is set in File > Preferences > General > Quantity Decimal Settings.
Cumulative Quantity Pricing - This pricing method can be applied to non-inventory item types and is set up similarly to the Fixed Pricing with Qty Breaks description above, however, the quantity break pricing is calculated cumulatively across multiple quantity breaks.
- Pricing Example: Enter a quantity of 12 for Sales Price 1 calculates an extended price of $84.00 ($25.00 + $40.00 + $19.00 = $84.00)
- Sales Price 1 with a Quantity of 5 X $5.00 = $25.00
- Sales Price 1 with a Quantity of 5 X $8.00 = $40.00
- Sales Price 1 with a Quantity of 2 X $9.50 = $19.00
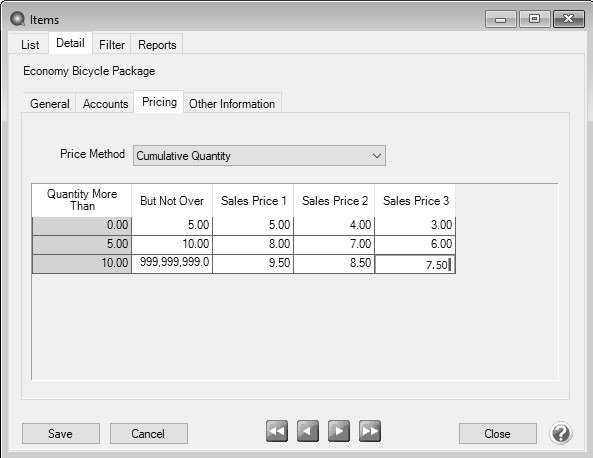
- Pricing Example: Enter a quantity of 12 for Sales Price 1 calculates an extended price of $84.00 ($25.00 + $40.00 + $19.00 = $84.00)
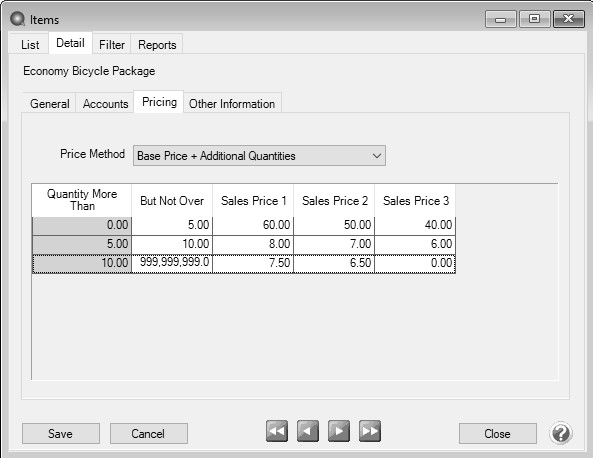
Base Price + Additional Quantities - This pricing method can be applied to non-inventory item types and is set up similarly to the Fixed Pricing with Qty Breaks description above, however, the quantity break pricing is calculated cumulatively across multiple quantity breaks. with an initial minimum price specified in the first break
- Pricing Examples:
- Enter a Quantity of 3 for Sales Price 1 - the Extended Amounts = $60.00 (Base Price)
- Enter a Quantity of 5 for Sales Price 1 - the Extended Amount = $60.00 (Base Price).
- Enter a Quantity of 7 for Sales Price 1 - the Extended Amount = $76.00 ($60.00 for the first Quantity of 5 and an additional $16.00 for the next Quantity of 2).
- Pricing Examples:
- Click Save.
|
Document: 3147 |
|---|