CenterPoint® Accounting
- Reprinting 1099s
Related Help
 View or Print as PDF for CenterPoint Accounting for Agriculture
View or Print as PDF for CenterPoint Accounting or CenterPoint Fund Accounting
This document describes how to reprint completed 1099 forms that you have processed. The 1099 reprinting process includes multiple steps which are detailed below.
- Select Reports > Reports > User-defined/Tax Reports.
- Select the appropriate 1099 Form.
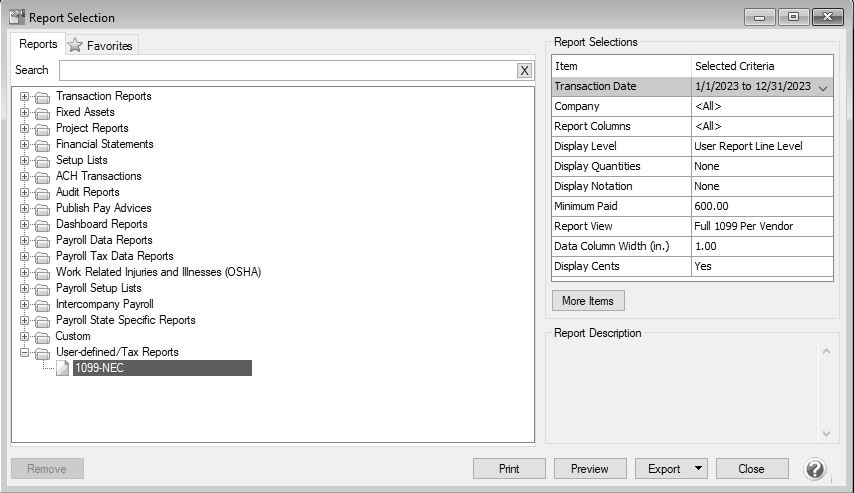
- Fill in the Report Selections with the appropriate Transaction Date and Company.
- Click Print.
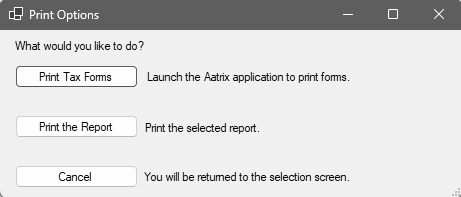
- Click Print Tax Forms.
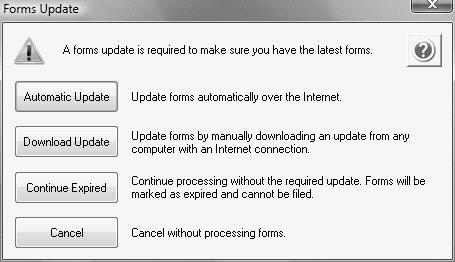
Forms Update
If you have internet access and the latest version of Federal/State Tax Forms (Aatrix) is not installed, the following Forms Update screen will automatically be displayed when you select the menu selection above. Simply click on Automatic Update and follow the on screen instructions.
If a Forms Update was required, from the Report Preview screen, click the Print or Print To icons again or from the Report Selections screen, click the Print button again. If an update was not required, the 1099 History Options screen will display.
1099 History File Options
Note: The W-2 History File Options screen that will display may be behind your program window. To locate the screen, minimize your program window or simultaneously press Alt+Tab (and continue pressing Tab). There will not be an icon in your task bar that will identify that this screen is an active screen.
- Choose Reprint Completed 1099s on the right and click Next.

- Click Next.
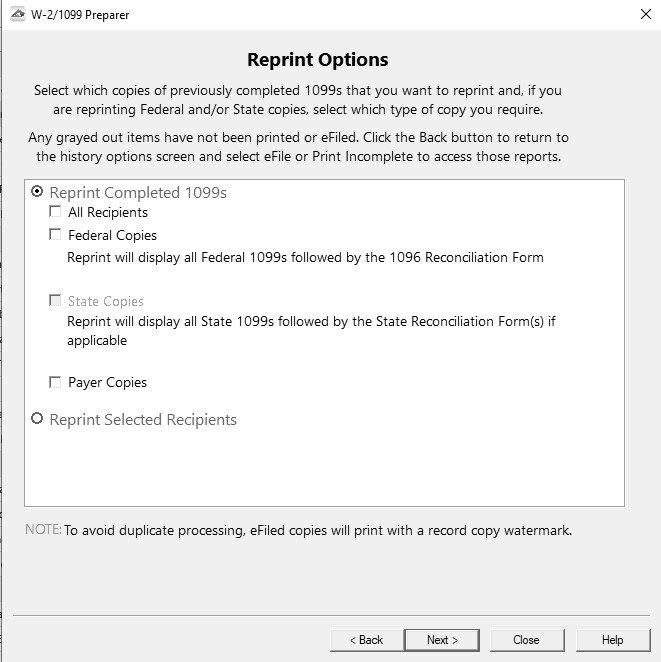
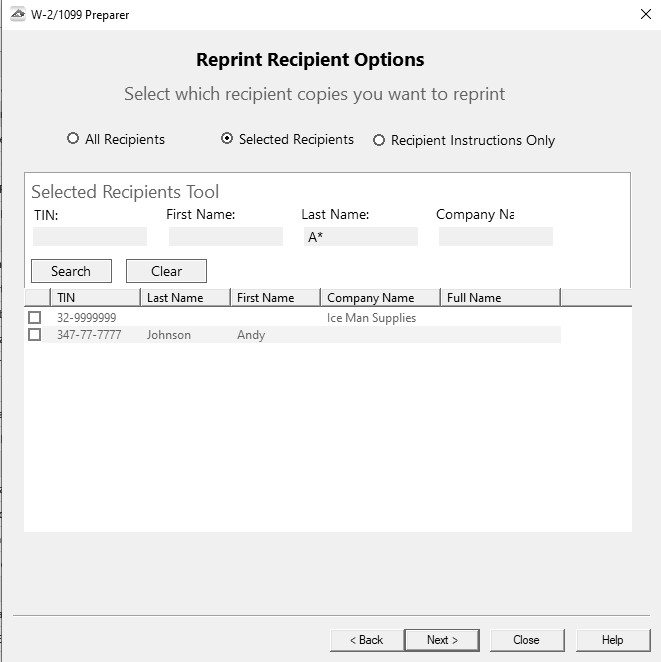
- A Reprint Options screen will display. If you want to reprint completed 1099s, select Reprint Completed 1099s and then select what you wish to reprint All Recipients, Federal Copies (original or watermarked) or Payer Copies, or if you want to reprint only for specific recipients, select Reprint Selected Recipients.
- Click Next.
- An Options screen may display depending on which type of copy you selected above, in this example the Reprint Recipient Options screen displays because Reprint Selected Recipients was selected above. This screen allows you to specify if you want to print for all recipients or a specific recipient.
- Click Next.
- The first selected 1099 form will be displayed. To print this first form, click Print Final and then Yes. Once the data is printed, click Next Step to continue to the next selected form. You will be reminded when to insert special perforated blank paper prior to printing.
- The next form will be displayed. Click Print Final to print the form, then click Next Step to continue to the next form.Repeat this process for each selected form.
- The 1099 History Options screen displays again. Click Close.
|
Document: 3281 |
|---|