CenterPoint® Accounting
- Enter a Paid Sales Invoice

Related Help
_24.jpg) Customer Sales Invoices Video - Duration: 14 min 36 sec
Customer Sales Invoices Video - Duration: 14 min 36 sec
Customer Returns Video - Duration: 7 min 08 sec
 View or Print as PDF for CenterPoint Accounting for Agriculture
View or Print as PDF for CenterPoint Accounting and CenterPoint Fund Accounting
Customer Invoices are used to record a sale of goods or services. If the customer pays for the invoice at the time it is entered, the invoice and payment can all be entered as one transaction.
Entering a Paid Sale:
- To begin entering a sale or return, select Processes > Sales > Customer Invoices from the main CenterPoint Accounting screen.
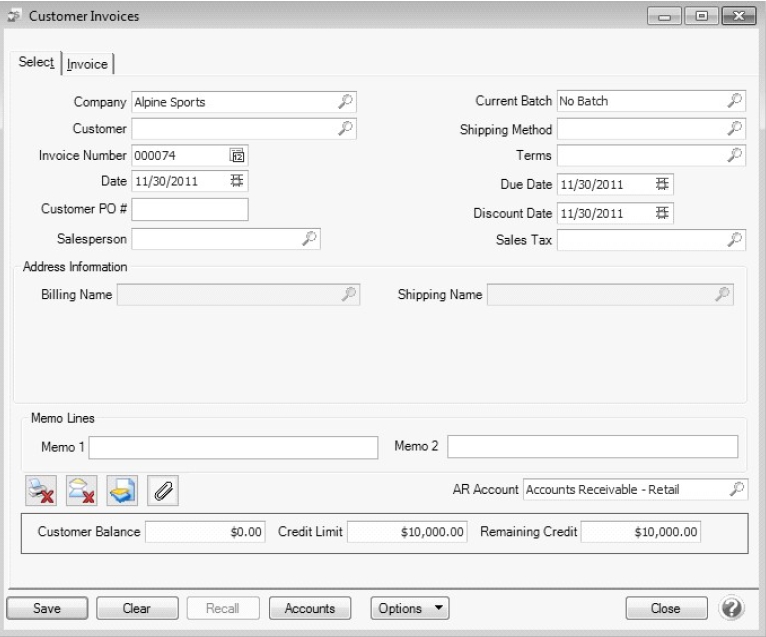
- Enter the Customer by typing in a portion of the customer’s name or abbreviation or click on the lookup button to display a list of your existing customers.
- Create a New Customer - Click New . The Add a New Customer screen displays with the name that you entered automatically displaying in the Company/Fund box. Complete the additional details to create the customer and then click Save.
- Create a One-Time Use Customer - Click New One Time Use. The New One Time Use Name screen displays with the name that you entered automatically displaying in the Name box. Complete the additional details to create the one time use customer, including the customer Price Level, and then click Save. When creating a new customer through the New One Time Use Name screen, the customer is automatically saved as an inactive customer in all companies/funds so it does not appear in Customer lookups (unless you chose to lookup inactive customers).
- To view or add internal notes for a customer, click the Additional Notes icon
 .
. - Once the customer is selected, the Shipping Method
- Complete all other needed fields on the Select tab. Most fields are optional – complete only those that are pertinent to your business.
- Click on the Shipping Address button to specify a different address for the shipping address.
- The Email or Print Options selected on the Email/Print tab in Setup > Names > Names or Setup > Customers will determine the default setting for the Print (an image of a printer displays on the button) and E-mail (an image of an envelope displays on the button ) buttons (the selection can be changed on this screen). If the Print or E-mail buttons display with a red X, it means the invoice or other forms selected in File > Preferences > AR will not be printed or e-mailed when the invoice is saved. If the Print or E-mail buttons display with a green check mark, it means the invoice will be printed or e-mailed when the invoice is saved. To override the Print button default setting, click the Print button to display the Print Setting screen where you can override the Print Invoice setting for this invoice only, select the printer to print the invoice to, the number of copies of the invoice to print, and the form the invoice should be printed on. To override the E-mail button setting for this invoice only, click the E-mail button to display the Email Settings screen where you can override the E-mail Invoice setting and the default To, CC, BCC, From, Subject, Message, and form the invoice should be e-mailed on.
- The system will automatically bring you to the Invoice tab when you enter/tab off of the last field on the Select tab. Otherwise, you can click the Invoice tab manually.
If you enter a name into the Customer box and it does not exist, the Lookup screen automatically displays, from this screen you can either Create a New Customer or Create a One-Time Use Customer:
- Select the first Item sold to the customer by either typing in a portion of the item abbreviation or the item description or click on the lookup button to display a list of items.
- Once the Item is selected the system will automatically display the Description, Account and Sales Price. This information will pull from the information that has been setup on the item. The Description, Account and Sales level can also be modified, if needed.
- Specify the Quantity Shipped (sold).
- If you set the File > Preference > Accounts > Personal Accounts preference and marked accounts as personal accounts and have a company marked with company type = Personal, you can add a Company column to the data entry grid that will allow you to identify personal vs farm transactions by selecting a company for each line on the data entry grid. This will allow to easily prepare consolidated or separate financial reports for your personal/farm companies.
- Continue entering additional lines on the invoice for each item that is sold to this customer.
- If you click the Detail button in the data entry grid, you can enter additional details about the transaction, for example for some of the fields you chose not to display on the data entry grid such as associated account, notation, and
- The Substitutes button will be highlighted in red if there is not enough quantity available from the item/location combination and the item has a substitute. Click the button to display the Substitutes Locations/Items screen. The Inventory Locations tab allows you to view the quantity on hand, assigned, available at the locations available in the system. The Substitutes tab lists any substitute items, inventory locations, quantity on hand, assigned, available, on order, and unit of measure.
- If you click the Additional Description button on the data entry grid, the Sales Item Additional Description screen displays that allows you to type in a 3200 character additional description for each line item in the data entry grid.
- If you click the Comments button on the data entry gird, a Line Comments screen displays that allows you to type in a 3200 character comment for each line in the data entry grid.
- If you click the Price Level button in the data entry grid, the Price Levels screen displays the price levels for the pricing method for the item being entered and allows you to select a different price level for the item.
- The Taxed check box allows you to indicate if a sales item is taxable or non-taxable on each line of the invoice. If an exemption id is required for this customer, it can be entered in Setup > Customers > Accounting in the Exemption Id box.
- A Notation can also be entered if you'd like to specify a description of what was purchased. If the sales item has an additional description, it will display in the Notation column. The Notation field is optional.
- If you click the Detail button in the data entry grid, you can enter additional details about the transaction, for example for some of the fields you chose not to display on the data entry grid such as associated account, notation, and
- To add up to eight custom fields you can define in File > Preferences > General > Custom Transaction Fields or a 3200 character comment for the invoice, click the Options button and select Custom Fields/Comments.
- If a Salesperson was selected on the Select tab, commission values are summed and displayed in a CommissionAmount box. If you want to override the calculated commission amounts, enter a new amount (the Override check box will automatically be selected and the commission from the lines are no longer totaled, displayed, and the changed value is not redistributed to the lines of the invoice).
- If applicable, enter Freight and Miscellaneous charges at the bottom of the screen. To specify management details to be posted for the freight or miscellaneous charges, for example profit center, location, project, etc. or a notation specific to these charges, click the Freight or Miscellaneous buttons and enter the information on the Details screen.
- The Sales Tax will be calculated automatically based on the Sales Tax selected.
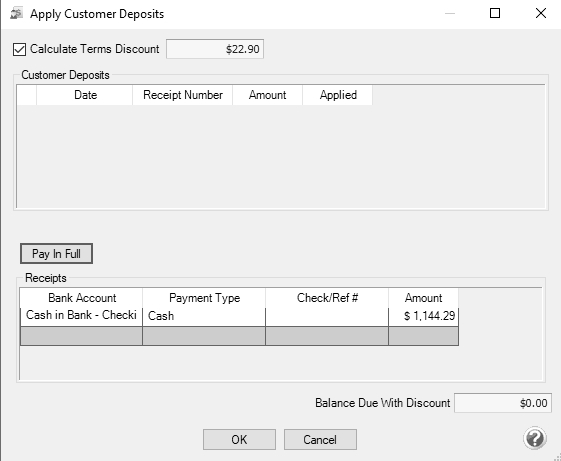
- Click the Amount Received button.
- Enter the amount the customer has paid on this invoice. This will automatically post the payment to your default Payment Type and Bank Account.
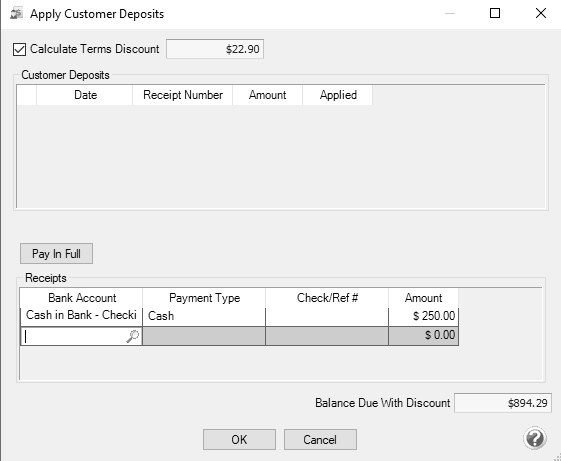
- If the payment should be posted to a different Payment Type or Bank Account (or posted to multiple payment Types and/or Bank Accounts)., enter the payments using different payment types or bank accounts, then click OK.

- If the invoice was paid in full, click the Pay in Full button.
- If you want to reorder the lines you entered on the transaction in a particular order, include the Line Sequence column in your data entry grid. Each line will automatically be assigned a line sequence number. The first line is assigned 10, the second 20, and so on. To reorder the lines, change the sequence number to the order in which you want the lines to print or display. For example, if you want the second line to print before the first line, change the line sequence to be 5, 6, 7, 8 or 9. To view the reordered lines, click Options, and then select Refresh.
- Verify the sale and payment information for accuracy and click Save to complete the transaction. The invoice and other selected form types selected in File > Preferences > Printing > Customer Invoices or Customer Invoices (Detail) will be printed if the Print button had a green check mark on it or e-mailed if the E-mail button had a green check mark on it.
Please refer to the Shortcuts/Time Savers in Transaction Entry document for tips on how to enter transactions efficiently and customize the screens.
|
Document: 3055 |
|---|