CenterPoint® Accounting
- Companies/Funds
Related Help
_24.jpg) Companies Video - Duration: 11 min 15 sec
Companies Video - Duration: 11 min 15 sec
Funds Video - Duration: 10 min 26 sec
 View or Print as PDF
A company/fund is a tax entity that has financial activity.Your operation may have more than one tax entity. Companies/Funds allow you to keep each tax entity's records separate, and at the same time share accounts and analyze the combined data. Companies/Funds must be in the same database to combine data. You can have many companies/funds in one database if they are part of the same operation. If you have more than one company/fund and they do not share the same type of business activities or accounts, or they do not wish to combine data for analysis, it is recommended that you create separate databases for each company/fund. You can have as many databases as needed. A company/fund stores individual account balances and maintains the active status of names, accounts, etc. A company/fund is required.
Should you create separate companies/funds or separate databases?
CenterPoint has the ability to maintain more than one company/fund in a database. The advantage that this gives you is the ability to produce reports for more than one company/fund combined. This is important when you have two companies/funds set up for tax purposes, but both are the same type of companies/funds and producing the same products. To see the overall profitability of raising/selling any one particular crop or type of livestock/license/inventory item , you would want to combine the detail from multiple companies/funds on one report. Multiple companies/funds within a database share Setup lists, therefore, the setup items created in one company/fund are available to the other companies/funds in that database. If you do not want to use that item in the other company/fund, it can, in most cases, be made inactive for that company/fund.
The following instructions can be found in this topic:
Create a New Company/Fund
Prerequisite
You must have a database created before you can add a company/fund. Select File > New > New Database Wizard to create a new database.
- On the Setup menu, click Company/Fund . Click New.
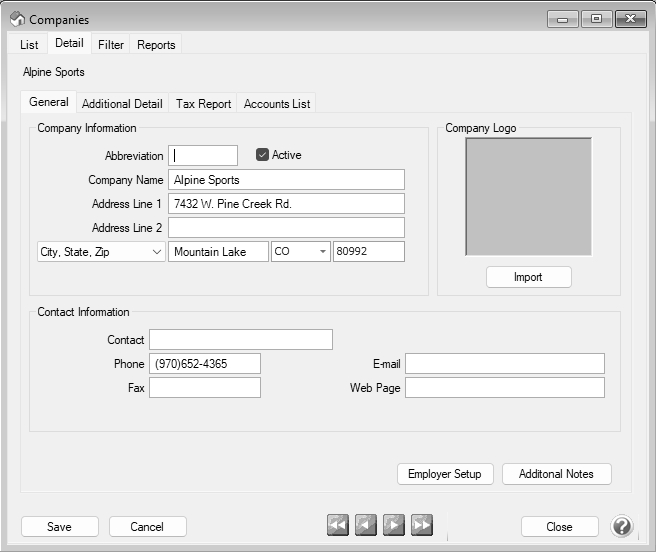
- On the General tab, in the Abbreviation box, enter up to ten characters of optional information that you can easily identify the company/fund by.
- In the Company/Fund Name box, enter up to 30 characters of required information that describes the company/fund.
- In the Address Line 1 and Address Line 2 boxes, enter the street address and any other information, for example, suite number or post office box number.
- The third address line has a format option preceding it. There are four options for the format of the third line of the address:
- City, State, and Zip Code (US Addresses).
- City, Province, Postal Code (Canadian Addresses).
- Address Line 3 (Free format line)
- Foreign City, Foreign State/Province, Foreign Postal Code, Country Code (Foreign Addresses).
Choose the correct format. If this is the format that you use most often, you can select it and then right-click on the field to make it the default format. The United States address format and the Canadian address format will perform a zip code or postal code lookup and fill in the city and state or province. Country Codes can be selected from a list when using Foreign Addresses.
- If your preferences are set to use the automatic Zip Code/Postal Code Lookup for addresses, in the Zip/Postal Code box enter the zip code or postal code. If a list displays, select the appropriate city/state or city/province from the list. If your preferences are not set to use the automatic Zip Code/Postal Code Lookup for addresses, enter the City/State/Zip, City/Province/Postal Code, Address 3, or Foreign Address information.
- In the Contact box, enter up to 30 characters of optional contact information for this company/fund.
- In the Phone and Fax boxes, enter up to 25 characters of optional phone/fax information for this company/fund.
- In the E-mail box, enter up to 30 characters of optional e-mail address information for this company/fund.
- In the Web Page box, enter up to 30 characters of optional Web (URL) address information for this company/fund.
- Under Company/Fund, click Import to locate an image file (.bmp, .gif, .jpg, .png, etc.) for use as your company/fund logo. When you select the image, it appears in the image preview box.
- To add notes to this company/fund, click Additional Notes, enter the notes, and then click OK.
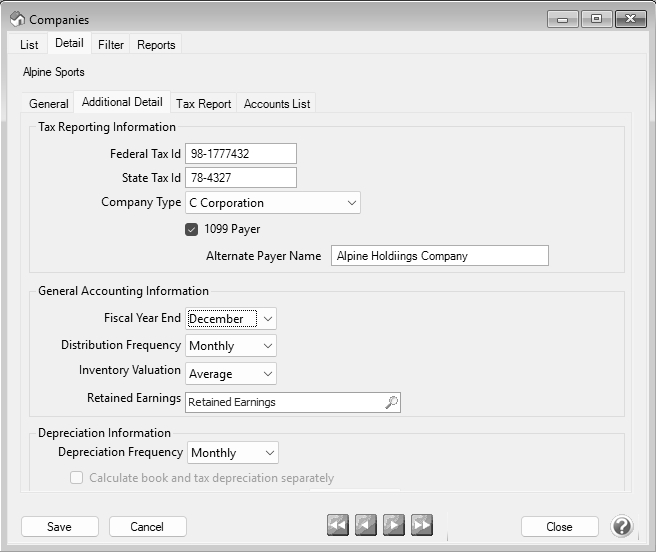
- Under Tax Reporting Information, in the Federal Tax Id box, enter up to 15 characters of optional federal tax identification information that will print on government reports in CenterPoint.
- In the State Tax Id box, enter up to 15 characters of optional tax state identification information that will print on government reports in CenterPoint.
- In the Company/Fund Type box, select a type, for example
- Select the 1099 Preparer check box to indicate that this company/fund should be used to pull the payer name for 1099 forms in Aatrix. This check box should be used if you run Federal/State Tax Forms for multiple companies/funds together as one entity.
- If you selected the 1099 Preparer check box, enter the Alternate Payer Name to use for the payer in 1099 forms in Aatrix. This is only used if the company/fund name is not the name you want to use on the form. For example, if you have several funds (General Fund, Park Fund, Street Fund) but the forms are filed as "Village of CenterPoint" or if you have several companies (Company 1, Company 2, and Company 3) but the forms are filed as Company 4.
- In the Fiscal Year End box, select the month your fiscal year ends. December will automatically display. Some of the reports in CenterPoint can be run on a fiscal year basis; selecting the fiscal year end will allow the system to calculate the fiscal year start. If you have the add-on Depreciation module installed and active, the depreciation schedules for all assets for the selected company/fund are recalculated as the schedules are based on the fiscal year.
- Specify the Distribution Frequency. Often, profit or production center details are unknown at the time a transaction is entered. These details can be assigned "later" to the appropriate profit, production center, or production center details. This option allows you to specify the frequency distributions can then be processed.
- In the Inventory Valuation Method box, select the method of purchased inventory reduction if you will be purchasing to resell merchandise or livestock. The methods are: First in First Out (FIFO), Last in First Out (LIFO), or Average Cost. Purchased inventory that is purchased for the purpose of resale and is not capitalized is recorded as an increase in an inventory at the time it is purchased. The expense for that inventory purchase does not get recorded for tax purposes until the item is sold. When the item is sold, CenterPoint determines how much expense to record based on the inventory valuation method listed here. An inventory can include many items purchased at several different intervals and for several different prices. Choosing FIFO, records an expense equal to the first item purchased is the first item expensed. Choosing LIFO will record an expense equal to the last item purchased first. Last, an Average method will take the average price of the inventory and multiple it by the quantity sold to come up with the expense amount.
- In the Retained Earnings Account box, select the account you want your retained earnings to post to (only accounts in the retained earnings account category will display in the Lookup list) for this company/fund, or type the retained earnings account. Typically, increases and decreases to this account should be equal to the differences between the revenue generated for a specified period and the expenses paid. This field is required in order for any transactions to be posted.
- Under Depreciation Information, in the Depreciation Frequency box, select how often you record depreciation transactions. The options are Monthly, Quarterly, or Annually. One feature of CenterPoint is the ability to have the system calculate a depreciation journal entry for you for each of your fixed assets. Selecting the frequency that you want those depreciation transactions recorded makes sure that the transactions are only recorded in valid periods and that they aren’t duplicated in any one period.
- If you own the Depreciation module, select the Calculate book and tax depreciation separately check box if you want the tax depreciation calculated annually on the fiscal year boundary and the book depreciation calculated on the frequency you selected in the Depreciation Frequency box.
-
In the Ending Book Depreciation box, select the month that ends this reporting cycle if the Depreciation Frequency you selected is Quarterly or Annually.
- Click the Tax Report tab. In the User Define Report Used for Tax Reporting box, click and select the report that you want to use for tax reporting for this company/fund, for example, 1040-Sched F/Schedule C/Six Month Published Report.
Note: In order for a transaction to affect cash basis tax information three things need to happen:
- The account needs to assigned to a line on the report.
- Transaction type for the transaction needs to be made a column on the report.
- The report line that included the account in the transaction needs to be checked in "Rows to Display in this Column" in the column that includes the transaction type.
The transaction activity that is to be considered cash basis tax will be included either on the Income Statement or the Balance Sheet based on whether the Row that the account is assigned to is marked as "Transactions in this row are taxable". Account activity on rows that are checked appear on the Income Statement. Account activity on rows that are not checked are posted to the Balance Sheet.
- Verify the Calculate Modified Cash Balances check box.
- If you are using modified cash balances, select the Beginning Period to start the calculation. All available periods since the start of the database will display in reverse chronological order. To change the order to chronological, right-click and select Sort Ascending.
- Click the Account List tab to display a list of all postable accounts for this company/fund. Active accounts display on the right side of the screen. To deactivate an account(s) for this company/fund, select the account(s) from the right side of the screen and move to the left side of the screen. When you activate/deactivate accounts from the Account List tab, they will also be changed in Setup > Accounts > Accounts accordingly and vice versa.
- Click Save to save the company/fund and return to the List tab, or click Close to save the company/fund and close the companies/funds screen.
Edit an Existing Company/Fund
- On the Setup menu, click Companies/Funds.
- Select the company/fund you want to change, and then click Edit. Note: If you change the information in the Name box, past company/fund information is automatically linked to the new name.
- The Company/Fund Detail General tab appears. Edit or view the company/fund detail.
- Click Save to save the company/fund and return to the List tab, or click Close to save the company/fund and close the companies/funds screen.
Combine Two Existing Companies/Funds
- On the Setup menu, click Companies/Funds. Highlight the company/fund to be combined into another company/fund and click Combine. Note: When the combine process is complete, this company/fund will be removed from the database.
- Within the Combine screen, select the company/fund to combine it into and click OK. Note: When the combine process is complete, the data for both companies/funds will be in this company/fund.
- A confirmation message will be displayed. Click Yes to combine the two companies/funds and return to the List tab. Click No to cancel the process.
Deactive/Activate a Company/Fund
- On the Setup menu, click Companies/Funds.
- Select a Company/Fund, right-click and select Activate or Deactivate. Note: A company/fund can also be activated/deactivated by selecting the company/fund and clicking Edit. Select or deselect the Active check box. Then click Save to save the company/fund and return to the List tab, or click Close to save the company/fund and close the companies/funds screen.
|
Document: 3269 |
|---|