CenterPoint Accounting
- Account Categories
Related Help
_24.jpg) Account Structure Video for CenterPoint Accounting for Agriculture- Duration: 12 min 43 sec
Account Structure Video for CenterPoint Accounting for Agriculture- Duration: 12 min 43 sec
Account Structure Video for CenterPoint Accounting - Duration: 12 min 43 sec
Account Structure Video for CenterPoint Fund Accounting- Duration: 13 min 56 sec
 View or Print as PDF for CenterPoint Accounting for Agriculture
View or Print as PDF for CenterPoint Accounting
View or Print as PDF for CenterPoint Fund Accounting
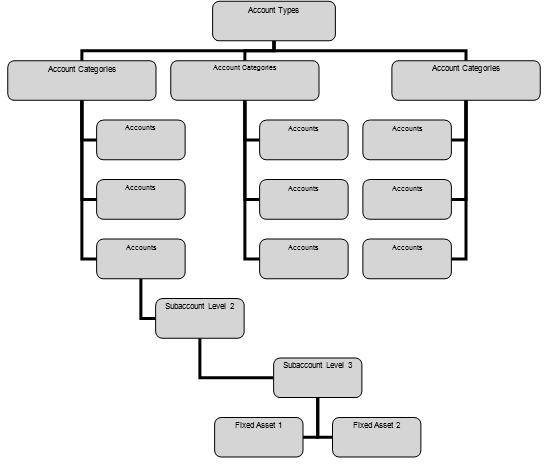
Each account is assigned an account type and account category. The account type is the highest level in the account hierarchy and its responsibility is to define if the account is an Asset, Liability, Expense, etc. The main list of accounts is grouped by account type. Under each account type are predefined account categories that describe the account type and maintains the properties of the account type. Each account in the Chart of Accounts must first fit into an account type level such as Assets, Liabilities, Equities, Revenue or Expenses and then into an account category.
You can access account categories from Setup > Accounts > Account Categories. Many of the CenterPoint reports are sorted by account category so that similar accounts report and are subtotaled together, for example accounts will print together for account categories Accounts Receivable, Land, Other Current Assets, Interest Income, Other Current Liabilities, etc.
An account can be a main (Level 1) account, a subaccount (Level 2), or subaccount (Level 3).
Subaccounts are used to summarize data at a higher level or get summary totals for groups of accounts on reports. Transaction activity is posted to the lowest level used on any account. If no subaccounts exist, the activity is posted to the account. If subaccounts do exist, the activity is posted to the subaccount.
For example:
Account Type: Expense Account Category: Fuel Expense Main Account: Gas and Diesel Level 2 Account: Diesel Level 3 Account: On Road Level 3 Account: Off Road
You would post transactions to On Road and Off Road, but the information can be summarized on reports to the Level 2 account, and even further to the Main account. In the above example, data may be summarized or totaled so that On Road and Off Road are found under Diesel and totaled there.
An additional level of accounts are items. Items are depreciable assets (fixed asset items) used for Fixed Asset accounts. Items do not display on a Balance Sheet in account level, but they are summarized on the Balance Sheet.
The following instructions can be found in this topic:
Create an Account Category:
- Select Setup > Accounts > Account Categories.
- Click New to start with a blank account category or select an existing account category that is similar to the one to be added and click Copy.
- Specify up to 52 characters in the Name field for this new account category.
- Specify the Sequence. The sequence is used to order the categories. Reports like Income Statements can be sorted by account category sequence.
- Specify an appropriate Type, Class and Subclass. These fields are used to specify where these accounts should be displayed on financial reports and filter accounts in various screens.
- Within the Balance Sheet Information area, this account category can be assigned to a Balance Sheet Group. Balance Sheet Groups are used for flexibility in designing financial statements and schedules. Balance Sheet Group names print on financial statements and are used in conjunction with account types and account categories to determine what financial information to print for the Balance Sheet Group.
- An Additional Note can be added to the account category by clicking on the Additional Notes button. This is allows you to further describe this account category. This field is optional.
-
Note: To add a time stamp to a note added or edited on the Additional Notes screen, click Stamp. If you are adding/editing a stamp in a database without security, the stamp will display "Edited on (current date and time)". If you are adding/editing a stamp in a database with security, the stamp will display "Edited by (username) on (current date and time)".
- If this account category is an Inventory category (purchased, finished goods, work in process, or lotted) or an Accounts Receivable or Payable category and you want to define sub-ledger detail, click the Balance Detail tab. This is only needed if you want to track the balance of these account categories by something other than account, company and date. On the Balance Detailtab, select the sub-ledger details you want to maintain by selecting the detail and then clicking to move the detail to the Selected Balance Detail Options list or drag-and-drop the detail to the Selected Balance Detail Options list. For example if you'd like to track inventory by profit center, then move Profit Center to the right side of the screen. A message will display at the top of the screen with a yellow background color: "Changing the items that account balances depend on requires that you repost all transactions to ensure that the balance detail reflects the transaction detail. Be sure to backup your data before reposting your data."
- Default templates will automatically be assigned on the Templates tab and we do not recommend they be changed. Templates control how all the pieces of a transaction are entered.
- Click Save to save the account category and return to the List tab, or click Close to save the account category and close the Account Categories screen.
Edit an Existing Account Category
- Select Setup > Accounts > Account Categories.
- Select the account category to be modified and click Edit.
- If this account category is an Inventory category (purchased, finished goods, work in process, or lotted) or an Accounts Receivable or Payable category and you want to define sub-ledger detail, click the Balance Detail tab. This is only needed if you want to track the balance of these account categories by something other than account, company and date. On the Balance Detail tab, select the sub-ledger details you want to maintain by selecting the detail and then clicking to move the detail to the Selected Balance Detail Options list or drag-and-drop the detail to the Selected Balance Detail Options list. For example if you'd like to track inventory by profit center, then move Profit Center to the right side of the screen.
- Default templates will automatically be assigned on the Templates tab and we do not recommend they be changed. Templates control how all the pieces of a transaction are entered.
- Make any needed changes, and then select Save to save the changes.
Delete an Account Category
- Select Setup > Accounts > Account Categories.
- Select the account category(s) you want to delete, and then click Delete.
- At the "Are you sure you want the item deleted?" message, click Yes.
Deactivate or Activate an Account Category
- On the Setup menu, point to Accounts, and then click Account Categories.
- Right-click on the appropriate account category and select Deactivate or Activate. Note: You can also select an active account category, click Edit and then clear the Active check box. Then click Save to save the account category.
|
Document: 3390 |
|---|