CenterPoint Accounting
- Network (Multi-User) Installation Instructions
| Document #: | 3013 | Product: | CenterPoint® |
|---|
This topic describes how to install CenterPoint in a network (multi-user) environment:
- Single User Network Installation - One user with the database on a server. You must purchase a network installation.
- Multi-User - Multiple users with the database on a server. You must purchase additional seats if multiple users are accessing the database on a server.
If you will only be using CenterPoint with your data on one computer, please refer to the Single User Installation Instructions document.
There are two steps to installing CenterPoint in a network environment:
Prerequisites
Complete the following setup on your network prior to installing CenterPoint. The prerequisites differ depending on the type of network being used. For assistance on any of the prerequisite steps, please contact your Network Administrator.
- Prerequisites for Peer-to-Peer (Workgroup) Networks (Windows Authentication):
- Server:
- All users setup on workstations that will access CenterPoint must also be setup on the server with the same username and password.
- Workstation(s):
- All user names must have Windows login passwords (must be the same as was setup on the server).
- All workstations must be joined to the same workgroup.
- Server:
- Prerequisites for Domain Networks:
- All workstations need to be a member of the Domain that the server is a part of.
- CenterPoint uses Microsoft SQL Server. For security and performance reasons, it is not recommended that Microsoft SQL Server be installed on a Domain Controller. For more information, please see the Frequently Asked Questions section of this document.
If you also purchased and will be installing CenterPoint Payroll, it should be installed after any CenterPoint Accounting programs.
Step A - Install at the Server:
- Close all other programs prior to starting the installation of CenterPoint.
Note: If you cannot download the CenterPointPayrollSetup.exe file and instead are using a CD, insert the CD and skip steps 2-6.
- From a web browser, enter www.redwingsoftware.com.
- From the Red Wing Software home page, in the upper-right corner, click Login, enter your Email Address and Password, and then click Login.
- If you have not previously registered on the Red Wing Software website, please see the Frequently Asked Questions section of this document for more information about registering on our website.
- If you do not recall your password for the Red Wing Software website, please see the Frequently Asked Questions section of this document for more information on retrieving a forgotten password.
- To download the CenterPoint program:
- From the My Member Account page, select the Downloads tab, locate your product and select Downloads,locate the download you need, and then click Download Now.
Or
- Select Menu, locate your product, select Downloads, locate the download you need, and then click Download Now.
- Wait while the program downloads. The file will automatically save to your Downloads folder.
- Select the CenterPoint##.exe file in your task bar or open the Downloads folder and then select the file to begin the installation. Wait while the contents of the setup package are verified.
- If you receive an Application Requirements screen, click Next to install the necessary requirements. Wait while the requirements are installed.
- If you are prompted to restart your computer, click OK. The computer will restart and the installation will automatically resume. This process may repeat depending on the number of requirements you need to install.
- On the Welcome screen, click Next to continue.
- On the License Agreement screen, select the I accept the terms of the license agreement check box, and then click Next to continue.
- On the Setup Type screen, select Complete, and then click Next to continue.
- By default, CenterPoint will install to C:\Program Files\Red Wing Software\CenterPoint. We recommend accepting the default. On the Destination Folder screen, click Next.
- On the Select Program Folder screen, you should generally accept the default program folder location by clicking Next.
- On the Completing screen, click Next to continue. Please wait while CenterPoint is installed.
- On the Completing screen, click Finish. If you are prompted to restart your computer, please do so at your earliest convenience.
- If you also purchased CenterPoint Payroll, follow steps 1-15 to install CenterPoint Payroll.
- Individual modules are configured separately after purchase and registration. See the How to Add a Module topic after CenterPoint is started if you have purchased the Accounts Receivable or Inventory modules. Select Help > CenterPoint Help > Installation and Registration > Add a Module to an Existing Database.
- In each firewall running on the server, exceptions must be configured to allow CenterPoint to run properly . In Windows 10, right-click on Start, select Apps & Features, and then in the upper left side of the screen, enter Windows Firewall or in Windows 7 & 8, select Control Panel > Windows Firewall. Select Advanced settings (menu on the left). > Inbound Rules (on the left again).
Port 1433 Exception:
- On the right, select New Rule. This will display a wizard that will walk you through the process.
- Select Port and then Next.
- Select TCP in the first section. Then select Specified local ports and enter 1433. Click Next.
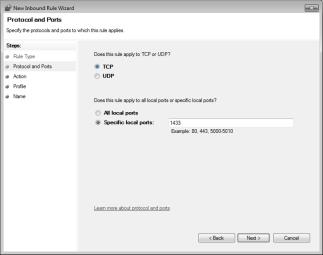
- Select Allow the Connections and click Next.
- In the When Does This Rule Apply screen, select all fields and click Next.
- In the Name field, enter Port 1433 Exception and click Finish.
SQLServr.exe Exception:
- In Windows 10, right-click on Start, select Apps & Features, and then in the upper left side of the screen, enter Windows Firewall or in Windows 7 & 8, select Control Panel > Windows Firewall. Select Advanced settings (menu on the left). > Inbound Rules (on the left again).
- On the right, select New Rule. This will display a wizard that will walk you through the process.
- Select Program and then Next.
- Select This Program Path.
- Using the Browse button, select the SQLServr.exe file and click Next. The location for SQLServr.exe will be in a path similar to this: C:\Program Files(x86)\Microsoft SQLServer\MSSQL10_50.RWS\MSSQL\Binn.
- Select Allow the Connection and click Next.
- In the When Does This Rule Apply screen, select all fields and click Next.
- In the Name field, enter SQLServr.exe Exception and click Finish.
SQLBrowser.exe Exception:
- In Windows 10, right-click on Start, select Apps & Features, and then in the upper left side of the screen, enter Windows Firewall or in Windows 7 & 8, select Control Panel > Windows Firewall. Select Advanced settings (menu on the left). > Inbound Rules (on the left again).
- On the right, select New Rule. This will display a wizard that will walk you through the process.
- Select Program and then Next.
- Select This Program Path.
- Using the Browse button, select the SQLBrowser.exe file and click Next. The location for SQLBrowser.exe will be in a path similar to this: C:\Program Files(x86)\Microsoft SQLServer\90\Shared.
- Select Allow the Connection and click Next.
- In the When Does This Rule Apply screen, select all fields and click Next.
- In the Name field, enter SQLBrowser.exe Exception and click Finish.
- Verify the following SQL protocols are enabled and that the browser is running:
- At the Server, click Start, select Microsoft SQL Server 20## or open Microsoft SQL Server 20##, and then select SQL Server 20## Configuration Manager.
- Under SQL Server Configuration Manager, select SQL Server Network Configuration (32bit), and then select Protocols for RWS.
- Verify that the Named Pipes and TCP/IP protocol status is Enabled.

- Under SQL Server Configuration Manager, select SQL Server Services.
- Verify that the SQL Server Browser state is Running.
![]()
- To start CenterPoint, double-click the CenterPoint icon on your desktop.
- On the Configuration Manager screen, review the selections and click OK.
- CenterPoint must be registered on the server. See the Frequently Asked Questions section for more information on registering
CenterPoint. - It is important that CenterPoint is operating properly at the server computer and all databases have been created, before setting up the client workstations; including transferring data from other Red Wing Software programs (Perception, AgCHEK, Champion Controller, etc), creating new databases, or attaching to existing databases.
Step B - Install at each Workstation that will be using CenterPoint:
- Follow steps 1-15 from the Server Installation section.
- To start CenterPoint, double-click the CenterPoint icon on your desktop.
- On the Configuration Manager screen, review the selections and click OK.
- CenterPoint must be registered at each workstation. See the Frequently Asked Questions section for more information on registering CenterPoint.
- Select File > Administration > Data Maintenance
- If you receive a message that the database is open, click Yes to close the database.
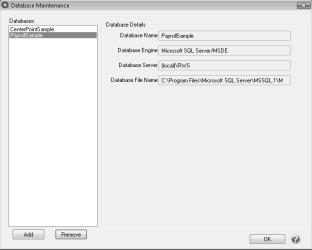
- On the Database Maintenance screen, click Add in the bottom left corner.
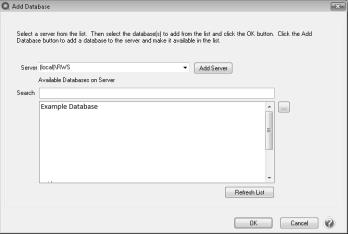
- On the Add Database screen, click Add Server.
- All available servers that you can connect to will display under the Available Server column. From the Available Server column, select the server that you want this workstation to connect to by moving it to the Selected Servers column. The selected server name should end with \RWS, for example FILESERV1\RWS.
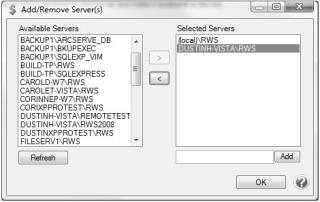
- On the Server Settings screen, in the Authentication box, by default we recommend you use Window Authentication. If you prefer you can select SQL Authentication. If you select SQL Authentication, please contact Technical Support for more information.
- Click OK.
- On the Add/Remove Server(s) screen, click OK.
- On the Add Database screen, click on the drop-down box in the Server field. Choose the server that was added in step d.
- All databases available on that server will then be listed in the Available Databases on Server box. Either select the database to attach to or in the Search box, enter the first few characters of the database name until CenterPoint locates the database you want to attach to. Multiple databases can be selected by holding down the Ctrl key on the keyboard while clicking on the databases.
- Click OK.
- Select File > Open. Select the database that you want to open. Click Open.
Frequently Asked Questions:
Q: I have not previously registered on the Red Wing Software website, how do I register?
A: To register on the Red Wing Software website:
- Click Register.
- In the Account Number box, enter your company Account Number. Your Account Number can be located in a few different places:
- On the Support Certificate that you receive upon renewing or purchasing Customer Care Membership.
- Red Wing Software sends customers a renewal form for Customer Care Membership. This renewal form contains your account number.
- Invoices you’ve received from Red Wing Software contain your account number.
- If others at your company have already registered, they can sign in to their account and find your company’s account number at www.redwingsoftware.com/home/myaccount.
- Contact Red Wing Software at 800-732-9464.
- Continue entering your Title, First and Last Name, Email Address (which is your login) and a Password.
- Enter the displayed Security Verification code, and then click Submit.
Q: I do not recall what my password is for the Red Wing Software website, how do I retrieve my password?
A: To Retrieve a Forgotten Password:
- From a web browser, enter www.redwingsoftware.com.
- From the Red Wing Software home page, in the upper-right corner, click Login.
- Click the
link.
- Enter/verify your Email Address.
- Enter the Security Verification code, and then click Send. Click Close.
- Wait until you receive an email that includes instructions to reset your password.
- Click the link in the email that you received from Red Wing Software.
- Enter the Validation Code which was included in the email. If you enter the code and it is not recognized, copy and paste the code from the email. The Validation Code expires in 24 hours.
- Enter a New Password and then Re-enter the New Password.
- Click Submit.
- Click OK.
Q: The software installed without any errors, but the software won't open? Or I received an error during installation and it stopped the installation of the software.
A: Make sure that all anti-virus, firewall, and any other security software are shut down prior to installing CenterPoint. If any of these software applications are running, the installation may be interrupted and will cause the installation to fail.
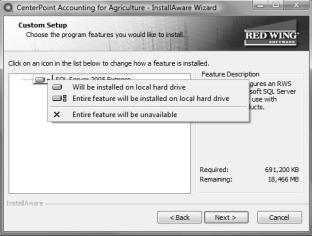
Q: Can I install CenterPoint without installing SQL Server Express on my workstations?
A: Yes. In some network environments you may want to install CenterPoint without installing SQL Server Express. During the installation of CenterPoint, on the Setup Type screen, select Custom, click Next,
On the Custom Setup screen, click the down arrow next to SQL Server Express and select Entire feature will be unavailable.
Q: When I restarted my computer, I received a message that said, "Windows has blocked some startup programs." What does that mean?
A: If you use Microsoft Windows 7 and if your computer requires a restart, you will receive a Windows has blocked some startup programs message in the lower-right portion of your screen. Click on the message, select Run blocked program, and then select CenterPoint Installation.
Q: When I was trying to add my server in the Database Maintenance screen (step 5 in the workstation installation instructions), my server was not listed. Why is that and how can I get it in the list?
A: Normally this happens if exceptions (Step 14 of the Server Installation instructions) were not setup or were not setup properly. Once the exceptions are completed properly, the server should be in the list. If it is still not available in the list, type in the server machine's IP address to add the machine to the Selected Servers list manually. Enter the address in the box next to the Add button with "\RWS" in the Add/Remove Server(s) screen (for example, 192.168.1.100\RWS), and then click Add.
Q: I received the following message when I tried connecting to a server in the Database Maintenance screen, "Failed to retrieve database for server XXX when trying to add a server in data maintenance. You may not have permissions for that SQL Server when connecting to a network database."
A: First, try a simple shutdown and restart of the server and the workstation. If that does not resolve the problem, then ask your Network Administrator to repeat each of the prerequisite steps. Normally this error is displayed if one or more of the prerequisites noted at the beginning of this document were not completed or not completed properly.
Q: Do I need to do anything different during the installation if I will be installing CenterPoint on a Terminal Services server?
A: Yes. Prior to Step 1 of the installation instructions, do the following:
- Click on Start and then click Run.
- In the Open box, type cmd and then click OK.
- At the command prompt, type changeuser /install, and then press Enter. The "User session is ready to install applications" message displays.
- Type exit and press Enter.
After installing CenterPoint on the server and prior to opening CenterPoint, do the following:
- Click on Start and then click Run.
- In the Open box, type cmd and then click OK.
- At the command prompt, type changeuser /execute, and then press Enter. The "User session is ready to execute applications" message displays.
- Type exit and press Enter.
Q: How do I register CenterPoint?
A: When CenterPoint is first installed and again when a major release is installed, you will be prompted to register the software. The Registration instructions can also be found from within CenterPoint by selecting Help > CenterPoint Help > Installation & Registration > Register CenterPoint.
Q: How do I register the Federal/State Tax Forms (Aatrix)?
A: Federal/State Tax Forms (Aatrix) is used to produce 1099s, W-2s, and other tax forms. If you will be processing tax forms, then Federal/State Tax Forms (Aatrix) will need to be registered. The Registration instructions can also be found from within CenterPoint by selecting Help > CenterPoint Help > Installation and Registration > Register Federal State Tax Forms (Aatrix).
Q: How do I get updates for CenterPoint?
A: New releases of the program are available for download from our website and can be accessed from the CenterPoint program. You must own a Red Wing Software Customer Care Membership to download program updates and be connected to the internet to check for updates.
- Select Help > Online Updates > Check for CenterPoint Updates. Your version of CenterPoint and all add-ons are compared to the current versions available on the Red Wing Software website.
- If an update is needed on your machine, the Online Updates screen will be displayed with the Last Update Check date.. The updates available for your Red Wing Software products will be displayed.
- Click Install Updates.
- When the download and installation are complete, click Launch CenterPoint.
If you prefer, you can setup a Preference that will customize the software so you are notified automatically that updates are available.
To set the preference:
- In CenterPoint, select File > Preferences.
- Select General > Online Update Settings.
- In the Check for Updates Location, choose Internet.
- Select personalized options for the remaining fields in the Online Update Settings screen.
Q: How can I get updates for CenterPoint Federal/State Tax Forms (not used with CenterPoint Depreciation)?
A: If you have an internet connection, you can check for updates on a regular basis by following the steps below. If you do not have an internet connection, Red Wing Software will mail you a quarterly Aatrix Tax Forms update CD, at your request, for an additional fee. Note: If an update is available when you print a federal/state tax form, a message will display.
- Select Help > Online Updates > Check for Fed/State Tax Forms Updates.
- Wait while the Updater starts and checks for the latest versions of the Federal/State Tax Forms (Aatrix).
- If you need to update your system with the latest forms or reports, you will be notified and .you can decide if you want to Automatically Update, Download the Update to manually download an update from any computer with an internet connection, Continue Expired, or Cancel without updating Federal/State Tax Forms.
- A list of necessary updates will display if you chose to update Federal/State Tax Forms.
- Click Next to update your system.
- When your system is updated with the most current forms and reports, the Update Complete screen will display, click Close.
Q: What are the minimum roles needed by CenterPoint for Microsoft SQL Server?
A: A verification is performed for the person using the database to determine if they have appropriate privileges to run the following tasks: opening or creating a database, attaching, removing or detaching a database to/from the SQL Server, and backing up or restoring a database. The following actions require the specified roles:
- Opening a Database:
- Required Permissions: SELECT, INSERT, UPDATE and DELETE.
- Suggested Minimum Roles: db_datareader, db_datawriter.
- Creating a New Database:
- Required Permissions: CREATE ANY DATABASE.
- Suggested Minimum Roles: db_creator.
- Attaching a Database:
- Required Permissions: CREATE ANY DATABASE.
- Suggested Minimum Roles: db_creator
- Backing up a Database:
- Required Permissions: BACKUP DATABASE, CONTROL.
- Suggested Minimum Roles: db_owner.
- Restoring a Database Backup:
- Required Permissions: CREATE ANY DATABASE.
- Suggested Minimum Roles: db_creator.
- Detaching/Deleting a Database:
- Required Permissions: CONTROL SERVER.
- Suggested Minimum Roles: sysadmin.
Q: Can CenterPoint be installed on a Domain Controller?
A: For security and performance reasons, it is NOT recommended that you install SQL Server on a domain controller. Domain controllers are primarily used for authentication purposes and do not support local users which SQL Server relies on. There are security restrictions when running SQL Server on a domain controller and it opens up some potential security risks that we believe should not be taken. Also, the domain controller tasks may result in decreased SQL Server performance.
Another concern is that SQL Server is not supported on a read-only domain controller. Setup will usually fail and even if you find a way to work around the problem with setup, SQL Server is not supported on a read-only domain controller.
There are two options that would allow you to use your domain controller:
- Separate your domain controller hardware from your application software hardware.
- Setup a virtual machine on the domain controller and use that for your SQL Server installation.
If you decide to use any of the options discussed above, you will need to have your network technician make the necessary changes or setup the virtual machine. Red Wing Software will not assist in the installation and configuration of SQL Server on a Domain Controller.
For more information, please refer to the following articles from Microsoft:
- Hardware and Software Requirements for Installing SQL Server 2012 (this applies to 2008 and 2014 as well) - http://msdn.microsoft.com/en-us/library/ms143506.aspx
- You may encounter problems when installing SQL Server on a domain controller - http://support.microsoft.com/kb/2032911