***See centerpoint-data-browser.htm instead.
CenterPoint Accounting
- CenterPoint Data Browser
Related Help

Important Note
The CenterPoint Data Browser is a free tool for use with CenterPoint. The Data Browser is not supported as part of the base Customer Care Membership beyond this document. Development support is available from Red Wing Software at $275 per hour.
The CenterPoint Data Browser allows third parties to access CenterPoint data programmatically via the same functionality used by CenterPoint to gather data for reports.
There are two ways to gather data. The first is to access the classes and methods available in the CenterPointDataBrowser.dll directly. This method is best suited to programmers with .NET experience and are able to program in Visual Studio. The second method is to run CenterPointDataBrowserConsole.exe which gathers the data and saves it to an XML file. This method was developed for programmers who are able to do file I/O and do not want or are unable to access .NET classes and methods directly. In addition, there is a tool, CenterPointDataBrowserUI.exe, to help with development.
This document includes the following information:
Installing the CenterPoint Data Browser
Using the CenterPoint Data Browser User Interface
Prerequisites
- A CenterPoint application needs to be installed on the same computer as the CenterPoint Data Browser. The CenterPoint Data Browser uses code and DLLs from the CenterPoint product.
- The CenterPoint Data Browser should be installed to the same directory as the CenterPoint application. By default, CenterPoint installs to the following directory: C:\Program Files (x86)\Red Wing Software\CenterPoint or C:\Program Files\Red Wing Software\CenterPoint.
- The computer that the CenterPoint Data Browser is installed on needs to have access to the SQL database you will be working with. The CenterPoint Data Browser can be installed on the same computer that stores the SQL data, but also can be installed at any computer that has access to the data.
- For assistance with the CenterPoint Data Browser, contact Red Wing Technical Support at 1-800-732-9464.
Installing the CenterPoint Data Browser:
- Download your CenterPoint products from www.redwingsoftware.com. Click here to view single user download instructions. If you are unable to download CenterPoint, please contact our Technical Support Department.
- Close all other programs prior to starting the installation of the CenterPoint Data Browser.
- Start the CenterPoint installation.
- Continue through the installation screens until the Setup Type screen displays. Select Custom, and then click Next.
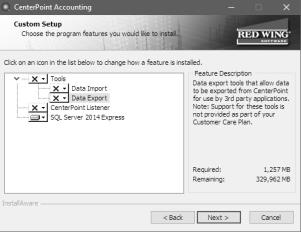
- Select Data Export, select Entire feature will be installed on local hard drive, and then click Next until the installation begins.
- Click Finish.
- From your Start menu, locate and start the CenterPoint Data Browser.
Using the CenterPoint Data Browser User Interface:
The CenterPoint Data Browser user interface allows you to look up information necessary to gather CenterPoint data, perform basic demonstrations and tests, generate code for accessing methods and classes directly, and generate a settings file used by the CenterPointDataBrowserConsole.exe.
The information you must know to gather CenterPoint data are the database name you want to retrieve the data from, the unique identifier of the report (the Report Key) which gathers the particular data in which you are interested, the Output type, and whether you want to Output Raw Data..
Optionally, you may want to filter the report data. This tool can be used to look up a particular filter’s key and type so that you can filter by it.
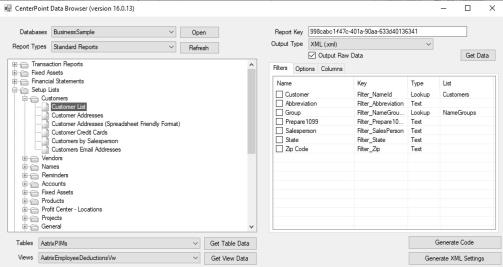
Illustration 1 - CenterPoint Data Browser User Interface
Field Names and Definitions
Table 2 describes the fields in Illustration 1 - CenterPoint Data Browser User Interface and provides definitions for each field.
| Field Name | Field Definition |
|---|---|
| Databases | This shows a list of databases accessible via CenterPoint |
| Report Types | There are two types of reports shown by this tool, the reports you see in CenterPoint when you first install (Standard Reports) and those, if any, that you modify and save as “favorites.” |
| Report Key | This uniquely identifies a report so you can access its data. |
|
Get Data Button
|
Clicking this gathers the data for the selected report and displays it. This is used for demonstration and test purposes. |
| Output Type | Select the output type: XML (.xml), Comma-Separated (.csv), or Tab-Separated (.tsv). |
| Output Raw Data |
Select this check box to export all data associated with a report or .leave the check box unselected to limit the output to the columns/groups selected on the report in CenterPoint. |
| Report Tree | The reports are presented exactly like they are in CenterPoint in the report tree. When you select a report in the report tree, the right side shows all the filters, options, and columns available for that particular report. |
| Filters, Options, and Columns tabs |
When a report is selected in the report tree, the associated information will display on these tabs. The check boxes on the Filters and Options tabs tell the code and XML settings generation to insert placeholders for setting the selected filters. |
| Get Table Data / Get View Data Buttons | In addition to gathering report data, data can also be gathered directly from CenterPoint tables and views. This data can be gathered programmatically if you know the name of the table or view. Those names are shown in the combo boxes to the left of the buttons. The buttons are used to test and demonstrate this functionality. |
| Generate Code Button | This generates code to retrieve data from the selected database for the selected report with placeholders for setting any selected filters. |
| Generate XML Settings Button | This generates the XML instructions used when data is gathered by CenterPointDataBrowserConsole.exe. |
API Walk-Through
Goal: Gather data behind the Customer List report, filtering by the Customer State. This walk-through requires knowledge of Visual Studio.
Step 1: Retrieve the Unique Key of the Customer List and the Customer State Filter
- Start the CenterPoint Data Browser user interface (CenterPointDataBrowserUI.exe).
- In the Databases field, select a database. In Illustration 2, the CenterPointSample database was selected which is a CenterPoint Accounting for Agriculture (Ag) database. If you have CenterPoint Accounting (Business) installed, then select BusinessSample.
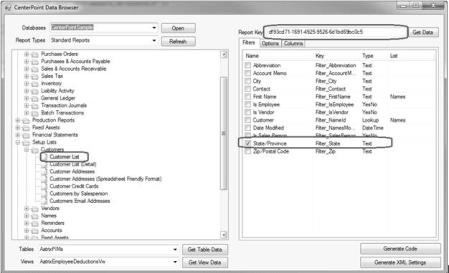
Illustration 2 - CenterPoint Data Browser Example
- In the Report Tree (on the left side of the screen), select Setup Lists > Customers > Customer, and in the Filters tab (on the right side of the screen), select the State/Province filter.
- In the example shown in Illustration 2, the Report Key for the Customer List is “df93cd71-1691-4925-9526-6d1bd69bc0c5” and the key of the filter (shown in the Key column on the Filters tab) on the customer’s State/Province is “Filter_State.”
Step 2: Generate the Code
- Click the Generate Code button to generate the code.
- Copy the Generated Code to the clipboard.
Generated Code:
using System;
using System.Collections.Generic;
using System.Data;
using System.Linq;
using System.Text;
using System.Threading.Tasks;
using CenterPointDataBrowser;
namespace CenterPointDataBrowser
{
public class ReportDataExample
{
public DataSet GetReportData()
{
string databaseName = "CenterPointSample";
string reportKey = "df93cd71-1691-4925-9526-6d1bd69bc0c5";
// Initialize the API
DataAccessAPI api = new DataAccessAPI();
// Open the database
api.OpenDatabase(databaseName); // there is an over-loaded method if you need to supply a user/name password
// Retrieve the report
Report report = api.GetReport(reportKey);
// Uncomment the following line of code line if you do not want any filters outside of your code
// If commented out, then the filters set in CP are applied.
// report.ClearFilters();
// Set filters (optional)
report.SetFilterYesNo(Filter_SalesPerson, true);
// Uncomment the following line of code line if you do not want any options
// If commented out, then the options set in CP are used
// report.ClearOptions();
// Set options (optional)
// Close the database Return the report's data
DataSet ds = report.GetReportData();
api.CloseDatabase();
return ds;
}
}
}
Step 3: Create a New Console Application Project in Visual Studio
- Set a reference to CenterPointDataBrowser.DLL. The DLL should be in the Reflected DLLs folder in the CenterPoint installation folder (Program Files/Red Wing Software/CenterPoint/ReflectedDLLs). On the reference’s properties set Copy Local to False.
- Add a new class to the project and paste the code generated in Step 2 into it. The class name can be user-defined, in the Generated Code from Step 2 the user-defined name is ReportDataExample.cs.
- Right-click on the project, select Properties, and under Build, set the Output Path to the CenterPoint installation folder.
Step 4: Modify the ReportDataExampleClass
- Change the name of the method GetReportData to GetCustomerListData.
- Make the GetCustomerListData method static and add a parameter for the state abbreviation.
Original Method :
public DataSet GetReportData()
Method After Changes
public static DataSet GetCustomerListData(string stateAbbreviation)
- Go to the line of code where the state filter and modify it so that the filter limits the data to the string parameter, stateAbbreviation.
Original Code:
report.SetFilterText("Filter_State", TextOperators.Contains, "the");
Modified Code:
report.SetFilterText("Filter_State", TextOperators.Equals, stateAbbreviation);
Step 5: Modify the Main Method in Program.cs
- Add "using” statements for System.Data and CenterPointDataBrowser.
- Call the static method GetCustomerListData with the state abbreviation set to MN to retrieve the data for all customers with a Minnesota address.
- Output the customer name and city to the standard output stream. If you go to the Columns tab in the CenterPoint Data Browser User Interface you can match the name of a column in a CenterPoint report (Name) to the name of the column in the raw data (Column). The raw data may contain columns that cannot be selected on a CenterPoint report (such as IDs.) The only documentation for what those columns contain is the name of the column. In the raw data, if you want to display data for the columns showing as “Customer Name (Last, First)” and “City” in CenterPoint look in the CenterPoint Data Browser User Interface to see that the column associated with “Customer Name (Last, First)” is “Customer” and “City” is “City.”
The code should display as follows:
static void Main(string[] args)
{
// While each report generates a DataSet, the DataSet will
// only contain one table.
DataSet ds = ReportDataExample.GetCustomerListData("MN");
// Sorting by City and customer name
List<DataRow> rows = ds.Tables[0].Select("", "City, Customer").ToList();
// Output the city and customer to the standard output window
foreach (DataRow row in rows)
Console.WriteLine("{0}: {1}", row["City"], row["Customer"]);
// Wait for key press
Console.ReadKey();
}
Step 6: Run the code. If you opened “CenterPointSample”, you should see several lines of output. In BusinessSample, there is only one customer with a Minnesota address.
Using the Console Application
The CenterPoint Data Browser Console Application (CenterPointDataBrowserConsole.exe) gathers the data and saves it to an XML file. This method was developed for users who do not want or are unable to access .NET classes and methods directly.
The CenterPoint Data Browser Console Application is run from the command line and it takes a single argument, the name of an XML file that contains run-time settings.
Console Application Walk-Through
Goal: Gather data behind the Customer List report, filtering by the customer state. This walk-through requires no knowledge of Visual Studio, and instead will gather the data and save it to an XML file.
Step 1: Retrieve the Unique Key and Filter
- Retrieve the unique key of the Customer List and the Customer State filter. You can do this by running the CenterPoint Data Browser User Interface (CenterPointDataBrowserUI.exe).
- In the Databases field, select a database. In Illustration 2, the CenterPointSample database was selected which is a CenterPoint Accounting for Agriculture (Ag) database. If you have CenterPoint Accounting (Business) installed, then select BusinessSample.
- In the Report Tree (on the left side of the screen), select Setup Lists > Customers > Customer, and in the Filters tab (on the right side of the screen), select the State/Province filter.
- In the example shown in Illustration 3, the Report Key for the Customer List is “df93cd71-1691-4925-9526-6d1bd69bc0c5” and the key of the filter (shown in the Key column on the Filters tab) on the customer’s State/Province is “Filter_State.”
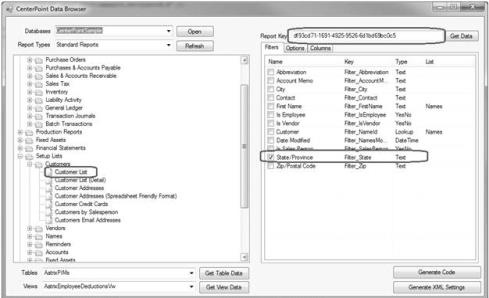
Illustration 3 - CenterPoint Data Browser User Interface
Step 2: Generate the XML File
Click the Generate XML Settings button and save the xml into a file. The full-name of this file is used later as a command line argument for the executable.
Generated XML File
<Settings>
<Database>CenterPointSample</Database>
<ReportKey>df93cd71-1691-4925-9526-6d1bd69bc0c5</ReportKey>
<OutputFile>C:\test.xml</OutputFile>
<ClearFilters>false</ClearFilters>
<Filters>
<Filter>
<Key>Filter_State</Key>
<Type>Text</Type>
<TextOperator>BeginsWith</TextOperator>
<SearchText>the</SearchText>
</Filter>
</Filters>
</Settings>
Step 3: Modify the XML from Step 2
- Change OutputFile. This is where the report’s data is saved in XML format.
- Change TextOperator from BeginsWIth to Equals,
- Change SearchText from “the” to “MN”
- Save the file.
Step 4: Run the Executable
- From the Command Line, run the executable in the CenterPoint installation folder with the filename you saved in Step 3 as the parameter. Example: CenterPointDataBrowserConsole.exe d:\testdata\testsettings.xml. The report data is saved in the file specified in the settings file and is in XML format. For this the example, the XML contains a node for each customer’s data. For example:
<ReportDataSet>
<NameId>2147468067</NameId>
<Abbreviation>A1 </Abbreviation>
<Customer>A1 Transport Company</Customer>
<LastName>A1 Transport Company</LastName>
<FirstName />
<MiddleInitial xml:space="preserve"> </MiddleInitial>
<FeinSsno />
<StateIdNumber xml:space="preserve"> </StateIdNumber>
<TaxExemptCode xml:space="preserve"> </TaxExemptCode>
<Prepare1099>N</Prepare1099>
<IsCustomer>Y</IsCustomer>
<IsVendor>Yes</IsVendor>
<SalesPerson>No</SalesPerson>
<IsEmployee>No</IsEmployee>
<AccountMemo>www.wemovit.com</AccountMemo>
<LocationName>Business Address</LocationName>
<Contact>Jesse Granbe</Contact>
<Address1>3899 Oak Ridge Drive</Address1>
<Address2 />
<Address3>Rush City, MN 55069</Address3>
<City>Rush City</City>
<State>MN</State>
<Zip>55069 </Zip>
<FirstLast>A1 Transport Company</FirstLast>
<NameLocationId>2147469475</NameLocationId>
<TradeDiscount>0.00</TradeDiscount>
<CreditLimit>0.00</CreditLimit>
<IsCreditHold>No</IsCreditHold>
<IsSubjectToSalesTax>Yes</IsSubjectToSalesTax>
<ExemptionNumber xml:space="preserve"> </ExemptionNumber>
<CustomerSince>2017-07-05T08:15:20-04:00</CustomerSince>
<BillingStatementType>Balance Forward</BillingStatementType>
<StatementType>0</StatementType>
</ReportDataSet>
Programmers Reference
There are two main classes in the CenterPoint Data Browser API; DataAccessAPI for accessing a CenterPoint database and Report for accessing CenterPoint report information, including report data.
Namspace: CenterPointDataBrowser
Assembly: CenterPointDataBrowser
| Methods | Definition |
|---|---|
| CloseDatabase() | Close the currently opened CenterPoint database. |
| GetDatabaseList() | Returns a list of database names. |
| GetReport(string reportKey) | Returns the CenterPointDataBrowser.Report object specified by the reportKey parameter. |
|
GetDataTable(string tableOrViewName)
|
Returns a System.Data.DataTable holding the data from the CenterPoint table or view identified by the tableOrViewName parameter from the currently open CenterPoint database. |
| GetTableList() | Returns a list of table names from the currently open CenterPoint database. |
| GetTViewList() | Returns a list of view names from the currently open CenterPoint database. |
| OutputReportDataUsingSettings | This is used by the console application and is designed for internal use. |
| OpenDatabase(string databaseName) | Opens the CenterPoint database indicated by the databaseName parameter. |
| OpenDatabase(string databaseName, string userName, string password) | Attempts to open the CenterPoint database indicated by the databaseName parameter using the specified username and password. |
Namspace: CenterPointDataBrowser
Assembly: CenterPointDataBrowser
| Methods | Definition |
|---|---|
| ClearFilters() | Clears all saved filters from the specified report. |
| GetReportData() | Returns the report data as a System.DataSet with one DataTable. |
| About the SetFilter Methods: These methods restrict the data returned by the GetReportData method. In all cases, filterKey identifies a filter that can be applied to the current CenterPoint report. Each filter has a Type which can be seen in the SDK’s UI. The method used to set a particular report depends on the filter type. For example if we had a filter assigned the type “Color”, the method to set that filter would be SetFilterColor. Filters are associated with a column in the report’s data. When you set a filter, you are restricting the rows returned by GetReportData to those that satisfy the criteria in the SetFilter’s parameter list. | |
|
SetFilterCompany(string filterKey, List<int> values)
|
Restricts data to those rows associated with one of the company IDs specified in the values parameter. |
| SetFilterDateTime(string filterKey, DateTime fromDate, DateTime toDate) | Restricts data to those rows where a particular date falls between fromDate and toDate. |
| SetFilterLookup(string filterKey, List<int> values) | Restricts data to those rows associated with one of the IDs specified in the values parameter. |
| SetFilterNumeric(string filterKey, NumericOperator numericOperator, decimal searchNumber) | Restricts the data based on the given operator and numeric value. |
| SetFilterPeriodRange(string filterKey, int fromPeriodId, int toPeriodId) | Restricts date to those rows where the period column associated with filter falls between fromPeriodId and toPeriodId. Note: You can call DataAccessAPI.GetDataTable(“OpenPeriods”) to see what periods exist in the CenterPoint database. |
| SetFilterText(string filterKey, TextOperator textOperator, string searchText) | Restricts the data based on the given operator and numeric value. |
| SetFilterYesNo(string filterKey, bool searchForYes) | Restricts the data to those rows where the a yes/no value is either a yes or a no. |
| NumericOperators | LessThan, LessThanOrEqual, GreaterThan, GreaterThanOrEqual, EqualTo, NotEqualTo |
| TextOperators: | BeginsWith, EndsWith, Contains, Equals, NotEquals |
| public void ClearOptions() | Clears any options saved in CenterPoint. |
| public void SetOptionBlockYN( string optionKey, bool showBlock ) | Sets where a block's data is included. |
| public void SetOptionDate( string optionKey, DateTime date ) | Sets the value of date option. |
| public void SetOptionDropList( string optionKey, string value ) | Sets the value of an option having a list of of valid options. |
| public void SetOptionNumeric( string optionKey, decimal value ) | Sets the value of a numeric option. |
| public void SetOptionText( string optionKey, string value ) | Sets the value of an option taking a text value. |
| public void SetOptionTextbox( string optionKey, string value ) | Sets the value of an option taking a text value, restricted to one line of text. |
|
Document: 3283 |
|---|