CenterPoint Payroll
- Maintain Employers
| Document #: | 3098 | Product: | CenterPoint Payroll |
|---|
An employer can represent:
- A company in a CenterPoint Payroll database that processes its own payroll and issues its own payroll reports to tax entities and other parties. While CenterPoint Payroll allows you to create multiple companies for a single employer, it is much more common for each company to be a separate employer.
- Several companies in a CenterPoint Payroll database that process payroll, but are part of the same payroll reporting entity. Payroll information is accumulated at the employer level. For example, an employee working in two different companies with the same database can receive one W-2.
Applicable taxes, earnings, deductions, etc. are added to an employer and can be used to process payrolls for that employer. The active status of employees, taxes, earnings, deductions, etc. is maintained by employer.
Tabs General Company Taxes Earnings Deduction & Benefits Leave
This topic includes instructions on how to:
Create an Employer
If you are transferring payroll information from Perception Payroll or Red Wing Payroll to CenterPoint, an employer will be created automatically.
If you are creating a new database, we suggest you use the Payroll Setup Wizard to create your employer. Please see the topic Using the Payroll Setup WizardUsing the Payroll Setup Wizard. You will be prompted to use the Payroll Setup Wizard when you select a payroll item and no employer exists yet.
If you desire, you can create an employer without using the wizard.
- Select Setup > Payroll Details > Employers. Click New.
- At the "Do you want to use the CenterPoint Payroll Setup Wizard to add an employer?" message, click No.
- Add your employer information to each tab
Edit/Change an Employer
- Select Setup > Payroll Details > Employers.
- Highlight the employer you want to change and click Edit.
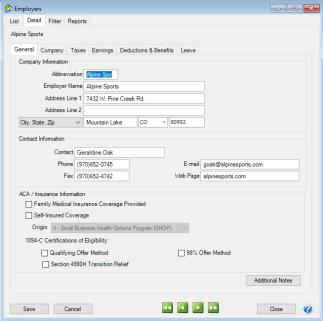
- The General tab contains your company and contact information. Add or change any information as needed.
- Under ACA/Insurance Information, select the Family Medical Insurance Provided checkbox if family medical insurance is provided by the employer.
- This step should only be completed if you are self-insuring your employees with your own health insurance and not insuring your employees through an insurance company. If you do not self-insure your employees, skip to Step 6. Under ACA information, on the bottom of the General tab, select the Self-Insured Coverage check box. When this check box is selected, the Part III Employer Provided Self-Insured check box will be marked on the 1095-C Transmittal form.
- If you selected the Self-Insured Coverage check box, in the Origin box, select the code that will display for the Origin on the 1095-B. The options are:
A - Small Business Health Options Program (SHOP).
B - Employer-sponsored coverage.
C - Government-sponsored program.
D - Individual market insurance.
E - Multi-employer plan.
F - Other designated minimum essential coverage.
G -Individual Coverage HRA (Health Reimbursement Arrangement)
- Under 1094-C Certifications of Eligibility, select the appropriate boxes:
- Qualifying Offer Method - Check this box if the employer is eligible to use and is using the Qualifying Offer Method to report the information on Form 1095-C for one or more full-time employees. To be eligible to use the Qualifying Offer Method for reporting, the employer must certify that it made a Qualifying Offer to one or more of its full-time employees for all months during the year in which the employee was a full-time employee for whom an employer shared responsibility payment could apply.
- Section 4980H Transition Relief - Check this box if the employer is eligible for section 4980H Transition Relief under either:
- 2015 Section 4980H Transition Relief for ALEs with Fewer Than 100 Full-Time Employees, Including Full-Time Equivalent Employees (50-99 Transition Relief), or
- 2015 Transition Relief for Calculation of Assessable Payments Under Section 4980H(a) for ALEs with 100 or More Full-Time Employees, Including Full-Time Equivalent Employees (100 or More Transition Relief).
- 98% Offer Method - Check this box if the employer is eligible for and is using the 98% Offer Method. To be eligible to use the 98% Offer Method, an employer must certify that taking into account all months during which the individuals were employees of the employer and were not in a Limited Non-Assessment Period, the employer offered, affordable health coverage providing minimum value to at least 98% of its employees for whom it is filing a Form 1095-C employee statement, and offered minimum essential coverage to those employees’ dependents.
- Click the Company tab.
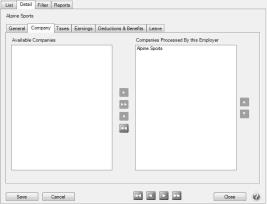
- Select the companies processed by this employer by using the green arrow buttons to move the selected companies to the right. It is possible to have one employer process payroll for multiple companies but this is usually a one-to-one relationship. Once this is setup, it usually does not need to be changed.
Note: If the company has been used in a pay run or a time sheet, a warning will display if a company is moved from the Companies Processed by this Employer column back to the Available Companies. The message will display as: "This company has been used on a Pay Run or Time Sheet. Removing it from this Employer may result in unwanted behavior and reporting issues."
- Click the Taxes tab
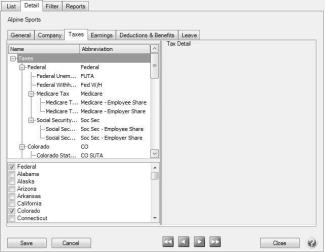
- The taxes that are used for this employer are checked in the box on the lower left side of the screen. Taxes that are checked display in the upper box. Selecting a tax in the upper box, displays the Tax Detail to the right. It is important to select Federal and then on the right side of the screen enter your Federal Tax Id. This information will be used on your W-2 forms and other tax reports.
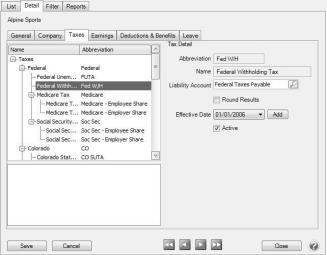
You can add additional taxes or change the tax details as needed. For example, to change the State Unemployment Rate, select the State Unemployment Tax on the left side of the screen to display the Tax Details on the right. Enter the new Rate and click Save or if you are not subject to Federal Unemployment Tax (FUTA) because you don't have 20,000 or more in total payroll in a quarter, but need to report the information on your payroll reports, select the Federal Unemployment Tax on the left side of the screen to display the Tax Details on the right, and select the Tracked But Not Calculated box. Effective dates prior to the system default of 01/01/2006 are not permitted. You cannot unselect a tax once it has been used on a pay run. If there is a tax that was used previously but is no longer needed for future pay runs, uncheck the Active box.
Note: Expense and Liability accounts are required and verified when saving or navigating away from the Taxes tab.Note: The default Liability Account you select must be an account in the Payroll Liability account category. The default Expense Account you select must be in the Payroll Taxes Expense account category.
- For more information about adding taxes, follow the Local Taxes and and Workers' Compensation Classes topics.
- Click the Earnings tab.
- The Earnings tab works similar to the Taxes tab. The earnings that are used to process payroll for this employer are checked in the box on the lower left. Once checked, the earning will be listed in the upper box. Selecting an earning in the upper box will display the Earning Information to the right. In the upper left box, select Earning. You can add earnings or change the details of earnings as needed.
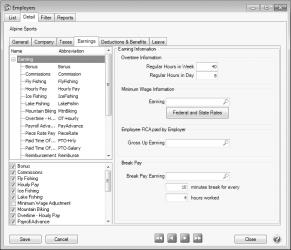
- Enter the number of Regular Hours in a Week and Regular Hours in a Day.
- Under Minimum Wage Information, assign an earning that will be used to make minimum wage adjustments.
- Under Employee FICA paid by Employer, assign a fixed rate earning to use for performing Gross Up adjustments (used in when an employer pays FICA for an employee, normally referred to as Gross Up).
- Under Break Pay, in the Break Pay Earning box, assign any fixed rate earning to use to compensate employees for rest periods separate and apart from piece rate pay, for example, this option is used for the Washington State Piece Rate Workers' law. And then, enter the number of minutes break for every number of hours worked. This earning will display on the employee check stub to report the total calculated amount and total number of hours for the breaks.
- If an earning is associated with a default Profit Center/Department, Production Center/Location, Production Year/Tracking Number 1, Production Series/Tracking Number 2, orProject, enter the default information with the earning. The default will display as the default in Setup > Employees if the earning is selected for an employee. Once an earning has been used in a pay run it cannot be unselected. Instead make it inactive by unchecking the Active box.
Note: Expense and Liability accounts are required and verified when saving or navigating away from the Earnings tab.
- For more information about adding earnings, follow the Earnings procedure.
Step E - Deductions & Benefits tab
- Click the Deductions & Benefits tab.
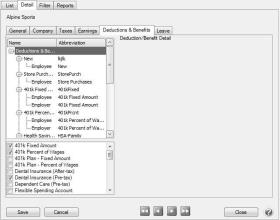
- The Deduction & Benefits tab works similar to the Taxes and Earnings tabs. The deductions/benefits used to process payroll for this employer are checked in the lower left box. The selected deductions/benefits are added to the list in the upper box. Selecting a deduction/benefit in the upper box with display the details to the right. The most noticeable difference on this tab is that there are up to two additional levels of detail under each deduction/benefit. This detail is used for setting up the employer/employee portion, as well as detail on the main level.
Note: Expense and Liability accounts are required and verified when saving or navigating away from the Deductions & Benefits tab.Note: The default Liability Account you select must be an account in the Payroll Liability account category and the default Expense account you select must be an account in the Other Employee Expense or Benefit Expense account category. The same expense account should not be used for a deduction or benefit expense as is used for an earning.
- You can add additional deductions/benefits or change the details of the existing deductions at any time.
- For more information, follow the Change an Existing Deduction/Benefit section in the Deductions and Benefits procedure.
- Click the Leave tab.

- The Leave tab works like the other tabs. Check the leave used for this employer in the lower box. Highlight the leave in the upper box to display the details to the right.
- Click Save to save the employer and return to the List tab, or click Close to save the employer and close the Employers screen. To return to the List tab without saving the employer, click Cancel.
Delete an Employer
The Delete button completely removes an employer from the system.
- Select Setup > Payroll Details >Employers.
- Select the employer you want to delete and then click Delete.
- At the "Are you sure you want the item deleted?" message, click Yes.